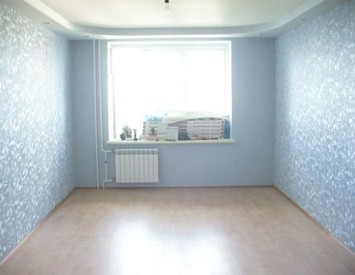
There are many ways to finish the walls of the walls, but most of them require a smooth and direct basis, but in reality everything is not so smooth. The walls of modern houses and even more so buildings of the old building only seem smooth, but are not suitable for cladding with tiles, laminate or panels, since they have an invisible drop in horizontal or vertical. In this article we will tell how to correctly align the walls under the finishing finish by any materials.
Preparatory work
Any repair begins with the preparation, and the alignment of the walls is no exception. In this case, first of all it is necessary to determine the degree of surface irregularities to know, the better leveling the walls and how many materials need.

How to determine the degree of curvature of the wall:
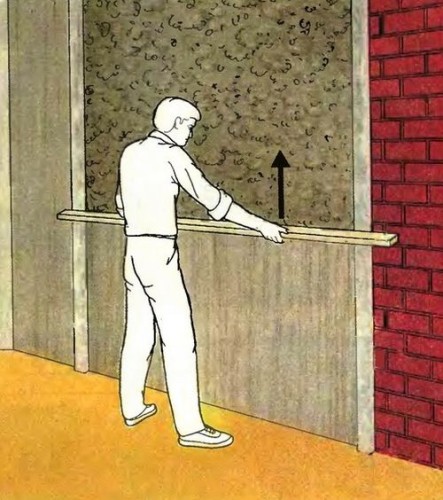
- Arm yourself with a long construction rule in 2-2.5 m long. In the corner of the room closer to the ceiling to take a nail, leaving the hat to hang on 2-3 mm (so that the lace can be tied to the nail). This nail is your starting lighthouse.
- Tie a nut or any other shipwheel to the lace or a strong thread and hang over a nail so that the load does not touch the floor. Wait for him to stop swing, and the thread formed a straight line.
- Watch the second nail lighthouse at the bottom of the wall and tear it smoothly so that the hat and thread are on the same level.
- Repeat this procedure with a different angle on the opposite wall. As a result, you will receive 4 lighthouse around the perimeter and 2 smooth lines, respectively.
- Take a long thread or cord and pull it between the upper nail of one piece of the wall and the bottom - the other (diagonally). Repeat with the second pair of lighthouses. When you enshrine the threads crosswise, make sure that they do not touch the wall surface.
- Now with the help of these threads stretched in four points, you can determine what state is any wall in the room.
Choosing a method of alignment
To determine how to level the walls in the apartment, it is necessary, first of all, find out the degree of curvature, secondly, to decide on the finish finish. If you want to apply a decorative putty, paint or beat the wallpaper, use GLC. If you want to know how to align the walls under the tile, mosaic, laminate, or other similar materials, it is better to use dry mixtures. Experts strongly do not recommend putting tiles on plasterboard, since he has an overwhelming surface with insufficient adhesion. However, despite this, there are some installation technologies that allow you to get a strong and durable tile coating based on GKC. This topic is disclosed in more detail in the article " Laying tiles on plasterboard».
Leveling dry mixtures
Align the walls of plaster, as practice shows, is the most universal option, relevant for any finishing material, be it wallpaper or tile. Despite the high labor intensity of work with the mixtures, you get a better and durable result.

How to align the walls with putty:
- Prepare the walls by clearing them from the previous coating and completely disabling the power supply in the apartment.
- Cover the wall of deep penetration with primer. If you are working in a room with high levels of humidity, apply moisture-resistant primer into two layers, waiting for the complete drying of each. So you make a wall stronger and more resistant to the effects of wet vapors. The walls in the bathroom or bath are recommended to be additionally impregnated with an antiseptic in order to avoid the appearance of fungus or mold.
- As you already know how to determine the degree of curvature of the wall, to put lighthouses-rail will not be difficult. Take metal perforated profiles - they will perform the function of the landmarks. We define the vertical location of the lighthouse and fix it with a gypsum solution (apply to the profile in several places and press the wall slightly, drowned so that its outer face stood in terms of the level with a plump thread).
- First, set the side lighthouses at different ends of the wall, and then intermediate. The distance between the profiles should be slightly less than the length of the tool that you will apply plaster. A pair of tools words: you will need a blade for applying and smoothing the solution, a drill mixer, a container for kneading and plastering falcon. Many work without plastering falcon, and meanwhile it greatly simplifies the process. This is a square shield with an approximately 40x40 cm handle, which is applied to plaster to be tilted every time to bucket.
- When everything is ready, you can apply plaster. Take a blade into one hand to another - falcon and type a little solution on it. Pour a small amount of mixture onto the wall and proceed to spinning. To transfer a mixture from a falcon on the wall, attach it to the surface and direct from below.
- At first, it will be difficult to achieve a completely smooth surface, but a snorkee will come with practice. Lighthouses help to understand how to align the walls in the house, but for landmarks you can take any racks of the required length of up to 3 cm and thick in the thickness of the plaster layer. First, hear solemn the solution between the lighthouses, then set the rule on them and take them from the bottom-up. Take the solution until the plaster will be left with the tops of the beacon.
- When the surface is smooth, carefully remove the beacons from the wall, and the remaining grooves fill with a solution and align the spatula.
- Another difficulty is how to align the angle of the wall. At the junction with a ceiling or two adjacent walls, you need to create absolutely smooth corners. This can be done in terms of or on a wall (by plane) - it all depends on the nature of the finishing finish. If you glue the wallpaper, level up by level if you plan to cover the walls with plaster or paint - on the shoots.
- For internal angles, many use the reinforcing tape. Apply to the inner sides of the angle, putty the spatula moistened in the water. Moisten the reinforcing tape with water and bend in half along, impose angle and slightly toupe in the putty. Gently align it, straightening from above. Finally, swipe the wet spatula on both sides of the corner, holding its edge as close as possible to the place of bend. Your task is to drive out of the tape excess solution. Finish layer apply an angular spatula. If there is a slight ripgy, correct it with a thin layer of finishing putty.


Useful advice: When choosing a dry mix, pay attention to the thickness of the layer, as well as the nature of the binding component. For example, gypsum solutions are recommended to take for rooms with a low or normal degree of humidity, because in the kitchen or in the bathroom such walls quickly miserably and crack. For wet rooms, choose a mineral mixture mixtures. Cement plaster can be prepared with their own hands, mixing 1 part of the cement of the brand not lower than 400 with 6 parts of the sifted fine sand and dilute all the water to the sour cream-like state. You can vary the amount of sand to get different plasticity of the solution - the smaller the sand, the more plastic solution, and it is easier to work with it (but the cement will then need more, which means that the costs for repairs will increase). Attention! It is necessary to use the finished solution for 1-2 hours, otherwise it will freeze or loses its properties, so do not mix large volumes at once.
Leveling plasterboard
Align the walls with plasterboard is much easier than dry building mixtures. This work is much cleaner, faster and more suitable for newcomers. A wide range of GLC allows you to work in almost any rooms, even with a high level of humidity. In addition, plasterboard allows you to level the walls with strong drops in height and horizontal, to which it would be necessary to apply the too thick layer of plaster. And at least such a way is relevant to finishing with wallpaper or paint, in some cases this is the only way to get smooth and smooth walls.

There are two ways to install GLCs for wall alignment: on the frame and glue. The first method is suitable for surfaces with serious drops and helps to align wooden walls, the second can hide minor surface defects and get the perfectly smooth base for the finish. It is also permissible to combine these two options to achieve neat wall docking and ceiling. The framework method is most common, so we will look at it first and in all details.
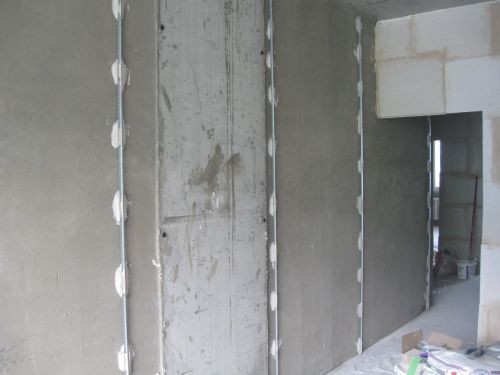
For the manufacture of the frame apply a special metal profile under GCC. Fixation is carried out by means of screws and screws. Before telling the instructions, how to level the walls under wallpaper or tile should be mentioned about one nuance of the framework method - due to the high thickness of the resulting skin, several centimeters of the useful area of \u200b\u200bthe walls are taken from each side (about 4-5 cm). And if it can be unnoticed in a spacious room, then for small rooms it is better to use another way.

Instructions and videos, how to solve the walls correctly:
- Remove the old coating from the walls and clean the surface.
- In this case, the priming is not necessary to increase adhesion, but to strengthen and protect walls from moisture and fungus. If you are trimming the outer wall or wall in a wet room, treat it with an antiseptic.
- Build a galvanized profile frame by mounting the first UD profile on the floor, the ceiling and adjacent walls so that the frame is. Then inside this frame, jumpers from a thinnest CD profile can be fixed, which will hold drywall sheets. In more detail, all the subtleties of the fastening process are described in the article " How to fix plasterboard to profile».
- When the frame is ready, you can start the installation of HCL, but before that you need to measure them, spread and numb them so that they fit clearly in the specified area. GLK is convenient because it is easy to handle at home by prudent tools. In the article " How to cut plasterboard sheets»Everything is described in detail.
- To close the seams between plasterboard sheets, use a special self-keeper grid. Start it on the seams, and then cover the starting putty to withdraw one level with the surface. The subsequent processing of the wall depends on the selected cladding. If you put a tile or other dense not translucent material, you can simply shut out the joints with putty and that's it. But before painting or sticking wallpapers, the wall should be fully covered with a white finishing spacion layer of 1-2 mm, stall and primed. In the article " Powing wallpaper on plasterboard"A lot of useful on this topic has been said.
But most often the owners of apartments do not want to sacrifice free space and build a frame. If the wall has local differences and defects in the form of bugs or recesses, they can be aligned with plaster or to rush to get a relatively smooth surface, and then wake it up. All technology is described in detail in the articles " Alignment of walls with plasterboard without frame" and " Installation of plasterboard on glue. How to glue plasterboard" You can also use the article " How to install rosettes in plasterboard».
Now you know than you can align the walls under the tile, wallpaper or any other finish. We hope this article will help you quickly and efficiently make repairs with your own hands. Finally, we suggest familiarizing yourself with another useful video, how to align the walls with plasterboard:


