Plasterboard can be called universal building material, which is suitable for all - wall decoration, creating decorative partitions, construction of furniture, protective structures and much more. But, main, for what vent Plasterboard - the ability to quickly and inexpensively create a perfectly smooth surface suitable for lining by any materials. Especially good on plasterboard walls lost Tile, but working with these two materials has its own specifics. In this article we will tell how to put tiles on plasterboard.
Content
Product specifications
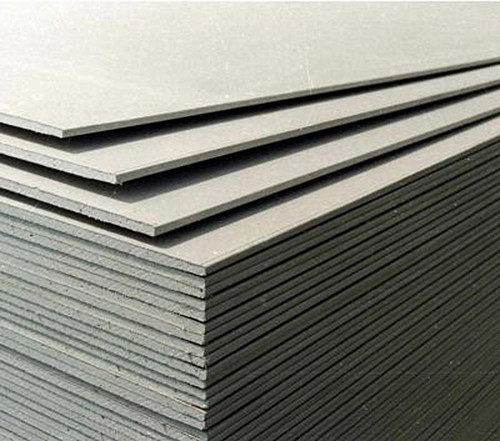
Plasterboard has long been one of the most popular building materials used to finish the premises. It can be reduced to the floor, attaching to the walls, and what are smooth and smooth of it the ceilings are obtained! The material itself is a plaster powder pressed in the stove, which is placed on both sides by a construction cardboard. V nem. There are no additives, chemicals and other extraneous impurities - only natural natural components. That is why plasterboard can be used everywhere - in residential buildings, children's institutions, production and in public buildings.

Ecology is not the only advantage of drywall. But we will not list them all, but boose Only what is needed directly to lay the tile - a flat surface. As you know, put the tile can only be on the perfectly level base. Traditionally, it was used for this lime, gypsum and cement plaster, but in some cases, the drops and surface defects are so significant that it is easier and cheaper to cover her Plasterboard plates than to coat with a thick layer of plaster mix.
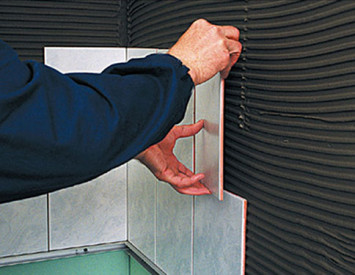
For reliable fixation of plasterboard plates pre-install elementary print From wooden rails or metal profile. Remains Only screw the screws and smear the slit pluckle. It is almost immediately after installing it in almost immediately after its installation.
Children's selection for tile
Plasterboard plates produced by semi-dry pressing. The most common plate consists of plaster and funny Cellulose waste paper on both sides. The thickness of the material can be different, as well as the characteristics of the outer cardboard shell. Conventional products are afraid of water, so laying tiles on plasterboard in the bathroom is not possible. For this, there is a special variety of material, resistant to humidity and temperature differences.
There are two main varieties of drywall:
- GVL - Unlike conventional drywall, where pulp layers are located outside, the paper fibers are evenly distributed on the gypsum "filling" and are compressed in a single slab. Thus, this material acquires greater strength and high fire and technical characteristics. After pressing the sheets are treated with a special mixture of challenge, that is, the material does not appear and not dumps, but When it is cut, a lot of dust is formed. GWL is used for cladding walls, dry floor screed, to create good sound insulation.
- GVL – hypusoloconne Sheets treated hydropobizer. It is them that you need to use for laying tiles on plasterboard in a bath or kitchen. But despite note Low water absorption, material necessarily need good support in the form of a system ventilation B. Room (exhaust ventilation B. Bathroom) and cladding moisture-resistant material.

Since the tile is usually placed in rooms with high levels of humidity, we will be interested, first of all, hypusolocon Moisture-resistant material. If you want to put a tile on plasterboard on floor, for example, in the hallway, then for such a relatively dry room, you can use strong GVL.
Glue for tile
The selection of glue is as important as the choice of drywall, especially if it are gone About repair in the bathroom or in the kitchen. Before buying, read the instructions for use and the list of surfaces on which glue can be used. It is best to take special compositions for plasterboard work.

Today, finding the right glue is not so difficult - a wide range is replete with suitable options, and some manufacturers even have special glue for tiles on plasterboard.
What formulations are suitable for work:
- Mixes on a cement basis for applying a paper surface.
- Elastic tiled adhesive for applying to a tile ( for sale v form powder which It is necessary to breed with water to pasty consistency).
- "Liquid Nails" — Universal binder based on water dispersion. Firmly gluits anything to what please how And it has earned great popularity. There are special weather resistant and moisture-resistant options.
Useful advice: If you bought glue that you need to knead yourself, do not prepare right away volume - You may not have time to spend it to frozen. The optimal option is to mix so much glue to have enough of 1 m² of area or a little less.
Masonry technology
Tile by itself pretty heavyeven if we are talking gone About fine decorative coating. For this reason no no Each sheet of plasterboard can withstand her the weight. Thin plates with time can progress and deform, and that this does not happen, it is necessary to strengthen them. To do this, use special guide rails. They are mounted on equifferent Distance throughout the area of \u200b\u200bthe wall. The optimal step of installing the guides is 40 cm, but if the sheets are too thin, it can be reduced to 25 —30 cm.

Guides can be made of wood or metal profiles. They are installed vertically, and then attach plasterboard using self-samples or long brackets. To enhance the strength of the wall and in avoiding the deformation of the seams after laying tiles plasterboard can be installed in two layers. This is exactly what the builders come in Western countries, while okeekhet It is only under the lower layer - between the wall and plates.

An alternative guide can serve as a reinforcing plaster grid. It not only increases the strength of the base for laying the tile, but also does not allow the cardboard sheath of the plasterboard to swell from the moisture of the glue. The best I. reliable The solution will install the plates on print And strengthen them with a plaster grid - so you will be sure that the tile will not fall off from the wall under any circumstances. For gluing mesh use the usual construction Plow And brackets.
Tile mounting scheme
Before laying a tile on plasterboard with your own hands, it is recommended to develop and draw a chart of laying a tile, that is, to create a detailed picture on a suitable scale indicating the exact location of each element. This will allow not only to avoid mistakes when laying and see an approximate end result, but also purchase an exact number of building materials. Buy a tile is still better with a small reserve in case of repair, or if you have it will not work Rivne Split any element.

By the way About sawing. Rarely when succeed clearly "Enter" tiles into space without good or gaps. Often will miss a little piece or ¾ tiles. Especially for such a case better stock platecores. Since you are unlikely to regularly put the tile on plasterboard, it is wiser to purchase an elementary manual platecores Or take a rental mechanism. Even very cheap platecores allow smoothly split wall tiles, but for thick floor products you need a device perceident. In addition, it will be nelfish Get a set st.rL DLi am a perforator, with which you can make round holes in a tile, for example, for wires, fasteners or outlets.
To quickly count how many tiles are needed on the wall, measure her (Wall) Height and Length, find the area and compare the resulting result with the dimensions of the chosen tile. At calculations Take into account the distance intercinery Swiss - it can be from 1 to 3 mm.

If it turns out that the last element in the row is included on 3/4, means It is necessary to start laying the tile on plasterboard from the front part, placing the cropped tile in the corner so that it is not so rushed into the eyes. If the total row is not enough less than half of the tile width, the installation should be started from the center of the wall so that evenly cropped items are in the corners. So you rather Symmetry and accuracy of the appearance of the wall.
Gluing tiles on plasterboard
So after all calculations And the purchase of the necessary materials can be finally started to facing the wall.

Ka to K.lialine tile on plasterboard:
- No one sticks the tile on dry plasterboard - first it must be prepared. To do this, all the docking seams between the sheets to smear moisture resistant pluckleSo that the wall turns out perfectly smooth. Wait for complete drying spikel. The composition should be designed specifically for working with plasterboard, so check this time from the seller.
- Cover the wall by primer, designed to increase adhesion with tiled glue. You will need to apply two layers - score the second time only after drying the first layer (for it wait 1.5-2 h). To work, you will need a paint roller and a short pile or a wide painting brush.
- When the primer dried, prepare glue (if you need to cook). Yet once we remind you that you should not knead a lot of glue at once, and after you spend the portion, rinse thoroughly capacity. If you cook a new glue in tara. With the remnants of the previous one, its grabbling ability drops sharply.
- Since the tile on the wall never put on the floor with the floor, you must attach the reference rail to distanceequal height Tiles. That is, the Planck should keep the second row from the floor. Before conspiring her Self-drawn, make marking with a simple pencil, checking the horizontal building level.
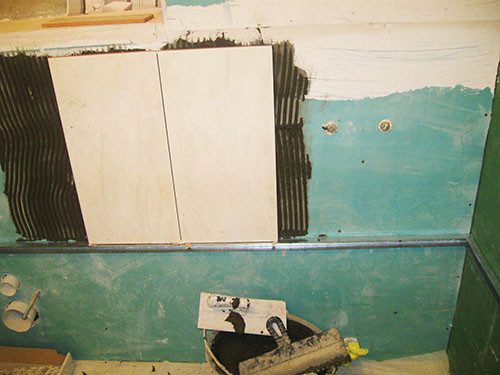
- Stay the tile laying, according to the selected scheme - or OT center or OT The edges of the wall. Pun the first tile on the rail and continue to lay the following items vertically or horizontally. Make sure that the space between the tiles is filled with adhesive solution, and do not forget to insert spacer plastic crosses.
Wash the back of the tile or the wall completely, without gaps and do not regret the solution. If empties are formed, the adhesion strength will be low, and with the tile time in these places it can fall off.
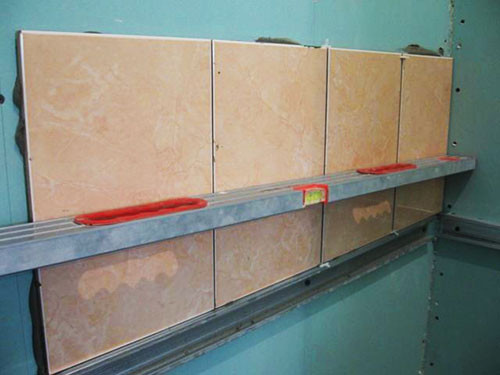
Cross insert in junctions Between four tiles. They are of different thickness - depending on how the gap you want to leave. It is not worth saving on cross, because the accuracy of the masonry depends on them. - When you laid 4 —5 horizontal rows, take a break on hour and a half. During this time, the voltage at the base will become less, the glue will grab a bit, and the masonry will not collapse under its own weight.
Constantly check the smooth masonry by the construction level.
- After that, you can continue to work and close the remaining part of the wall. In the process between the tiles, glue will appear, and it is better to immediately wipe off with a wet rag, because after frozen it will make it much more difficult. When the whole tile is on the wall, leave her For a day until complete hardening glue.
- After 24 hours, you can proceed to the final stage - the grout of the seams.

The rapid composition is better to select , based Tile colors. In most cases, use white or light gray grout, as this is the most neutral option. But if you want to refine, you can choose a contrast color, for example, black tile with white seams, red tile - with black, green - with yellow grout. It is enough to buy a special pigment, and you can paint the seams in any color.
Put the seams between the tile follows the rubber elastic spatula. - After drying the grout (after a day), the thin brush wrap the seams with protective waterproof varnish.


All features of laying tiles on plasterboard in video format:
Recommendations of specialists
Finally, we suggest you familiarize yourself with useful tips from professional builders. These recommendations will help you to figure out the first time. to K.leigh the tile on plasterboard.

Useful tips:
- The primer for drywall is better to choose deep penetration so that it completely impresses the stove and defended her From the effects of moisture and temperature differences.
- Always apply two layers of primer, waiting between them at least an hour.
- You can apply primer with a roller or flat brush, but for subsequent laying tiles best work gear terek.. Smooth edge terks Lay the ground on the wall, and distribute gear her according totop to stay smooth grooves.
- So that the glue grabbing the most firmly, its consistency should remind a thick sour cream, but not to be loose.
- Cress the tile to the wall with your hands, and if you work with large tiles, then use a rubber xy or a wooden hammer.
Now you know how to glue a tile on plasterboard, and we hope that this article will help you make high-quality and beautiful repairs without attracting specialists.


