Plasterboard, as a building material, is gaining increasingly popular, so many builders face a question how to make a rosette in drywall. Special tools will not need for this, they all have every wizard. The main thing is to accurately perform the sequence of work.
Content
Holes for sockets
At the beginning of work, you need to decide on the tools that will be needed in the process, their little:
- Socket.
- Box.
- Screwdriver.
- Drill.
- Knife stationery.
From the reverse side of the plasterboard, you must have wiring. From the outside of the wire, there should be no need to be visible, so you need to remember, at what distance from the floor and relative to the parties are the ends of the wires, and in this place to mark the hole with a pencil. At the same time, consider that the plasterboard is mounted on metal racks and so that it is not necessary to get on them, it is necessary to carry out a strong magnet along the wall.
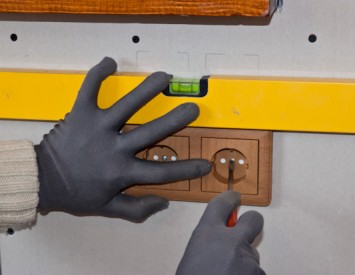
The layout of the holes must be carried out, given that the wires will still be bend and under the outlet. Now you need to put the level to the plasterboard wall horizontally and where there will be a future rosette to carry out a smooth pencil line. Now you need to put the level vertically and make a cross. Intersection of lines and is a central point.

Holes are made under the sockets in the drywall with a drill, you need to use a special crown on wood. You can, in principle, use the usual drill, but then you will have to drill a lot of holes in a round, and then with your hand neatly squeeze this circle. But the specialists still do not advise to use this handicraft method, otherwise the edges are not even, and then the fragile material can be broken at drilling. The diameter of the conversion - 68 mm, which means the same size hole should be made in the drywall.

If you still stumble upon a metal profile, then carefully cut off the part of the metal interfering to you, so that in this place is approaching anything bothered to get up smoothly.
There are some standards for placing a socket:
- The center of the socket must be 30 cm from the floor.
- In the bathroom, the socket must be in a meter over the washing machine.
- In the kitchen, the socket must be 1.20 m from the table.
These sizes may vary depending on the wishes of the host of the house.
Installation of pickle
All submersers, despite the fact that they produce them, have the same principle of fastening in drywall - legs. At the pickle on plasterboard there are not two screws, like on concrete, and four. One pair is located outside and fixes the frame of the socket.
How to mount Podrottor in plasterboard:
- Cut in the pickle with a hole under the wire. It will be correct to make it so that the wire will be behind in the opposite, it will be easier to mount the outlet.
- Insert the wire into the hole. Naturally, electricity in the room should be disabled.

- Set the mounting screws into the horizontal plane and insert the conversion into the hole.
- To spin the screws so that the peavern is slightly pulled into the hole, then weaken slightly and check the reliability of fasteners.

Installing a socket on the conversion
Installation of sockets in plasterboard is carried out in this way:
- Remove the screw and remove the cover from the cover of the rosette.
- The base of the socket is imposed on the conversion, so that the nests take place on one horizontal line, and the base should be in the middle in the opposite.
- Stop the selection or pencil place where the screw will be mounted.
- Make a drill of recesses for a screw. Note that the drill has a smaller diameter than the screw.
- Muffle a short screw to schedule.
- Split screws on a socket without a lid.
- Wires to connect with terminals and top to put the lid.

When wiring a closed type, the sockets are installed in plasterboard in recesses. On the boxes for rosettes for plasterboard there are holes where the conductors are injected. You can fix the box and the mortar. So that the socket does not jump when the plug is removed, you need to remove the paws to be removed in fire. It happens that there is no stepper. Then it is necessary to make the design to secure sockets. For this you need:
- Cut from rubber sheet strip 20 cm. The rubber thickness must be about 4 mm. You can cut two stripes, but then their width - 3 cm each.
- Stick stripes on the side of the box for the beaten. Thus, the socket will keep inside the box, because the barrier will appear for the spacer paws. They will disappear into the rubber and will not go beyond the outlet.
- As a barrier for the paws can perform a tree or cement bar, before that it is necessary to degrease the box.

If the plastic box, then it usually does not happen to it. The spacer foots are independently done for themselves, and held inside the wall. If for some reason you do not have ordinary boxes, then instead you can use tin cans. Best of all, banks from under condensed milk or stew will be performed. They coincide with the diameter of the boxes from the store. With the help of buns from the bank, you need to remove sharp edges so that in the future it is not hurting about it. You can make two boxes from one whole printed bank of condenries, for this you need to cut it in half, and the contents of pouring out. In the bank it is necessary to make holes where foot will be resting and also make a hole for wires. All holes will be done with the help of a chisel.

Rules for using a rosette under drywall
Fundamental rules:
- As a rule, it is written on the outlet, what power and voltage it can withstand. But in any case, the load on it cannot exceed 1500 W. And that, it is only if the fuse is located in the house. Instead, it does not need to use "bugs", otherwise the apartment will not be protected from network drops. And the socket will quickly come out of the working condition.
- Plug sockets need to be installed for at least half meter from the floor, and inappropdable - 30 cm. The latter - should always be equipped with rotary plates, which, when removing a plug of the socket, close the sockets.
- According to the safety technique, it is not necessary to mount the outlet not far from the grounded sections of the apartment. The distance is no less than half a meter.
- In the bathrooms to install the sockets are not recommended, as an exception, you can make a power outlet with a hidden wiring and driven from a reduced transformer.
- According to construction standards, one socket may have 10 square meters. Meters, and in the kitchen, regardless of the area there can be only two outlets.
- The plug must be removed by two hands. One thing is to hold the outlet, and the second is to remove the plug. If you do not support the outlet, then it can break, and one day you will take out the plug along with the rosette from the pickle, and then insert it although it is possible, but it will not be long. Therefore, it is better to handle carefully with a socket, then it will serve it without failure for many years.


