In the process of performing the finishing of the room, plasterboard is a rather popular material that without much costs will allow to align the surface and construct any forms of the ceiling or wall. Installation of drywall implies the installation of the profile and securing it on it. How to mount a profile for plasterboard Consider further.
Content
Plasterboard installation options
There are three methods for attaching drywall to the wall. The first and most common - fastening of plasterboard to the profile. The second is glittering the plasterboard sheet directly on the wall. And the third is the installation of plasterboard on a wooden design.

The embodiment of the plasterboard sheet is the easiest, but requires the presence of an ideally aligned wall. The adhesive solution is applied to the surface of the plasterboard and on the wall. The sheet is applied to the wall and is aligned with the help level. This adhesive has a quick drying property, so work is carried out very quickly.
Installation of drywall on a wooden structure is a bit more complicated and requires the installation of horizontal and vertical guides from the tree. They are fixed on the wall by self-draws. There is an option to install only vertical bars, but, in most cases, every 60 cm mount horizontal jumpers.
Features and varieties of profile for drywall
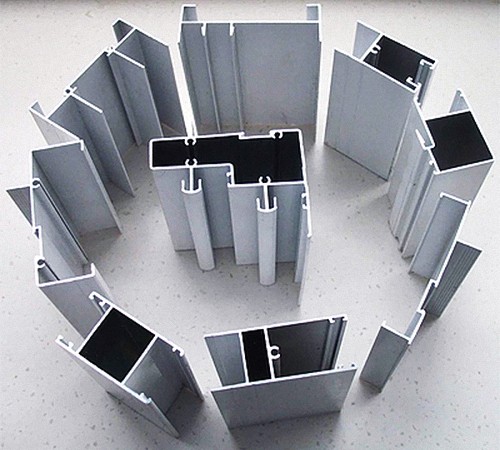
A galvanized profile is used to secure plasterboard. The main function is fixing drywall on the surface of the wall or ceiling. The profile allows you to build structures of any shapes and sizes.
When performing data, it will take the use of profiles of various types and destination, as well as a large number of connecting elements.
Advantages of using the profile when installing drywall:
- the possibility of creating figure structures;
- under plasterboard, all communications are laid, such as wiring, ventilation system, plumbing, etc.;
- there is a possibility of forming a heat and sound insulation layer between plasterboard and wall.
We suggest to consider the main types of profiles used in the process of mounting plasterboard structures. In accordance with the appointment of profiles divide on:
- specialized, which are cited by certain planes;
- profiles for the construction of partitions.

The first option is used in the process of plating a wall or ceiling. To create the designs of this type, three species profiles are used:
- UD profile;
- CD profile;
- arched profiles.
All profiles have a standard size, the main difference between them consists in the size of the metal and its length.
To decide which profile for drywall, we suggest to consider the main types of profiles.
- The profile for fixing the drywall UD is used in the process of facility of flat surfaces. For example, if you need to form a frame of plasterboard, then this kind of profile will be installed on its perimeter. Dimensions of this profile: Width - 2.5 cm, length - 300 cm. UD profile is distinguished by a high level of reliability due to metal thickness, which is used in its manufacture. It is from the thickness of the metal that the durability of the constructed design depends. This profile has different thicknesses: more subtle is used in the construction of walls, and thicker - when the ceiling structures are trimmed.
- The CD profile is also called carrier, since its use is associated with the formation of metal frames and the impact of the main load on the plasterboard design. Plasterboard is fixed precisely on this profile, and it depends on it, how tough and durable this design will be. CD profiles are of different thickness. The profiles with a minimum thickness are less reliable, so in the installation process requires a large number of fasteners. The width of this profile is 6 cm, the thickness is 2.5 cm, and the length is 3 or 4 m.
- Arched type profile is also a guide or carrier profile, which is characterized by a large number of cuts weakening its design. If necessary, such a profile is easily bent and accepts any form.

The second group of profiles is partitioned. They are used to cover flat surfaces. Such profiles are characterized by large sizes and other functional purposes. They are produced in various sizes. In accordance with the profile widths: 5 cm, 7.5 cm, 10 cm, 12.5 cm, 15 cm. The profile width depends on the technical characteristics of the partition on which it is installed: sound insulation, thermal insulation, communication works.
- UW guide profiles are used to build a flat surface and partition direction. Their installation is carried out throughout the partition area.
- CW rack profiles enhance the frame and give it great strength. The gain occurs after 40 cm, so that plasterboard sheets are attached on both sides.
Fasteners and locks for a frame from a profile under plasterboard
For fixing profiles, different fasteners are used, which also combine various types of profiles.
Consider the most popular fasteners used in the construction of plasterboard structures:
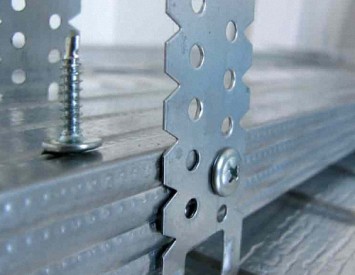
- P-shaped brackets - this fastener is a perforated steel plate, which can break into the letter "P". Its main function - the compound wall or ceiling with a steel profile frame. The middle part of the bracket is fixed to sheathe portion and end sections are attached to the supporting profile by means of screws.
- Fast speeds - are an alternative replacement of the P-shaped bracket. In the case when the length of the P-shaped bracket is too small, the speed is used. Its main components are: the needles, at the end of which there are ears and directly suspension, which is fixed in the CD profile. The combination of the spokes and suspension occurs with the help of a special spring mechanism. The advantage of this mechanism is the ability to adjust the horizontal position of the profile. The flaw of the spring consists in its gradual weakening, which leads to a saving ceiling design. The use of fast-tracks applies only to ceiling structures, because, as a rule, the length of the P-shaped bracket is enough to fix the profile on the wall surface.
- Crab CD connectors are used during the installation of jumpers that connect the main profiles of the carrier type. The connection takes place condo. The crab-type CD connector is mounted on the profile surface and snaps on it, and then attached by self-draws or special mustaches. Installing the jumper occurs in the same way: first it is necessary to snap into the crab connectors, which are located on the carrier profile located in the neighborhood, and then secure the screw. To install such a product, it is necessary to have eight screws.
- CD connectors perform the function of elongation of the carrier profile. One part is set at the end of one profile, and the second is put on the profile. Then their fixation occurs on both sides with the help of four screws.
- Two-level CD connectors are very rarely used in working with profiles. Applied when mounting a frame design, which is attached to the wooden overlap. A frame that is collected using connectors data is doubled. First form the first level from the CD profile, which is fixed on the wall surface and build a moving structure from it. Then there is a fastening of the second level, which is connected to the first with the CD connector. This design helps to improve the strength of the drywall construction in a wooden house, and repays a change in the size of the tree during its operation.


Methods for fastening profile for drywall
Materials required for work:
- plumbers - 2 pcs.;
- nails;
- chalk;
- level;
- hammer;
- rope.
Attach the plumb on the top of the wall, which is under the ceiling. Instead of a rope, it is better to use a fishing line, three parts of which are stretched on the plumb to get a perfectly smooth surface. The highest point between the plumbing and the wall is the guide to which the profile will be attached.
With the help of chalk and additionally stretched fishing line, make a breakdown according to the previously designed design. With the help of the rule and chalk, draw the perimeter.
Before you begin directly fastening the profile, it is necessary to carry out work on its preliminary strengthening. This will require:
- perforator with a drill nozzle;
- hammer;
- dowel-nails;
- pliers;
- scissors for metal.

- Start work from the bottom - so mounting the profile will be more convenient. Attach the profile on a pre-calculated surface, retreat from the bottom edge of 300 mm, and drill the hole for fixing it.
- Make two more holes in the middle and lower part. Check out the correctness of the profile and its compliance with the drawings, then clog nails.
- Measure the distance left to the height, and add two centimeters to it, install the check-in guides. With the help of scissors for metal, make a cut of the side parts, bend the profile out and cut the middle. Pliers will help in equalizing the edges.
- Now make the installation of guide profiles for drywall, secure it with a dowel-nail. Having done these operations throughout the perimeter, you will receive a profile framework.
- In accordance with the strength of the wall, secure the design of metal with self-assembly, making a step from 20 to 40 cm.
To install a vertical profile, you will need:
- screwdriver;
- self-tapping screws;
- forers;
- regulations;
- suspensions;
- perfodrel;
- dowels-nails;
- hammer;
- chalk;
- pencil;
- pliers.

Installation instructions for vertical profile:
- Measure the width of the plasterboard sheet from the wall and put the mark in this place. It will correspond to the transverse middle part of the profile.
- In this way, it is necessary to note all vertical parts that fall on the joints of the sheets.
- Divide the width of the plasterboard sheet into several parts, the maximum width of which should be half meter. Put the label on the floor.
- Now with a plumb installed on the ceiling, transfer this label to the surface of the ceiling.
- At the middle of the wall should measure the distance between the ceiling and the floor. Transfer the measurements to the surface profile and turn down one centimeter. Cut the side of the profile, straighten out and cut the middle part. Using pliers to align the cut edges and fold - it will facilitate the installation of the vertical profile.
- Place the workpiece on the surface of the wall, and then drag it from both sides. Divide the wall into three parts and make the layout.
- Attach the hangers using dowels, nails. They will help to consolidate the profile and put it on a level.
- Make the setting of the second suspension and fix the vertical profiles of screws for metal.
- On vertical guides need to attach the screws to the level where the hangers are located.
- The side of the suspension have to fold and put vertical profiles in accordance with the fishing line.
- Upon detection of errors at this stage it is still possible to correct them. Therefore, check the evenness of the design carefully.

Installing horizontal profile for gypsum board
The horizontal sections are crosspieces between the vertical parts of the structure of the profile. Their main function - strengthening the overall structure and increase its rigidity. These parts are not attached to the wall.
To carry out these works requires the following:
- screwdriver;
- self-tapping screws;
- pliers;
- scissors on metal;
- crab connectors;
- pencil or marker.
The intersection of the vertical profile horizontal use crab connectors.
Otherwise, you must perform the following steps:
- make measurements between two vertical profiles;
- cut and try on its workpiece;
- using marker tags set so that the profile placed in the hole between the verticals;
- using scissors, metal make cuts on the sides of the profile;
- pliers align them to the outside;
- set profile and secure it with screws;
- check the evenness of the structure.

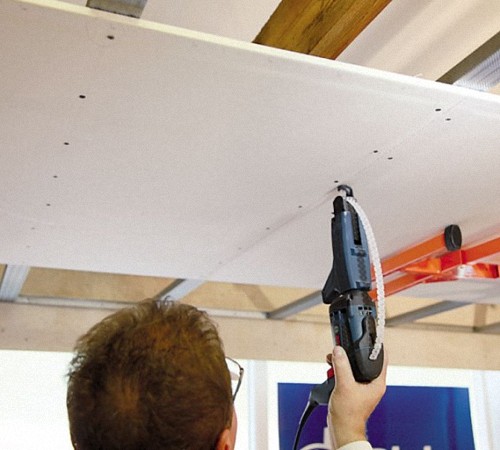
How to fix plasterboard to profile
For work, will need to have:
- screwdriver;
- screws;
- pencil;
- regulations;
- stationery knife;
- planer;
- roulette.
On a standard wall requires more than one gypsum board, therefore, consider this option.
The first thing you are installing whole sheets. To make this work, you need at least two people. One of them presses the sheet to the profile frame, while the second fix it with screws. The first sheet is set from below, and the second - on top. This design is more rigid. Then you need to fill the remaining space.

With the help of a roulette, produce two horizontal and vertical measurements. Transfer them to a plasterboard surface and make marking. Set the rule on the line by which the cut backs will be made. With the help of a stationery knife, skip the plasterboard to the middle. Set it in such a way that one part of it hangs, and fract it on the cut. Then, with a knife, ride the paper on the other side. Using the ruble ruble turning processing. Do the same with the second side. Install the cut items and secure them with self-draws. When all sheets are installed, additionally secure them with self-draws, making a step at 20-30 cm.


