
The basement is really done in almost every private house, if the type of foundation allows. It can be used completely differently - for storing harvest and conservation, like repair shop or living room. But that the additional space serve as efficiently as possible, it is necessary to carry out a high-quality finish, and start better with the most problematic part - gender. In this article we will tell you in detail how to make the floor in the basement and what materials are used for his finish.
Options for floors
The functionality of the basement may be different, depending on what purpose you built it. But the floor in any case must comply with certain requirements. Since he is closest to Earth, the risk that it can be wet and cold, much higher than for premises on the first floor. That is why it is important to do everything possible to isolate the floor and make it as stable as much as possible.

If you want to make a living room from the basement, then the floor is better made of wood. A concrete screed is perfect for the workshop, and clay floors can be arranged for the storage of conservation, products or things. Consider each of these options in more detail.
Concrete floor
Concrete floor in the basement of the house is the most popular solution, since it guarantees high strength, durability and reliability. This is the optimal option for the basement arrangement in areas with a shallow depth of groundwater. Other materials referred in such cases and deteriorate, and concrete provides additional waterproofing.

To make concrete floors in the basement of a private house, you will need the following tools and materials:
- cement brand is not lower than M400 (if you choose less durable cement, the floor will not endure the load and cracks);
- river sand without clay impurities;
- crushed stone to create drainage through which an excess moisture will be leaving;
- ceramzite for floor insulation;
- rolled waterproofing;
- capacity for kneading a solution (ideally it is better to rent a concrete mixer);
- shovel;
- rule;
- building level.
Below we briefly describe the process of creating a concrete screed on which the finish coating can be laid. It should also be selected based on the functional destination of the basement. For the workshop, it is better to choose ceramic tiles or inexpensive linoleum so that the floor can be easily and quickly wash. For residential premises, warmer and aesthetic coatings are preferred - carpet, laminate or parquet.

How to fill the floor in the basement of the house:
- Align and confuse the surface of the soil.
- Make a mound of rubbing with a thickness of 15 cm, sprinkle it with water and thoroughly confuse.
- Matter 10 cm on the rubble, also moisten it with water and sink. Check out the level of mortality - you need to get a smooth and dense layer for the fill of the future floor.
- Place a rolled rubberoid on a sandy drainage pillow. The waterproofing of the floor in the basement of the house is extremely important. If not to do it, the moisture will penetrate into concrete and destroy the coating. Instead of runner, you can use a thick polyethylene film in 2 layers. Place cuts with an overlap at 10-15 cm and make the walls on the walls by 20 cm.
- In the resulting waterproof "bowl" pour 15 cm layer of clay - it will protect the floor from the freezing. Also, concrete floors can be insulated with mineral wool plates, expanded polystyrene and other solid materials, but the ceramzite is cheaper and is most often applied.
- If you plan to accommodate heavy furniture or equipment in the basement, the floor should be strengthened with a reinforcement grid with rods with a thickness of 5 mm. For storage of vegetables and preservations, reinforcement is optional.
- Now you can proceed to the pouring of the floor in the basement of the house. You need to start from the corner opposite to the exit, gradually moving towards the stairs. Pour a bit of concrete and immediately align it with the rule.

- In the process of creating a screed inside the cement mixture, air emptiness is required. If you do not remove them, the floor will come out impossible, so after you flooded and slightly leveled the segment, treat it with a vibropilet or twist.
- Leave the screed to dry for 3 days, periodically splashing with water to prevent it too fast evaporation. Otherwise, the surface can crack. After three days, you can no longer moisturize the screed, but calmly wait for its complete drying. Usually it takes up to 3 weeks.

It is not recommended to leave a naked concrete floor, because how much it is neither taking, it will still dust. Alternatively, you can cover it with a polymer self-leveling mixture or simply paint enamel (the cheapest option). If you want to make a residential premises from the basement, you can arrange a warmed wooden floor on the lags along concrete. We will tell a little later about the technology of laying Lag.
Paul in the basement of a private house (video) from concrete:
Clay
The technology of making clay floors has appeared many thousand years ago, but recently the interest in it resumed. Environmentally friendly, cheap and very cozy floors from clay are increasingly appearing in private homes and even apartments, and for the arrangement of basement, they are just perfect.

What are the good clay floors:
- The cheapness is a decisive factor for the majority who started repair or construction. But with all its economy, the clay floor in quality is not inferior to expensive coatings, and even exceeds them. Savings lies not only in the low cost of consumables, but also that you will not need specialists or large construction equipment.
- Naturalness - the clay floor does not contain dangerous substances, on the contrary, it brings a continuous benefit. When walking, clay removes the load from the stop, and the natural components favorably affect the skin.
- Clay can be reused - if you ever want to change the floor in the basement of the wooden house, then from clay and straw can be built a small extension or make the floor in another room.
- Heat - clay perfectly holds heat inside and does not allow cold from under the ground to penetrate the room. In winter, she quickly heats up, and in the summer she keeps a pleasant coolness.
- If you put the floor from the Samana (clay with straw), there will never be spots, scratches or dents. Cleaning will take a couple of minutes!
- The clay floor does not need waterproofing, since the materials themselves in the composition of the mixture perfectly cope with this function. It is only necessary to organize a drainage pillow and you can proceed to laying the floor.
- With the arrangement of the clay floor, even unwise in the construction of a person will cope.
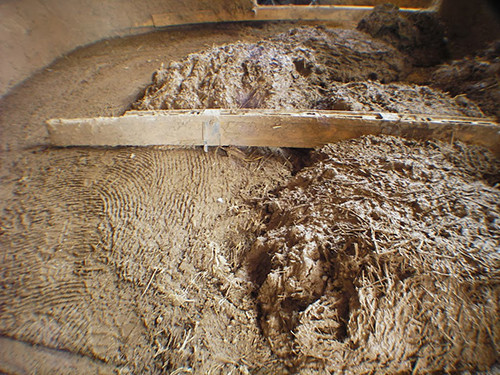
Of course, the technology of making a mixture for the floor has undergone some changes and improved, but the essence remains the same. For the manufacture of a saman coating, you will need clay, river sand, straw, linseed oil, rubbank, turbid and beeswax.

Progress:
- If you live in the area with a wet climate, it is necessary to pour 20 cm with a layer of rubbank to the prepared and ravenous land. For the northern regions, the clay floor will need to be additionally insulated. To do this, you can make a mound of 10-15 cm from vermiculite or perlite.

- At the finished base, lay a layer of draft floor with a thickness of 5-7 cm. Its task is to align the finishing gender and its insulation. Make a mixture of 30% clay, crushed straw and 70% sainted sand. Straw in this case ensures tensile strength. Prettyly connate the draft floor with vibrating plates or with the help of sweater.

- The thickness of the first floor will be 2-2.5 cm. The mixture is manufactured for it from the prescription described above, but the straw should be used shorter. Since the quality of clay, sand and straw everywhere is different, it is impossible to accurately guess with proportions and guarantee the same result. Therefore, experts recommend first to test the mixture on a small area. It should be quite dense, do not crumble and not crack when it dries.
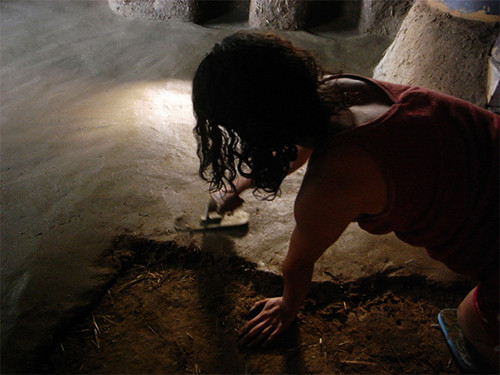
- Use a wide spatula for applying the mixture, and for alignment is a rule. The composition should not stick to the soldier, if this happens, then you added too much clay or it is too fat. Dilute the mixture with water and blend thoroughly until uniformity. If the solution, on the contrary, does not hold onto the spatulas, it is necessary to add more clay to add.
- Important: Apply the finishing layer only after drying the rough floor. Usually it takes from 3 to 6 days depending on the climate.
- So that the finishing coating is obtained beautiful and smooth, clay and the sand for the solution must be sifted and thoroughly stir the mixture, breaking lumps.
- The composition on the draft floor is applied three times with thin layers so that in the amount they gave about 2.5 cm. Each subsequent layer is applied after complete drying of the previous one.
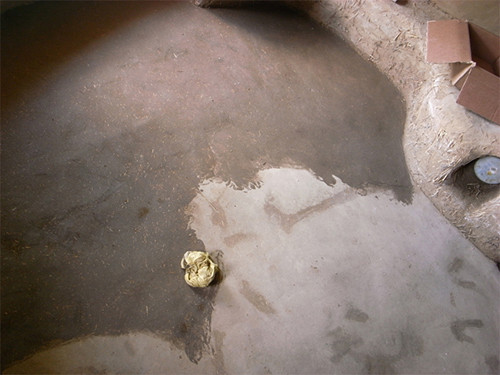
- When the third layer is completely dry, you can proceed to impregnation. To do this, use heated linseed oil, which reliably protects the floor from abrasion and gives a rigid and shiny surface. But the impregnation consists of several ingredients. So that linen oil penetrates the clay stratum, it is necessary to add turbid into it. The same result is allowed to achieve mineral solvents, but to use them against the background of natural and environmentally friendly materials will be a real crime. When working with a turpentine, use gloves and ensure good ventilating basement.
Oil consumption for 30 square meters. m is 8 liters. The impregnation should be carried out in several goals, each time cooking a new mixture. The second layer is applied only after full absorption of the previous one and so on. For the first time, the impregnation should consist only of oil, the second layer is a mixture of 80% oil and a 20% of the turpentine, the third is 60% oil and 40% of the turpidar. Each time you add a 20% turpidar to 20% to at the end to cover them the floor in pure form. - The final stage is the floor coating by beeswax. It gives the surface smoothness and makes it pleasant to the touch. Heat the wax and apply it in several thin layers.


Such a floor device in the basement of a private house will obtain a solid, smooth and environmentally friendly surface for many years. But over time, the clay floor, like any other, will need to be updated. To do this, simply repeat the impregnation procedure. If chips and small cracks appear during operation, soda them with solid wax and impregnate with oil.
Paul on lagha
The flooring of the floors in the basement of the house on the lags is better to do if the soil waters run away from the surface, and the ground is sufficient dry.

Wooden lagows should be treated with antiseptics to protect against rotting, insects and rodents. The length of them should be less than the length of the room by 2-3 cm, otherwise the floors can be deformed when shrinking. Choose powerful pine bars with a thickness of at least 150 mm, for the draft flooring you can use any untreated boards, and it is better to take a t-shut-off board with a width of 40-50 mm.
How to make the floor in the basement of the house:
- Since the lags will be installed on the ground, it is important to prevent direct contact with the Earth. First of all, see the base and make a sandy pillow with a thickness of 15 cm.
- On the pillow, install the Standing Stands for Lag. Determine which parts of the house will be laid down (lower strapping, woodworm, covered with rubberoid, etc.). In the reference points, place the chalk mark. Then make marks in the installation places of the columns and calculate their quantity.

- Set the poles from reinforced concrete or bricks in the outlined places.
- The upper part of the poles will easily with waterproofing material.
- Attach the lags to the columns and supports using anchor bolts. We remind you that lags do not need to be placed close to the walls - make a distance of 1-1.5 cm on each side.
- To the bottom of the Lag, the support rails are supported and put on them a draft floor. It is not necessary to attach the blackboard boards - they must lie freely to eliminate the deformation in the case of grounds of soil or shrinkage of wooden structural elements.
- How to insulate the floors in the basement at home? The cheapest way is to pour a clamzite on the draft floor or put mineral wool. If you use cotton, it is better to put additional waterproofing for it so that the evaporation from the Earth does not harm the material. Relieve the polyethylene film or rubberoid flashes, bonding cuts with a wide scotch. Make a 20 cm sweat on the walls.

- On top of the heat-insulating material, it is recommended to put a vapor barrier membrane.
- There is a ventilation gap between the boards of the floor and insulation, so that the moisture is not accumulated and did not impregnate the thermal insulation. The width of the gap is about 2 cm. If you use a double-sided vaporizolation membrane, the gap can be reduced to 1 cm.
- Plumbing boards of the first floor attach across the lag, starting from the long corn corner. Return from the wall 2 cm - this gap will subsequently close the plinth. Alternatively, non-tanted boards can be used to finish the floor in the basement, but another material. If you are planning to lay carpet, put a tile or laminate, close the plywood lags - it will create a perfectly smooth surface.


More information about the construction of sex on the lags can be found in the article "Laying of wooden lags: master class."
Make the floor in the basement at home for everyone, good, there are many techniques that are different in difficulty, cost and practicality. Finally, several useful tips:
Before arranging the floor, consider where wires and communications will be hidden. Paul on lags, for example, allows you to lave them without any problems and provides access at any time.
If you want to make a wooden coating, choose wood resistant to moisture. Large breeds are considered the best in this regard.
Choosing a carpet as a cover, consider that if the basement is wet, it will not work normally, and the carpet can be molded. In this case, experts are recommended to stay on the tile or self-leveling polymer mixtures.


