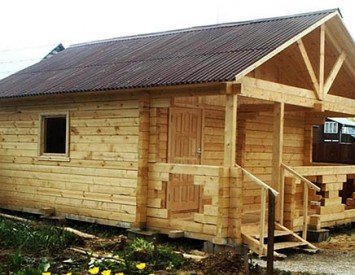
Banya is a great addition of each country house. The construction of the bath takes a lot of time, forces and means. Traditionally, the baths are brought from the log, however, the cost of this material does not make any economical owners. In search of an alternative building material, many have found an exit in the construction of a bath from the sleeper. How to build a durable, reliable and, most importantly, an inexpensive bath from the sleeper?
Content
Pros and cons of sleepers
First of all, it is worth understanding what sleepers are. The sleepers are inexpensive lumber treated with creosote - a special composition protecting the tree from corrosion. Creosted - a poisonous antiseptic, extending the life of a sleeper and preventing the damage to the material with fungi, mold and parasites. Speals are used when laying railway tracks. Often they are written off from production for various reasons, ranging from minor production defects, ending with the expiration of shelf life. Usually, dacha builders, including the baths, are brought out of such written spanks.
What are the pluses of a bath of sleepers:
- low cost of lumber;
- simple installation;
- short installation time.
But, as often it happens, you have to pay for the cheaper. Creostess is characterized by a specific odor, which is enhanced when heated, so it is very difficult for a long time in the bath. But the majority of dachas are already put together with this discomfort for more than a dozen years and continue to build baths from the sleeper.
Stages of construction
Choice sleeve for a bath
At first glance it may seem that the sleepers are all the same, and it is not particularly necessary to choose, but if you know some subtleties, you can purchase better material. First of all, determine which sleepers you will buy - new or written off from production. Of course, "overdue" sleepers will cost much cheaper. In addition, the old sleeve has one good superiority - for 10-13 years old, the caustic odor of crerosol is almost completely destroyed.

Decide with the amount of sleepers, based on the square and the project of the future bath. For a small bathhouse with a parillery and a sink you need to buy no less than 100 sleepers.
Carefully inspect the sleepers before buying. Very often, the sleepers are written off due to old age and wear, so if not to examine everything in person, there is a risk of buying a drowned material that has rotted from the inside. Let's knock the hammer on the sleeve, and if you hear a deaf sound, then the material will serve you at least 20 years.
Before making a final decision on the construction of a bath from sleepers, we once again weigh all the pros and cons. Even high-quality insulation of walls, gender and ceiling will not save from the specific smell of creosol, so think if you are ready to go to such victims.
Foundation
So, the right amount of sleepers is prepared, now it is time to bookmark the foundation. The foundation for the bath from the sleeper is selected, based on the characteristics of the soil, the features of the project of the building and financial capabilities. About what types of foundations are and how much they will cost you can read in the article " How to save when building foundation»
It is worth noting that most experts tend to advise the columnar foundations for baths, but the belt foundation will behave no worse, but will serve much longer.

When the foundation froze, it is necessary to take care of waterproofing. The bath is a rather wet place, and if the groundwater on the site is closed to the surface, you need good waterproofing. To this end, the concrete surface of the foundation must be deceived by liquid bitumen mastic, on top of it in two or three layers to store rubberoid.
Installation Baths of sleepers
The assembly of the bath from the sleeper is similar to the assembly of a log. Place the first crown on the rails that separate it from direct contact with the foundation. Broad of the sleepers must be tied up with a thorough compound. The very first crown is necessarily attached to the foundation. After its laying, blend the gap between the lower crown and the foundation of the mounting foam.

To put the insulation from jute, moss, packle or any other material for cacopki on the first crown of Speall. On top of the insulation, put the rest of the wints of the bath, not forgetting to fasten them with a thickening way. It is recommended to use an additional connection, cutting the hole at opposite ends under the brazing. Please note that all holes for fasteners need to be cut up to a few millimeters. Otherwise, the bath will be uneven.
During the installation of the bath, it is necessary to carefully ensure that the inner walls of the building are as even as possible, because if external errors can be masked by siding or any other external finish, then the internal irregularities hide not so easily.
Exterior trim Baths from sleepers
The windows and doors are "cut" into the building box after laying and fixing all the crowns at the height of the bath. The creation of window and doorways is a very laborious process that will require certain skills to work with cutting equipment and fairness. Calculate the size of the openings and cut them on marking with chainsaws.

Since even the sleepers impregnated with cryosis are not protected from exposure to external factors by 100%, it is better to carry out additional processing with an antiseptic. On top of the sleepers, it is recommended to cover with varnish or oil to prevent swelling from moisture.
After overlapping the roof and the primary insulation of the walls, the floor and the ceiling, a re-cape of sleepers, interior decoration, installation of furniture and equipment is made. If you want to save on the purchase of special furniture for the bath, we recommend reading the article " Bath furniture do it yourself»

Internal trim Baths from sleepers
By tradition, various wood species are used to finish the internal space of the bath. If you use the boards, you need to accurately calculate the length of each element, customize for the desired size and ensure that the fasteners are completely hidden. A sticking nail or self-tapping screw can not only scratch the skin, but also burn. In addition, in view of constant humidity in the bath, all "open" metal fasteners will very quickly begin to rust.

The most economical and rational solution is cladding. Elements are attached to each other with grooves and joints without applying metal fasteners. If you decide to conduct an internal finish with clapboard, first install the crate along the entire length of the walls in no more than 0.5 m. It should be borne in mind that the lining "eats up" quite a lot of space, so for a small bathhouse it will not be the best solution. Starting the molding is recommended from the angles of the wall opposite the entrance to the bath.


