If you started repairs in the bathroom and have already decided on the choice of toilet bowl, then sooner or later the moment of installation on it is a drain tank. In order to make the installation itself, and at the same time perform everything correctly, you will need several tips. In this article, we will tell you in all details how to install a tank is not worse than a professional plumbing.
Content
Types of drain Bachkov
Before installing the drain tank on the bowl of the toilet bowl, it should be understood with its type.
There are three types of tanks:
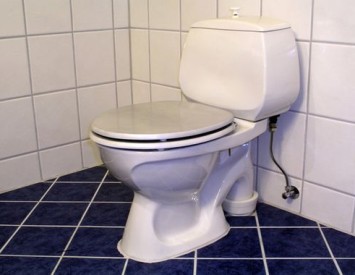
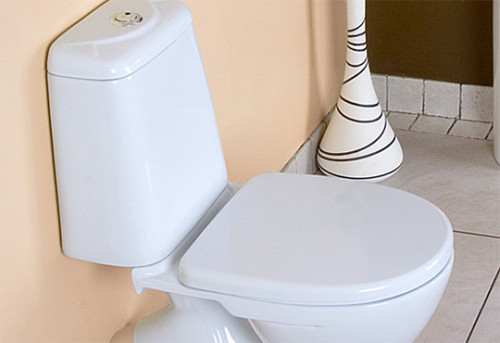
- The compact is on a special shelf directly on the toilet bowl, moreover, the drain process is activated using the button.
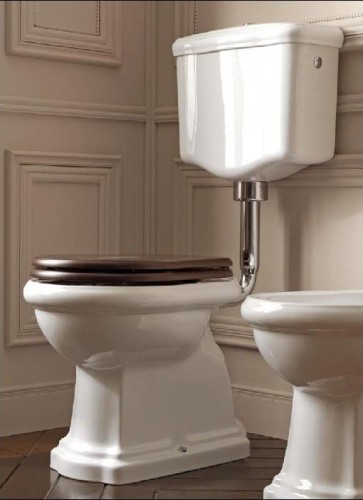
- Autonomous type tank - often it is placed significantly above the toilet bowl and mounted to the wall connecting the tap pipe. The descent of water when using this type of system is made at the time when you pull the chain.
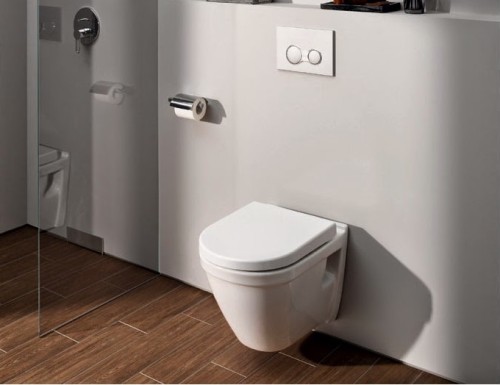
- Installation - for such a system, a special toilet is used. It is placed on the surface of the wall and is in a suspended state, while the drain system is located inside it. In this system, water is descended by a special button mounted in the wall.


Drain Tank Mounting Technology
After determining the distinctive features of the types of drain tanks, you can safely begin the installation process. Working with each of the species is distinguished by the topic or other installation subtleties, and therefore it is necessary to follow the instruction suitable on the occasion.
To do this, before installing, it is necessary to prepare the following:
- fasteners (including silicone gaskets);
- hose (allows you to connect a tank with a water pipe);
- fixture of draining device (located in the middle of the tank);
- sealing gaskets (overlap the gaps between the bowl and the tank capacity).
Also, when installing, we recommend adhere to the general principles that are inherent in each tank type without exception.

To do this, follow these steps:
- Carefully prepare the floor surface. Connect the toilet with the sewage drain with the ABU (fan tube).
- Toilet bowls screw to the prepared surface using copper screws that often go bundled. However, it is not necessary to fill the joints between the toilet and the surface of the floor using cement, since in the future they can give a crack.
- Mark the fastening places of the drain tank to the wall and toilet the most accurately as possible. In the future, this will help you finish the installation of the entire system, protecting yourself from many unpleasant moments.
- Using the perforator, make holes in previously scheduled points. Then lock the tank using the fastener items offered by the manufacturer. We clarify again what to do this with the highest possible accuracy.
- Connect the tank with a drain pipe. It is worth noting that additionally install the safety pipe, the hole in advance is drilled in the wall. To check the functionality of the system, turn on the water.
Now we have allocated and disassembled all the main points and nuances in the installation of a drain tank. But nevertheless, each of the types of tanks has additional moments and difficulties that should be disassembled individually.
Installation of the Tank Type "Compact"
This is one of the most simple options for installing a drain tank on the toilet, so that you will do any work personally. A feature of such a tank is that after connecting to the toilet, such a design looks solid, since you can only purchase them.

How to install a tank "Compact":
- At the shelf, located at the top of the bowl of the toilet bowl, attach a special self-adhesive gasket or glue it with silicone, thoroughly wrapped on both sides. This will help avoid unwanted water leaks.
- Install the drain tank over the gasket. From the opposite side of the toilet bowl, lock everything on the shelf with the help of fasteners (we mentioned yours).
- Connect the entire resulting design to the pipeline tube with a flexible hose.
- To make sure that the installation is correct, type the water into the tank and press the drain button. For greater confidence, the procedure can be conducted 2-3 times.
If your older sample drain tank, the installation additionally requires the mounting of the shut-off valve with a rod valve.
Autonomous Type Installation
This method of installation is inherent separate location of the toilet and the tank. Typically, the plum system has much higher bowls of the toilet, while connecting them with a drain pipe.

Consider the following work order for this system:
- First of all, you need to connect the plum pipe with the toilet, noting the place where the entire design will be located.
- Then choose the height on which the tank will be fixed.
- Mark the places of fastening the drain system to the surface of the wall can be manually. However, experts recommend using an ordinary construction or laser level for this. Accurately set tags will help to significantly simplify further installation.
- Fix the drain tank and the pipe on the wall using the fastener (usually included).
- Reliable to connect the toilet with the resulting system, and connect the tank to the water supply.
At the end of the installation, conduct tests for the lack of leaks and system functioning. Usually for this wash off the water several times.
Installation of the Tank Type "Installation"
When it comes to "installations", any professional plumbing knows that its installation is carried out directly inside the wall. Do it, hiss the entire design required for a washing of the system using moisture-resistant drywall.

In addition to the external attraction, "Installation" allows you to release the precious space of the bathroom, which is always catastrophically lacking, especially in urban apartments. Since most of the part is mounted in the wall (except for the bowl of the toilet) and does not repel, it will become an additional plus in the cleaning of the bathroom. Another positive point is that such an installation system gives more opportunities in the design and decoration of the floor (toilet "hanging" above the surface of the floor). This gives your room additional privileges when laying a tile, especially if a large-scale image is applied on it or painted.

I would also like to note that often the tank capacity of the type "Installation" is made of plastic, which makes it quite easy, convenient in installation and relatively inexpensive. The "Installation" kit always contains a special mounting frame that is manufactured individually for each model, as well as all the necessary fasteners.

Install the plastic tank is very simple. To do this, it must be attached to the steel frame, after which it is necessary to adjust the volume of the water required for the drain. In such a design, two buttons are always provided for a drain. One of them is used for partial drain, and the second is needed for completely emptying the tank. No need to completely empty the tank every time this happens with classic tanks, it allows you to significantly save.
Drain tank fittings: Setup and installation
In this part of the article, we suggest to understand all aspects of the installation and functioning of the drain tank mechanism. Armature is a device that is responsible for filling the tank, the function of automatic reset of water, and also protects the tank from overflow.

We suggest to consider the armature device in more detail:
- a hole for the descent of water located below or in the side of the tank;
- overflow hose from the side of the hole;
- the top of the valve mechanism (the kit "cover, a gasket gum");
- mechanism allowing to fill with water tank;
- button (performs drain function).

Before starting installation, it is worth paying attention to two main processes that play a key role in the work of the entire mechanism:
- The filling process is due to the mechanism of the type "float" and the shut-off valve fills the tank with water to the maximum allowable value. In the event of a change in the amount of water, the float mechanism connected to the metal lever comes into motion. When the amount of water in the tank is extremely high, the float goes up and the valve overlaps with the lever. It closes the access of tap water, allowing the lever to reach the float again. Due to this, the tank capacity begins to fill again.
- The process of descent - helps water from the tank pour into the toilet. In this process, two components of the descent element take part: "Pear" (protects the tank from leaks, closing tightly) and the sloping lever (looks like a handle on the cover or side of the tank, which is enough to raise the drain). The "pear" is a type of siphon made of rubber and similar to Vanuz. As for the lever, in most modern toilet models, it was replaced with a button.
After installing and connecting the toilet system with the sewage system, the valve should be put into it.

Installation of reinforcement occurs as follows:
- The water drain mechanism is fixed in a tank with a plastic nut, after setting a special gasket (rubber or silicone).
- To fasten the washers on the fasteners (usually come complete with gaskets), then turn it into the holes.
- Fix from the back of the puck with a nut.
- On top of the nut put on a sealing rubber ring. Additionally, it is possible to wash the ring with silicone (in case it has already been used).
- Tank Install to the toilet shelf and fasten with nuts.
- With the help of a flexible hose, connect the mechanism to the plumbing pipe and then fix.
- Tank cover to put in its original position. Set the drain button.
Useful information: When fixing the flexible hose to the water pipeline, try not to use a plumbing thread or a pass. It is better to do this, avoiding the skew so that the thread does not break down and the item has not spoiled. The process of installation of reinforcement at this stage can be considered performed.
Adjusting fittings
Usually the installation of the valve does not cause additional difficulties, but it will be worth it to learn to customize it correctly.

To adjust the valve, perform a number of uncomplicated manipulations:
- Traction disconnect from overflow pipe.
- Squeeze the decisor of glass.
- Rack moving up or down.
- To adjust the water level in the tank, you need to fix the glass so that the top edge of the tank to the top of the glass remains at least 4.5 cm.
- The overflow tube is above the limiting water level of about 2 cm and below the top edge of the rack by 7 cm.
To adjust the small floss, the float is usually moved above or below the overflow tube. In order for the drain to be fully made, the flap is shifted upward from the glass or at the bottom. When it comes to adjusting the maximum or minimum drain, it must be borne in mind that water consumption in the most directly depends on which direction the flap is moving.
Replacing the old drain tank new
The drain tank, as the main toilet mechanism, never serves you for a long time if you do not adhere to the established rules and technologies when installing. If you decide to replace the old non-working tank more new, you will also have to tinker.

Everything should be done in stages using the following algorithm:
- Used tank disconnect from the tap pipe, pre-break water.
- Remove the tank (with the help of a plumbing adjustment key unscrewing all nuts).
- Remove from the shelf lime raids and rust residues (hereinafter, this will allow achieving the maximum dense joint of the bowl bowl with a drain tank).
- Mount the new tank (using one of the instructions described above).
- Connect all the mechanism and equipment to the water supply.
- Install the required water level.
- Fasten the drain tank.
- Slide the drain button on top.
As you can see, collect and install the drain tank is not so difficult if it is strictly followed by the instruction and carefully examine the sequence of work.
Will summarize all the above information video on how to properly install the drain tank:


