The building materials market is gradually replenished with new positions. Recently, at the peak of popularity, a new finishing material is a polymer putty for walls and ceilings. Its uniqueness is that the putty is used to complete the last stage in the repair - the finishing of walls and ceilings under painting or shook wallpaper.
Content
The main and most important advantage of this putty is that the material is very practical and is able to align not perfectly smooth surfaces. That is, if there are minor irregularities (deepening, pits, bulges), then all these flaws can smooth out a polymer putty.
Elastic putty. Characteristics and advantages
Some people believe that if the walls are designed to wet wallpaper, you can not spend much on putty. And even more so, on a polymer putty. In any case, it is necessary to prepare the wall to painting or sticking wallpaper.
There are many species of putty and they firmly conquered the construction market. It is difficult to say how many years in construction is used by putty. By the way, the very first and simplest, which was presented in the market of sales of about 15 years, was made of cement and gypsum. When diluted with water, a plastic mass turned out, something remotely resembling a liquid cement solution.
Now the construction market presents a large assortment of putty materials. Of these, the leading position occupies a polymer putty.
Types of putty:
- latex;
- acrylic.
The first option or latex putty is used exclusively for finishing the premises. This material is characterized by simplicity of application, the complete absence of a sharp smell, good plasticity and a long service life.

The second option is a universal and relatively inexpensive material. The difference is that it is possible to use this finishing material both for indoor work and external work. In addition, the acrylic putty can be used both for rough finishes and for applying the last, finish layer.

If we compare different types of putty, then it can be noted that:
- gypsum-based putty - inexpensive, well falls, lines the surface, but does not react well to increased humidity;
- based on cement - a resistant to humidity, but gives a strong shrinkage: cracks, it is cleared;
- the polymer putty does not give a shrinkage at all, well falls, plastic, moisture-resistant.
As for the shortcomings - they are not, except for the high price.
Scope of using a polymer putty
Before you go to the store to purchase the best option for wall decoration, it will not be superfluous to familiarize yourself with the characteristics and find out what putty in which area can be applied.
So, the finishing material happens to such species:
- universal putty;
- self-leveling;
- special;
- finish.
From the titles it becomes clear that the mixture of self-leveling is intended for the draft wall decoration and to eliminate irregularities. Universal can be applied not only for finishing walls and ceilings indoors, but also for external work. Special - Used only to perform certain tasks, and the finish only for the final stage of the surface finish.
If we consider work with a polymer putty, then it is necessary to clarify that it should be applied only by the second layer when the first is Chernovaya, has already grabbed. If you want to purchase a universal one, then you can use this finishing material both to apply the first layer to smooth the surface irregularities and for the finish.

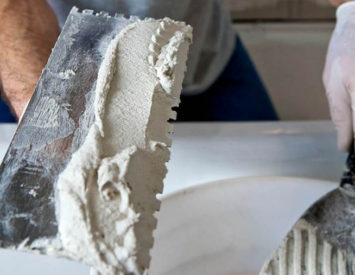
The scope of the polymer putty is quite wide. Elastic putty is used to process concrete surface, cement, gypsum and plastered. The material is very simple and universal in use, working with it - solid pleasure.
The result of effort is a smooth, smooth surface. It can be said that perfectly smooth. Plus, add that putty after drying, provided that the application technology does not crack, it does not rock, it does not crumble, does not give a shrink and, by the way, dries very quickly. In addition, in the divorced form, the polymer finishing material is stored 12 hours. So you can take a break and proceed to work again. Just need a bucket with a diluted putty to close the lid, then it will not dry before the deadline.
Tool for working with elastic putty
For self-putty walls under painting, you need to get a special tool.
Especially if you never put the walls, then you need to purchase:
- several spatulas of different sizes (narrow, medium and wide);
- a spatula angular;
- in order to apply primer, prepare a foam roller or a comfortable brush;
- metal rule for aligning the layer of putty;
- construction level (experts recommend buying laser or alcohol). Especially cuts out this tool in work when the walls are uneven;
- sandpaper of different sizes (coarse and small) to achieve the desired result;
- shroter manual - for convenience in work;
- capacity for solving stirring, long wand for mixing.

Instructions for applying elastic putty
Do you know how to work properly with a new type of putty? We share with you experience:
- A putty is applied (any!) Mandatory on a pre-prepared wall. Therefore, before proceeding with the work, it is necessary to prepare the surface to work: clean, remove dirt, make dust. If necessary, it is advantaged in places the departed plaster, and with overhaul - remove a completely layer of old plaster. If fat stains manifested themselves on the wall or ceiling, they must be impregnated with a degreaser. And it is quite natural that the surface prepared for the application must be soaked with a primer mixture. Carefully read the information specified on the package - you need to withstand the time between the applying of the primer and putty.
- The portion of the dry putty is poured into a pre-prepared container (bowl or bucket), poured with water. On the contrary, it is possible to pour water first, then pour powder. It is stirred by a solution for putty manually, and if you have an electric drill, then you need to wear a long "mixer" long nozzle and quickly breed putty. This is the easiest and easiest way to breed a polymer putty.
- Leave the solution for 10 minutes, then you need to mix the putty once again.
- It is necessary to apply an elastic putty on the wall or any other surface: dial a slight putty on a spatula or a celma, distribute over the surface. The layer should not be too thick, it is best to apply a putty gradually, control the thickness of the layer. Ideally, the first layer does not exceed 3 mm.
- To the trowel, type a little solution, distribute along the edge of the spatula (use a wide spatula), after that the spatula must be accurately attached to the wall (the angle is sharp) and stretch from top to bottom. As a result, the putty will be distributed evenly on the surface.
- By the way, Pressure strength plays a big role. If you press the spatula and change the angle of inclination, then thus you can vary the thickness of the layer.
- Thus you need to cover the entire surface. If you see that there are stripes and irregularities, it is necessary to use the rule.
- On the drying of the elastic putty, it is distinguished from 4 hours, then you can smooth out the irregularities with the help of sandwich, and the best thing is to insert a sheet of sandpaper to the skin. So it will be faster and more convenient.
- If you see that one layer is not enough to achieve an ideally smooth surface, then one layer of polymer putty is applied with a thin layer. But with a break at least 4 hours.

Finish putty walls with their own hands
If you plan to turn the walls under the stick of wallpaper, then you can put a putty into several thin layers. It is desirable that there are no more than 2 layers, if the wallpaper is dense and 3 layers are allowed to apply on the wall or ceiling, if the wallpaper is thin. Then you can count on the fact that the wallpaper will be shaved exactly, there will be no wrinkles and air bubbles.

Under painting, the surface requires more thorough preparation, because the paint is not capable, like wallpaper, hide small irregularities. Therefore, only the finish putty is used.
Performance of work phased:
- Application by a thin layer of the first layer of putty.
- If there are too noticeable irregularities, then after 4 hours it is applied again another layer, and if necessary, then after drying the second layer - the third one.
- Be sure to withstand the time so that the putty is pretty grabbed and dried.
- Applying putty finishing a very thin layer to eliminate small defects (if necessary).
- Grouting with a skin after drying all the layers to get an ideally smooth surface.


