Laminate is a relatively new floor covering that quickly gained popularity. It is now much easier to complete the repair, because the laminate is designed in such a way that even a person who has never concerned the repair and laying of the laminate, can easily cope with the stacking on its own. The material is easy to calculate, it is easy to cut and also simply lay. Laying the laminate with your own hands: where to start how to calculate the amount of material, what tools are needed.
Content
What is a laminate
A few more years ago, there were several types in houses and apartments: wooden boards, parquet or pressed sawdust sheets, laid on top on the old wooden floor. The tree is a durable material, but over the years gradually loses its relevance, because the old flooring has to be disrupted to bring the floor in order. Of course, you can spend a lot of time to restore the wooden floor, but this work is painstaking and the result will not be as I would like. Another thing is laminate laying. From the strength for a couple of days - and the entire apartment will be transformed literally in front of her eyes.
So what is laminate? This is the same parquet, or rather, its analogue. And laminate is made not from the wood array, as a real parquet board, and from pressed sawdust and other materials. The cost of such a material is much lower than the wooden parquet, but to afford the imitation of the wooden floor can anyone. And, most importantly, recently laminate began to produce not only under the tree, but also imitation of natural stone, tiles, etc. Externally, such a floor covering is no different from the original, except when you spend your hand on the floor, then it becomes clear that it is not a tree and not a stone, because you can take care of the joints.
Laminate is the same multi-layer cake consisting of several layers. The main layer is the durable and sturdy, made of focus of high density. From above on this layer is superimposed, then also. Each layer performs its function: protection against moisture, strength, color, texture, etc.
When choosing a laminate, you need to pay attention not only to the price, because the cheapest flooring can serve for a couple of years, and then problems will begin. Such a laminate is afraid of moisture, and also does not withstand temperature fluctuations. If a glass of water is accidentally shedding on the floor and not wipe the puddle in time, then the laminate will swell and have to be changed not a separate element, but completely coverage in this room.
Another thing is to immediately purchase high-quality laminate, resistant to temperature drops and moisture, then you can count on a longer service life for 8 years or more. And if a separate panel is spoiled, it is easy to replace it with a new one. Fully change the floor in the room is not necessary.
Laying of laminate with your own hands - what will be needed
Installation technology of this flooring is characterized by simplicity, like the design itself. How to start to lay the flooring with your own hands with a selected material - laminate, brought not only pleasure, but also pleased with an excellent result?
For work on laying laminate, it is necessary to purchase the laminate itself, also need to be acquired by such instruments and materials:
- purchase a substrate if the laminate is placed on the old wooden floor. If on a concrete tie, then you need to buy waterproofing and foamed polyethylene material;
- polyethylene film;
- to avoid gaps, without wedges can not do;
- plinth and special attachments for it;
- glue;
- roulette;
- line;
- pencil;
- cutter or acute building knife, as well as scissors.
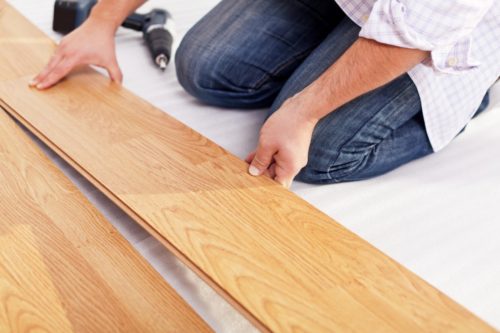
Laying the laminate on the wooden floor with their own hands it looks like this: if the floor is absolutely smooth, then you can immediately begin work. It is necessary to spread the substrate, and to lay separate elements of the laminate.
If you have to lay the laminate on the concrete base, then it is necessarily stacked by a layer of waterproofing directly, then the substrate and laminate. And now about everything in order to witness to know how to lay the laminate with their own hands.
How to cope with laying laminate yourself. Advice
So, you decided to independently put the laminate in the living room or the children's room, these recommendations are just for you:
- Paul preparation. If this is a concrete screed, you will need some time to snack. Extra moisture is an enemy for laminate, even the most expensive coating can be deformed.
- So: the installation for laying under the laminate should be absolutely dry, and also - preferably perfectly smooth. Therefore, if your gear is different from these requirements, you first need to eliminate the shortcomings, namely, to apply a self-leveling screed and naturally wait until it grabbies and gets dry.
- Laying without preliminary preparations on a wooden, relatively smooth floor without significant transitions, on linoleum (if it is not damaged), on any floor, covered with chipboard, fiberboard or OSB.
- The process of laying outdoor coverage does not occupy a lot of time. Experienced masters say that this is a fascinating occupation, resembling a designer assembly.
- If the floor is even, then each element is suitable with adjacent, thus the single monolithic coating is obtained. Drops in height are allowed, but not more than 2 mm for each coating meter.
- The substrate should be bought and stacked necessarily, without this element, laminate laying is not performed. And if you do not suck and buy a substrate from pennate or peronolistic, then due to this coating, it is possible not only to provide additional protection against noise and moisture, but also to smooth out the substantial irregularities of the floor, as well as rely on the preservation of heat in the room.
Read more about the choice of laminate and castles for connecting boards
Choosing an outdoor coating, you probably drew attention to the method of connecting elements.
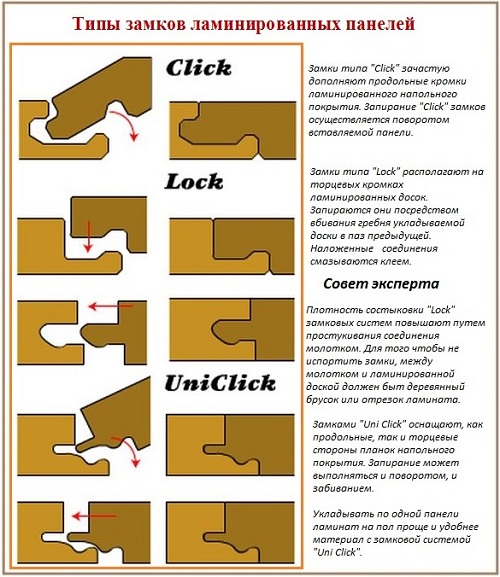
There are not many options, but it is worth staying on this issue in more detail to understand the principle of assembling laminate:
- The "spikes plus the grooves" is the glue system of connecting the laminate board with each other. The principle is identical to the build of a wooden parquet.
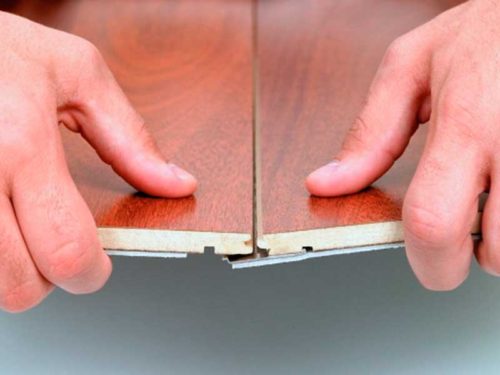
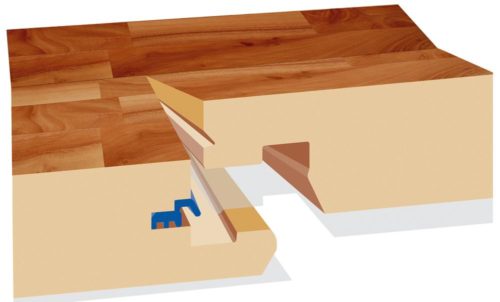
- Crochet system or "Click". Each element has dropped hooks and grooves. If you put a laminate at an angle of 30 degrees, then this hook will enter the hole and snaps up.
- The lock system "Lock" is approximately the same principle of fastening, as in the previous version: spike is included in the recess located on the adjacent element.
Each fastening system has its own characteristics. For example, in the adhesive method, you can count on the fact that the seams will be strong, which means that the high strength of each seam is ensured. But it is no longer possible to disassemble such a floor, especially when dismantling the coating.
As for panels with fastener "Lock", you will need a special tool or device to score spikes until they do not "be tight". When laying a laminate with such an attachment, you will need a piece of wooden bar and a metal hammer. Cons: With an increased load, gradually the comb at the scene is erased. As a result, the slots between the elements of the laminate appear quickly.
And the system "click" is perhaps the most common, because the additional tool will not be required, and you can disassemble and collect such a laminate about 5-6 times. The grooves are connected to spikes and cuddle tightly to the surface until the hook finds a place. If done all right, you will hear a click.
Video on laying laminate with their own hands. Step-by-step instruction:
Laying laminate with your own hands. Step-by-step instruction
We gradually got close to the most important and very soon let's start laying the laminate. But first you have to calculate the number of main material. To do this, you need to know the area of \u200b\u200bthe room to multiply the resulting digit for the length and width. Therefore, you need to add plus 10% about the reserve. If your goal is to lay the laminate diagonally, you will have to add plus 20% on the material stock.
Laying of laminate with hands on a wooden base:
- And work begins with the preparation of the coverage. If it is a concrete surface, then the mixture is superimposed by self-leveling, and then it is possible after complete drying of the floor (period - 1-1.5 months) to start work.
- Laying without preliminary preparation is allowed on the wooden surface only after prevention: antifungal treatment preparations (if necessary), as well as eliminating drops, fixing "floating" boards, replacing damaged.
- If a linoleum or tile is laid on the floor, then this coating should fit tightly. The dug plots must be put down.
- Old wooden floor can not be disrupted, but to align in this way: the sheets of chipboard are to be used on top.
- How to sharpen the substrate: on the base you need to lay a layer of polystyrene or polyethylene (foamed). The coating is laid out with the allen in 20 cm on each other, plus the allowance of the wall to 15 cm to the maximum.
- As for the substrate thickness on the concrete floor, then choose a coating with a thickness of 3 mm.
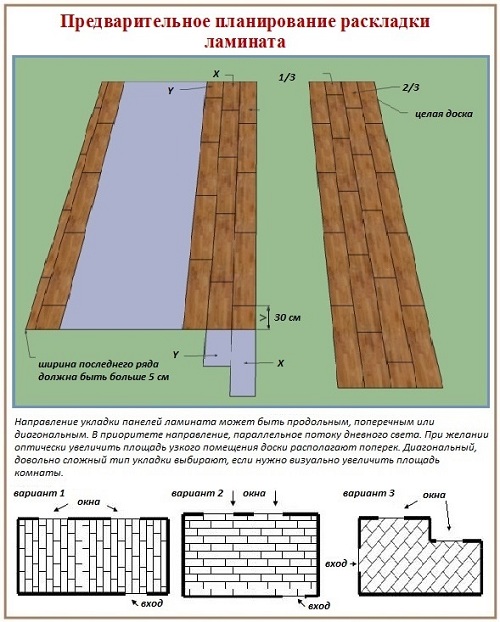
- Faster and easier to lay the laminate panels in a direct way, that is, the placement of the laminate starts from the angle of the room and gradually move to the exit.
- It is better to work with natural daily lighting. The room temperature should not be descended lower than +15 degrees and be higher than +30 degrees. The humidity in the room is within 40%.
- Laying the first row: from the far corner of the room. The band should be moved to the wall, but set the wedges between the wall and laminate), taking into account the linear coating extensions.
- Seam should pass around the perimeter of the room. If everything is correctly performed, then the seams after the installation of the laminate should not be visible.
- Installation of the second strip - the next element of the laminate is inserted into the first to click. If the wedges are not inserted along the ends, it can lead to the fact that with the slightest fluctuations in temperature or humidity, the laminate can appear and explode.
- As for the installation near the doorway, then in this place the gap can be done smaller.
- Installing the plinth and threshold - be sure. If there are no transitions, then the laminate can be laid in all rooms with a single web.
- To dock the panels between the rooms and hide the seam, the threshings are installed in the laminate tone.
- By the way, the rounded shape will help to smooth out a small difference between the premises.
We recommend laying the threshings for laminate with your own hands to look at this video:
Council from professionals: start laying laminate best from a long corner or from the place where heating pipes are held.
What else to consider:
- laying laminate in rooms with high humidity is not recommended;
- the laminate is not attached to the carpet cover;
- as for the electric system "Warm floor" and "Water warm floor", choosing a laminate, you need to prefer wear-resistant coatings with an exploitation class not lower than 31-33. In terms of security, this is the indicator "E1 and E0".
You can watch the video structure on laying a laminate with your own hands:
