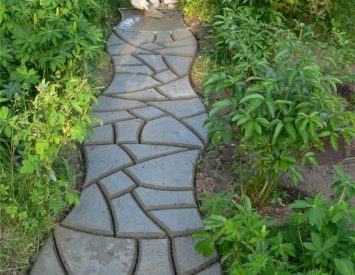
If you built a cottage on your own land plot, then probably faced with the issue of the arrangement of the local area. Everyone knows that it is difficult to move on crude land after the rain - the occupation is not easy. You are not only staining shoes, but also turn the earth into a real porridge. So that this does not happen, it is necessary to equip all the main trails on the plot. In this case, the garden paths made of tiles will help you. They will be able to properly protect you from dirt during precipitation. In addition, walking on such a surface - one pleasure. Among the widest selection of finishing materials for laying the track in its own section, you can select the paving slabs. If the presented range did not come to you like, then the tile can be made personally. Thus, you will not only save, but also be able to achieve the original result, which will be envy to the neighbor.
Content
Forms for creating tiles for garden tracks. general characteristics
If you still decided to do everything yourself, it is better to start to decide on the choice of shape and the size of the tile. These indicators are directly dependent on your preferences. We should also not forget that some forms can simply not fit into the overall landscape of the site. Be sure to consider the size of the garden path so that the tile lay on the base is optimal.

Tile for garden track. Advantages and disadvantages of forms
The carpet in the country can be issued in different ways using various infirm materials. Often you can meet a path from wild stone, sea pebbles, wood log cabins and even polyvinyl chloride plates. Often use ready-made metal flooring, as well as the bay paths from concrete. We will equip the household territory with a conventional concrete tile, which will be manufactured by yourself. Before doing this, it is better to carefully disassemble all the pros and cons of such a way to further avoid unpleasant moments.

The main advantages of forms for the manufacture of concrete tiles are considered as follows:
- You can choose almost any form you like. With the help of conventional girlfriend and materials, you can make tiles in any format.
- The quality of finished products is not inferior to the tiles purchased in the construction store.
- The possibility of a lot of multiple use of forms. A qualitatively made form will serve for a long time if you use it correctly. Plastic has a number of properties capable of protecting the form from frost, moisture and corrosion.
- Low cost of stencil. Most often, old plastic containers are used as a billet for tiles. In case of their absence, everything can be purchased at any economic store at a very reasonable price.
- If you make a thicker tile, then it can be operated as the basis for entering or storing the car. This option is much cheaper than specialized tiles.
- To handitically make tiles, no special skills and knowledge are required. The production process is quite simple and uncomplicated, so it will be under the power of anyone who is able to hold a trowel in hand.

As you can see, one of the main advantages in the manufacture of tiles using forms is the low cost of finished products. Having made a matrix for a garden path with your own hands, you significantly reduce all costs associated with the purchase of the finished form. Do not forget about the existing shortcomings of this method of arrangement of the local area.
To the main disadvantages of forms for garden tracks include the following:
- In case you decide to make a garden track on the example of the already existing one, it will be quite difficult for you. Tile that is sold in a construction store is made on the conveyor. All processes are brought to automatism, therefore it will be difficult to reproduce the identical product. In addition, to give additional strength, the factories use the firing, which is almost impossible to repeat at home. Thanks to these indicators, the self-made concrete tile is inferior in quality to the store analogue.
- If you did not take care of the processing of the tile surface in advance, then you will note that about once every 1 year, you have to apply a new layer. It will protect the path from abrasion, but not fully. Some are added to the concrete solution. Special pigment powder, which fully stains the finished product. Pigment is quite expensive, and the effect is far from the best.
- When the work suggests laying a large area, keep in mind that the process can delay. Since the form cannot be seized until the solution cuts out, it will have to wait for a long time to fill the next site. Such a problem is solved by purchasing several forms. In this case, the project budget will increase significantly.
- For a complete hardening of the solution may be required from 2-3 weeks. In case the car will drive around the track, you need about 5-6 weeks. You can use the path only after the required interval is set.

Choosing a pavement tile as a finishing material for your site, be sure to compare everything and against. Buy you ready, or make everything on your own sketch, it all depends on your desire and wallet thickness. If you are going to lay a small section of the garden track, then, undoubtedly, it is better to use sweater agents and forms. To work on a larger area, it is better to get a few ready-made forms, then it will significantly speed up the whole process.
Tile for a garden path with their own hands
Getting Started by the sidewalk path in the country, it is necessary to properly prepare. Make preliminary calculation of the necessary raw materials. To calculate the cube of your track, it is sufficient to multiply three values: the width, length and thickness of the future coating. Based on this result, you can buy the required amount of sand and cement. The preliminary calculation will allow a little to save, then the remaining material will not disappear.
To better figure out the process of creating and laying paving slabs in the country with your own hands, we advise you to see the following video:
Tools and materials
Any building process does not work out without the use of additional aids that allow you to speed up the work without losing the quality. Get yourself all necessary, then the paving path will serve you for a long time.

To put a garden path with your own hands, purchase everything you need, sticking to the following list:
- Concrete mixer, construction vibrator, Bulgarian, drill with a nozzle mixer, tamping, scrap, bucket, shovel, level, trowel, cord.
- Sand, crushed stone, cement, pigment, plasticizer, lighthouses, cutting and grinding discs on stone, forms for tile.
Such a simple set will simplify work, while you will get a great and durable result. In addition, it can always be borrowed from the neighbor's concrete mixer, and, for example, a vibrator to take on rental.
Preparation of the base of the garden path under the tile
If you want the track on your dacha for a long time, and the tile does not slip the tile and crackled, it is important to pay special attention to the preparation of the foundation. From how accurately these works will be performed, the quality of the finished surface depends. Act step by step, adhering to clear instructions, then all trouble can be avoided.

To equip the foundation for a garden track, use the following algorithm of actions:
- Cleaning the surface. Remove all unwanted items in those places where the track will be. Get rid of large stones, branches, stumps and other things that make it difficult to make the process of laying.
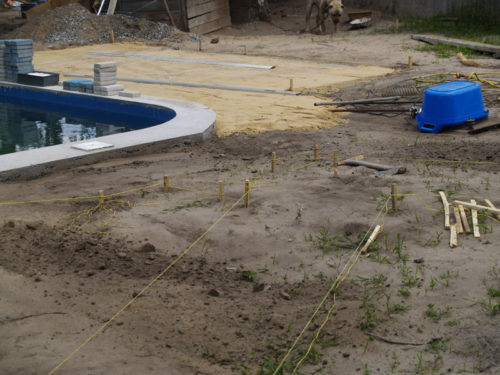
- Marking. Armed with wooden or metal spikes, designate the size of the future track. Consider all the turns and bends. Between the pegs, pull the cord to determine the dimensions of the path.
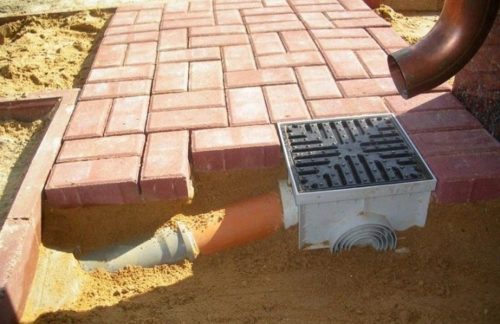
- Drainage. Works at this stage may differ, it all depends on the type of soil. For example, internal method uses for viscous soils (drainage pipes under the necessary angle are placed in a pre-roof trench). In another case, the outer drainage is used (the tile is placed at an angle of 2-3 ° so that the extra moisture goes into the soil).
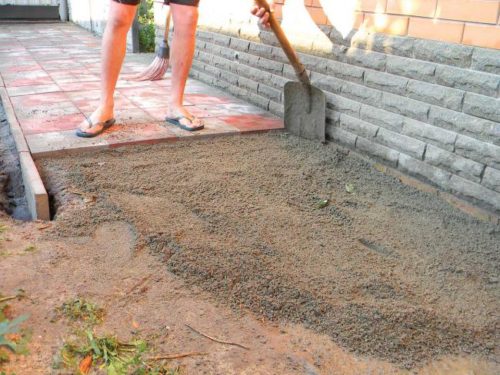
- . Before starting to plug the pillow, you need to cut the trench to a depth of 20 cm. Do it using a pre-planned landmark. At the cement-sandy solution, set the border perimeter, if necessary, after which, start to fall asleep the crushed stone of the middle fraction. The layer of 100 mm will be enough. From above, fall asleep wet sand with a small layer, then scatter and confuse. The finished two-layer pillow is plenty of water from the hose, then leave for a day.
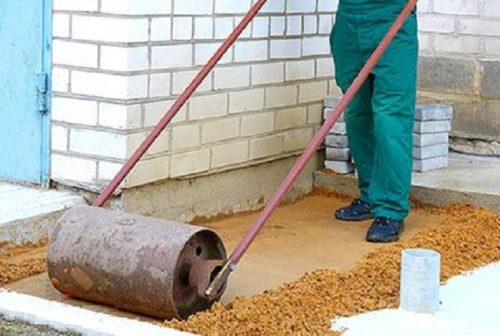


Observe all the rules when arranging the foundation. Adhere to the correct layer thickness, and act in stages. The better you install the pillow, the faster the process of laying paving slabs will pass. Do not forget about the drainage, which must be foreseen, regardless of the size of your path.
Production and laying of tiles on the garden path with their own hands
In the event that the assortment of the store for some reason did not suit you, you can make a tile for a garden track yourself. It is always nice to walk along the path that you have done with your own hands. The manufacturing process is quite simple and uncomplicated, it is important to determine the form and design for the future tile.
Let us consider the way to create a concrete track from the tile on the example of the finished form:
- Pull the cement-sandy solution 1/1 in the concrete mixer, then pour water.
- During the mixing of all components, you can add a special additive. The frost-resistant plasticizer will not only protect the concrete from cracks, but also give the solution with the necessary elasticity. If the drawing of the garden path is presented in different colors, then add the desired pigment with each kneel.

- One or more finished shapes position on the pillow to achieve the desired pattern. Observe the intergraph seam, it should be the same everywhere.
- Dial the solution in a bucket, then start pouring into the cells. Do everything consistently and do not rush. In the event that bubble formations appeared in the solution, it can be pushed in several places acute part of the trinker.
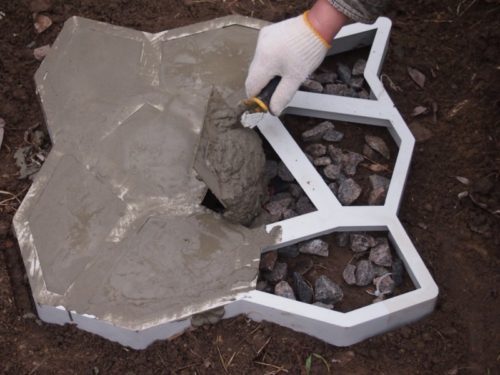
- Make sure that the solution is evenly distributed in the form, and was flush with the top edge of the matrix. With a spatula or Kelma, arrange the solution so that in all cells it accepted the same consistency.
- Give the solution with the shape to open. This will require 1-2 days. If you work for cloudy weather, it is better to cover everything with polyethylene.
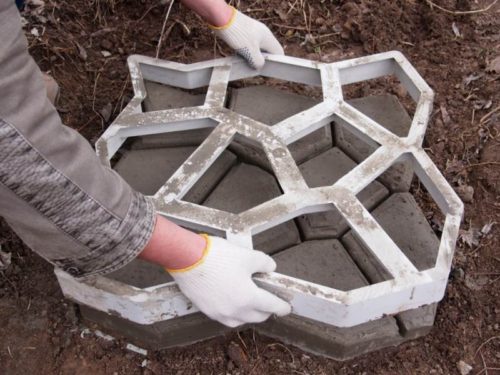
- When concrete is dry, carefully dismantle the form. Use scolding or chisel. Act carefully not to damage the concrete.
- Similarly, lay the tile on. Cut off the unnecessary parts of the tile with the help of a grinder.
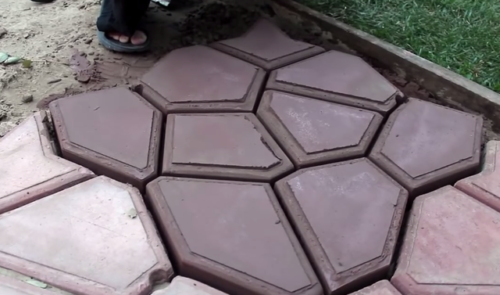
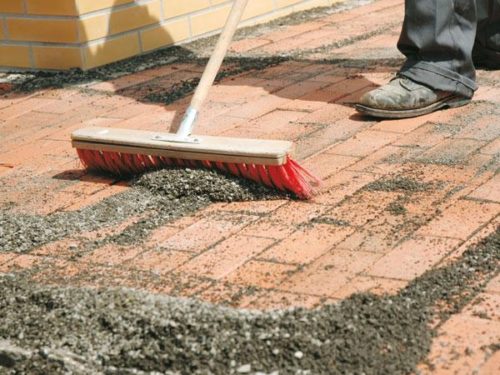
- Now evenly scat out sand along the path, then start filling the intercutric seams. Use a broom to score gaps.
- Pour the garden with water from the hose so that the sand gives shrinkage.
- Tile can be treated with a special stone or concrete impregnation. This will protect the surface from abrasion and exposure to the external environment.


Specialist Council: When you put the tile, move on the surface of the concrete form. It is better to move on the ground or pillow.
Tile forms for a garden path can be different, the laying principle remains unchanged. Observe the correct sequence and proportion. Use special protective equipment, additives and varnishes, then you can walk along the path without worrying about the sparrel of the upper layer. In addition, on a concrete basis, you can always put a battered tile by creating a mosaic effect.


