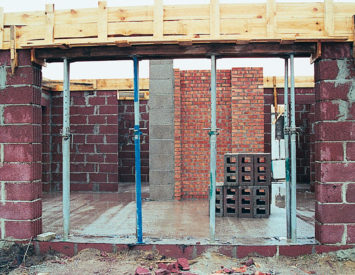
If you independently built your own home, then I have been faced with the issue of arrangement of the door or window passage. For these parts of the building, it is necessary to install special support parts that will become a reliable base for further masonry or filling with concrete. As a strengthen, special jumpers are used, which are installed above window and door peters. There are already ready-made structures that can be purchased at the reinforced concrete shop. In this case, the product will be more expensive than the self-made design, besides, it will require additional costs associated with the delivery of the jumper. To save a little, it is better to do all the work on the installation of the jumper of the window turnout independently.
Content
- Types of jumpers over window and doorways
- Rules for creating jumpers over window and doorways
- Jumper over window and doorways do it yourself. Tools and materials
- Manufacturing and installation of formwork for jumper door loan
- Warming of the jumper of the window loan
- Pouring and reinforcement of the jumper
Types of jumpers over window and doorways
Before starting work, I would like to draw your attention to some of the features of such a product. The use of one or another jumper depends on the type of design and the intended loads.
For different types of structures use the following types of jumpers:
- rigel (jumper of a particularly large size. Special shelf located in its top, is used as a structural support);
- run (large jumper used as carrier);
- pencil (type of jumpers that do not play the carrier role. Look like thin designs (hence and name), which are often equipped with door loops);
- carriers (such structures take over all loads from the slab of the overlap);
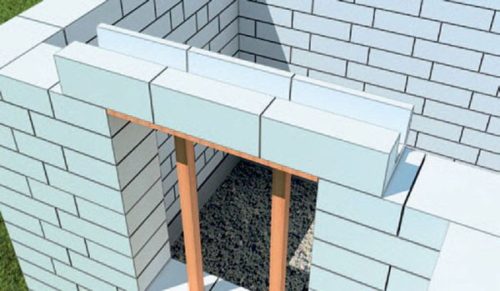
- undesome (jumpers, designed for the load from the masonry above the window or door loop).
For the arrangement of the passage in his own house, it is enough to mount an extensive jumper. In case the building is more than 2 floors with a height, you can set the boring type of design. In addition, you can mount the metal jumper, or assemble it above the brick opening. But we still believe that the most optimally and appropriate is to assemble a gentle jumper from reinforced concrete with their own hands. Thus, you will get a high-quality product that will not yield in its characteristics of finished products, but it will be cheaper.
Rules for creating jumpers over window and doorways
The process of making jumpers from reinforced concrete at first glance may seem fairly simple. To properly install such a design, you need to know some nuances that will help to spend all the work qualitatively.

By mounting the reinforced concrete jumper, pay attention to some subtleties of the technology, among which the following can be distinguished:
- the height of the concrete jumper is not more than 0.05 on the length of the door or window loop;
- the width of the jumper should be equal to the width of the wall;
- as a reinforce, it is better to use a metal corrugated rod with a diameter of at least 14 mm;
- formwork and backups are removed only 20-30 days after fill. This is necessary so that concrete is completely discussed;
- choosing the finished jumper, do not forget to tell the seller about the alleged loads and other features of your home;
- so that during the masonry process there is no drops, it is better to pour a jumper with a solution at the moment when its upper part will be in the same plane with the last layer of brick, aerated concrete, seven, etc.;
- in the process of filling the solution, use a deep vibrator. This will help to avoid emptiness in the design;
- to create jumpers in the bearing walls, use high-quality grave concrete.
If you are going to do everything yourself, then definitely pay attention to each of the above councils, then the installation of jumpers over the doorway will seem not so complex.
Jumper over window and doorways do it yourself. Tools and materials
To get a high-quality product, you need to use only the right material. In addition, it would be nice to get a good tool, then the work will pass faster.

For high-quality assembly and installation of reinforced concrete design, the following will be required:
- concrete mixer, deep vibrator, Bulgarian, electrolovik, screwdriver;
- hammer, knitting hook, mount, trowel, veser, shovels;
- roulette, level, stepladder, gloves, overalls;
- edged board with a thickness of at least 20 mm, timber;
- renormal corrugated rod with a diameter of at least 14 mm, knitting wire, metal corner, rolling 6-8 mm;
- galvanized nails 80-100 mm with a wide hat, wood screws, polyethylene film;
- studs, nuts, washers, mounting foam;
- sea sand, cement M500, small gravel, plasticizer, insulation.
In addition to the above, we advise you to conquer in advance, and find an assistant. Since the work will be partly at the height, then the additional pair of hands does not prevent you.
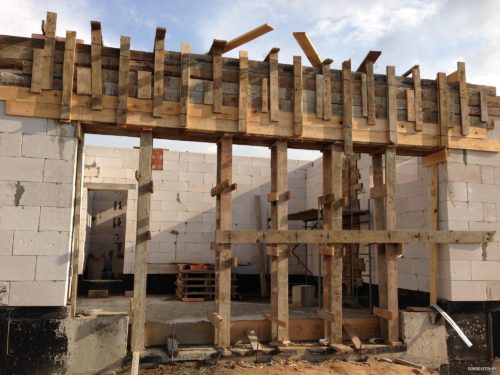
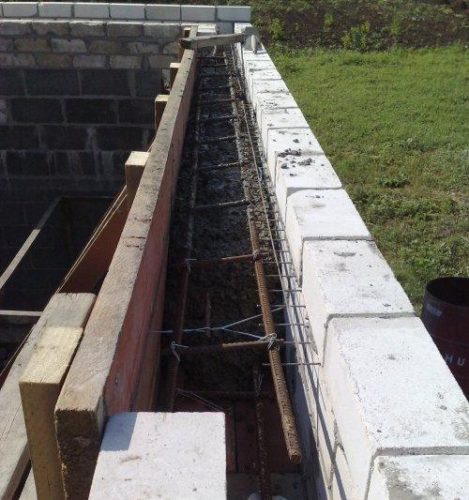
Manufacturing and installation of formwork for jumper door loan
In order to make a concrete jumper in accordance with all the rules, it is necessary to assemble the framework of the future design. This will require several boards and a bar that are chopped into shields. Shields are located below and from both sides in the form of a crushed letter "P". At the same time, the lower shield in length should exactly coincide with the width of the day.

In the formwork it is better to drill holes in advance. This will help subsequently fasten the shields on knitting wire. The inner part of each shield is squeezed by a polyethylene film so that the solution in the fill process does not flip into the slot between the boards. When the shields are collected, you can proceed to the immediate assembly of the formwork.
By mounting the box for the future jumper, go as follows, acting in the stages:
- Start from installing the bottom shield. Note that it should correspond to the size of the length and width of the day. From the floor to the outer part of the lower shield, the backups of the required length are exhibited. In order to accurately set the shield to the horizon, use the construction level.
- Now you can mount side shields. First, the shield is attached to the wall on the tapping screw or nails (depending on the type of coating). After that, the shield can be mounted to the bottom.
- In a similar sequence, the second shield of the formwork is installed. It is better to fasten them with self-draws on the tree.
- So that under the severity of the solution, the side shields are not falling apart, they must be securely fixed. To do this, you can through pre-drilled holes to stretch the knitted wire with a double ring. After that, take a small piece of reinforcement, and begin to pull the wire. You can also use the hairpin, which has been trained through both shields, which is fixed from the outer part to a wide flat washer with the nut of the desired diameter.


After the box is assembled and installed, it is checked for the presence of slots. If there are such, they can be built by mounting foam. Make sure once again in accuracy of vertical and horizontal levels. The distance between the inner edges of the side shields must correspond to the width of the day.
Warming of the jumper of the window loan
The layer of insulation should be set so that on one side it adjoins the jumper, and on the other - to the masonry. To do this, use minvatu with a thickness of at least 50 mm, however, this is not the best option. In the future, installing the window, you will have to put the slopes with bricks. Since mineral wool with foam has a rather low level of adhesion, the window frame will not be fixed properly.

We advise you to use extruded polystyrene foam as insulation. Such material is much dense of mineral wool. The sheets with a thickness of at least 30 mm are excellent. If you decide to use this insulation, then you will note that the gap between it and the window frame will be subsequently bleed by mounting foam. In this case, you will not have to warm the slopes.
Pouring and reinforcement of the jumper
Before starting concrete work, it is necessary to calculate the amount of material for filling the jumper over the opening. For this, it is sufficient to multiply the length, width and height, pre-measuring all the indicators using a roulette. Note that all measurements must be made from the inner walls of the shield. When calculating, do not forget about the presence of insulation inside the box.
To correctly pour a reinforced concrete jumper, you need to do the following:
- On the bottom of the formwork lay a few brick trimming with a height of about 30-50 mm. They will subsequently laid the design of the reinforcement.
- We start collecting a metal frame. The reinforcement rods with a diameter of 14 mm will be laid along. The wire rolling wire with a diameter of 6 mm is suitable as transverse nodes.
- The frame is placed in the formwork. Remember that it should not be located directly on the surface of the shield. Place the frame on brick trimming.
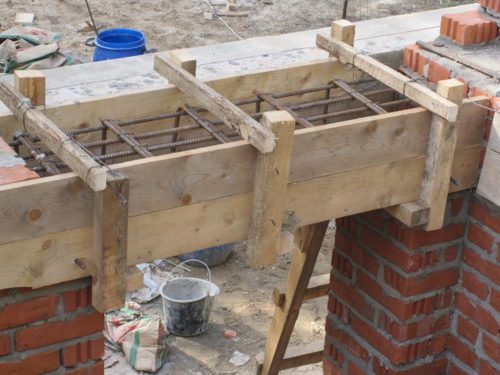
- To fix the frame inside the formwork, you can release a slightly transverse rod through the side shields. Subsequently, the discovering parts of the reinforcement can be trimmed with a grinder.
- Now it is necessary to prepare a solution to the fill. To make high-quality concrete from cement, sand and small rubble, use the following ratio: 1/2/5, respectively.
- The mixture is gained in the vest, after which they begin to sequentially distribute inside the formwork. It is better to pour everything, moving as if layers than immediately pour the whole solution. This will help avoid formwork deformation.
- Do not forget to use the deep vibrator. It will help remove bubble formations from solution.
- Now concrete needs to give time to hardened. It will take it from 20-30 days, depending on weather conditions. In the event that rain begin, the non-agricultural solution is better to hide the film from above. When you work in a hot, a concrete surface can be mixed with water.
- Remove the formwork by mounting. If the jumper is located in the gasline wall, it is enough to unscrew the screws, then dismantle the shields. Lastly, the bottom shield and backups are removed.


Professional Council: Collecting the framework from fittings, do not use welding. The branches must be connected strictly with a knitting wire. This design will be more reliable.

As you can see, make a jumper over the door or window opening personally - quite real. It is enough just to know the basic rules of work with reinforced concrete structures. Pay the choice of material for a metal frame and formwork. Special attention. Do not forget that the concrete must fully operate before starting to remove the formwork. Do everything consistently, then you will have an excellent concrete product that will not give way to quality costly ready-made analogue.
To better figure out the process of making window and door jumpers from reinforced concrete, we advise you to see the following video:


