
Anyone who came across the problem of arranging their own cottage or country house, sooner or later became the choice of sources of coverage of the local area. A huge range of lighting instruments will play an important role in choosing a lamp for giving. But keep in mind that all street lights have a fairly high cost, and will not always taste. It is better to make them yourself, thereby saving. In this article, we will try to carefully disassemble how to make a street flashlight with your own hands by performing everything according to the technical standards and requirements.
Content
general characteristics
To assemble a lantern on your own taste, you need to pay attention to some nuances and features inherent in every type of street lamps. All of them are different in shape and composite materials, but have a common feature. Carefully examine the characteristic of a particular type. It will help to decide on the further design of your lamp.

Types of street lamps
To equip the cottage with lighting elements, you must first understand their destination. Each species is intended for accommodation on surfaces of different types, and has its own design features.

For the illumination of the local area, the site and other elements of the cottage, the following light sources are used:
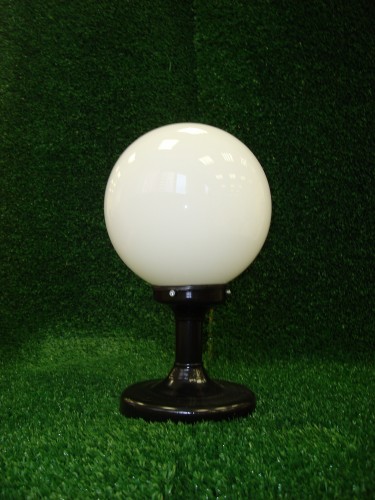
- "Torsher" - represents a rack with a height of 30-50 cm, on which the plane is placed. Most often they are mounted to the floor of the veranda. A variant of installation is also possible near the veranda to the ground. Such lamps serve to illuminate the local area, having a pleasant soft spectrum of the glow. There is a huge variety of different design forms of "Testers", but the classical remains - spherical. As a diffuser, a round plastic or glass ball is used, which cooled on the rack;
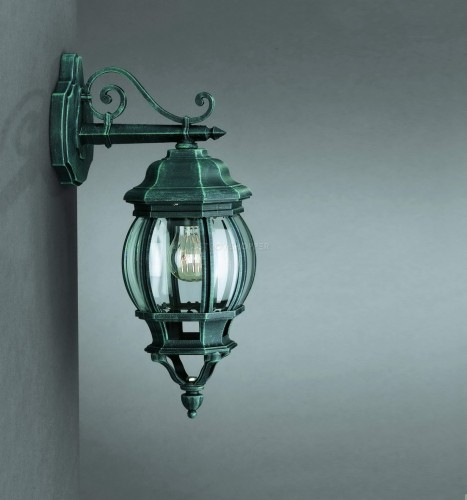
- wall-mounted - a classic version will be the lantern, made in an old-style style using wrought elements. Such lamps are installed on the wall next to the door. A variant of installing a wall light is also possible near the wicket or gate. In both cases, the lamp plays the role of illumination of a small area. Often, such a lantern is installed in a pair with a motion sensor;
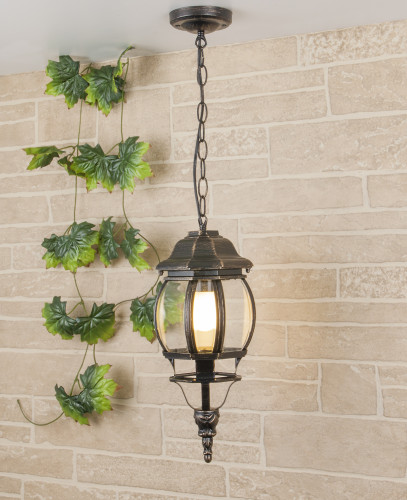
- suspended - represents a rope or chain fixed to the ceiling, to which the plane is mounted at the bottom. Most often, they are used to illuminate the veranda and arbors. The suspension lamp mounted on a tree branch will excellently light up the place at the bottom of the rest, harmoniously shook in your landscape design;
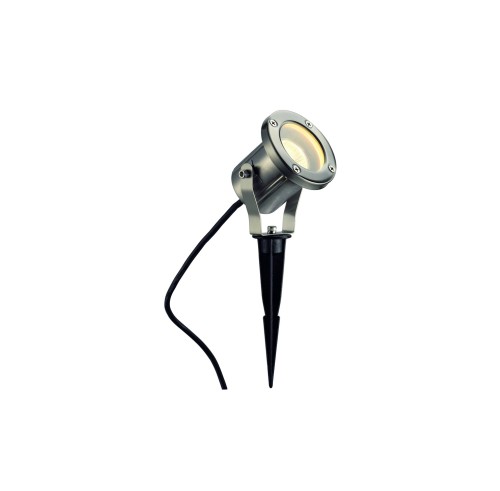
- soil - serve for the convenience of moving around the site, lighting paving paths, bushes and pedestrian alleys. They are installed directly on the surface of the Earth, which allows you to hide the wiring in the soil. Ground lights greatly highlight trees, statues, swings and other objects located on the plot. In such lamps, the light beam is directed most often from the bottom-up, and it has the ability to change the angle of inclination.


As can be seen, all street lights serve as the same goal - the lighting of the house and the local area necessary for the unimpeded and convenient movement along the site. A wide selection of models and design solutions will allow the light to be perfectly fit into the general view of your estate.
Sources of light
On the change of old street lamps, which shone due to burning inside the phytyl, impregnated with flammable material, came new light sources. Their wide choice and design will not leave indifferent any owner of the household site.

The following types of light bulbs exist as a source of light lamps:
- incandescent lamp. We do not advise you to use this source, since it is not resistant to temperature drops, has a very bright range of the glow, and consumes a huge amount of electricity. However, the incandescent lamp has a sufficiently low cost, which cannot but rejoice. Due to frequent replacements associated with burnout, the use of such a light source is unacceptable for street lighting;
- halogen lamp Provide excellent intensity and light transmission. It will not be very hot, besides, it will become a very economical and durable option. But note that such lamps are quite expensive and sensitive to voltage drops. In addition, halogen lamps do not tolerate dirt, which is able to bring them out of order;
- choice lED lamp It will be far from the cheapest option. But the huge advantage of such a light source will be: savings (up to 95% energy consumption) and long service life. In addition, LED lamps are placed in a durable case, which will reduce the likelihood of accidental damage. Another important advantage will be the lack of substances negatively affecting human health;
- solar battery, The power supply source of the street lamp will become an excellent solution for places in which the sun shines most of the day, for example, in beds or flower beds. Street lantern with such a battery is better to install in places where the wiring laying causes problems. The battery is charging in the daytime, feeding with solar energy. She leaves for about 12 hours. This lighting option carries more decorative function than practical. With the onset of the daytime, it automatically turns on. Since the lantern on the solar battery is dimmingly shine, then several are used immediately.

To select the desired lighting option, analyze the settings of the installation, lighting items, as well as weather features of your region. We advise for all types of street lamps to use LED lamps that initially require a circular amount, but in the future you will get rid of you from frequent replacements, while saving your tools.
Material of manufacture
Make an old wrought lamp with your own hands will be quite difficult. To make such a lamp, you need to have certain experience and knowledge that will help perform a forging in compliance with all technologies. In any case, an independently made flashlight will become the original addition of your site, and make your neighbors just envy.

In order to make the street lamp at home, such materials are used:
- wood It will serve as excellent material for the manufacture of a street lamp. In addition, you can use old boards and even firewood. Since the lamp will be located on the street, it will constantly succumb to the negative impact of ultraviolet rays, precipitation and insects. Be sure to treat wood with a special impregnation. This will help increase the service life, protecting the lantern from weather factors and fires;
- plastic - fragile and not particularly reliable material. The location of the lamp made from such a material is better to move the inside of the room. In an extreme case, some auxiliary elements of the lamp can be performed from it, but not the whole lantern;
- metal It will become excellent material for making a street lamp with their own hands. The use of galvanized sheet will help experiment with rounded shapes. Metal is a coarse material with which it is quite difficult to work. The flashlight made of such a material will serve much longer, since it is not affected by weather conditions. To give originality, color types of metal can be used, such as: bronze, brass or copper. But note that the manufacture of such a lamp will get to you "in a penny";
- glass - One of the most popular materials from which street lights are made. It is enough to find a bottle or a jar of suitable diameter and draw it beautifully. In addition, the glass lamp will shine brighter.

Naturally, the option is also possible when the design of the lantern consists immediately of three materials at the same time. Before proceeding to independently manufacturing a street lamp, carefully analyze the characteristic features inherent in one or another type of material. Then you will achieve a better result, and the lantern will last you for one year.
Installation of street lamp
Street Light Solar made with their own hands, to serve the local area not only a decor element, but also save a certain amount, because it does not need constant power, accumulating charge during the day. Wall street lamp, made his own, and is sure to impress the neighbors, moreover, will give a special "flavor" of your home. The lamp, made of paper, will also be original, but certainly not last for long. Choose the material to your liking, but do not forget about the characteristics and disadvantages of each.

Tool
To rid yourself of the extra difficulties associated with the assembly of the lantern for your garden, buy or borrow a neighbor all the necessary tools.

Personally to collect street lighting, will help the following set of tools:
- manual (bucket, a shovel, a trough, pliers, scissors and a hacksaw, wood saw, a knife, a set of screwdrivers, ruler, angle);
- the tool (drill with a set of bits, auger drill with concrete, Bulgarian, welder, soldering).
Availability of the necessary tools, can help you make the assembly and installation without much effort.
assembly Procedure
Street lamps made personally, differ in size and shape of the materials from which they are made. But pay attention to the sequence of actions, which is inherent in each type separately.

To create a street lamp with his own hands, there are step by step, using the following algorithm:
- Draw drawing lamp project. Mark all the corners of bends, as well as specify the color of the material and connection methods.
- Using the blueprint, prepare all the elements of the future canopy. Cut and bend metal sheets. Treated wood and cut as desired. Cut the plastic decorative elements.
- Using drawing circuit elements prepared assemble together.

This order of assembly will be true for any kind of street lamp and correctly formatted drawing, will make everything extremely accurately, observing all the necessary dimensions.
General principles Wiring
Before proceeding to the installation of lighting elements, analyze the characteristics of the soil in different areas, to determine the installation location, make sure that a number of high-voltage wires are not routed.
Measure the distance from the light to the electrical panel, from which it will be powered. Also note: the column height, the ceiling amount, the presence of multiple light sources. By measuring the distance required for the purchase of the required length of wire, add to the result of more 10-15%. Better to buy the cable VVG 2x1.5 designed specifically for such work.
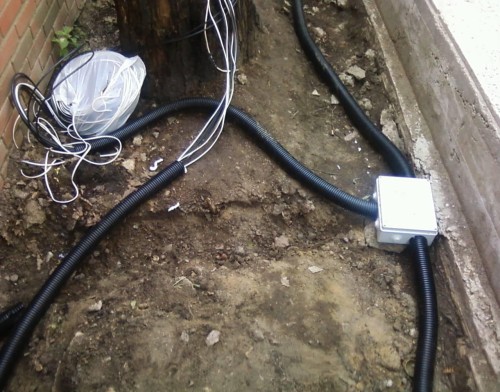
Buy a special corrugated sleeve 18-25 mm in diameter (depending on the amount of stretching wires). It must be made of metal, and having a silicone braid, which protects the cable from moisture and small rodents. Do not buy gofrorukav made of PVC, because it does not protect the wire into the desired extent.
Do not forget to buy the terminal block and cartridges, which are necessary for the liner and connecting wires to the light source. Choose a shoe designed for 5-10 A. To select the cartridge is better to determine the order which will be used bulb in your lamp.
In order to qualitatively mount wiring, use the following algorithm:
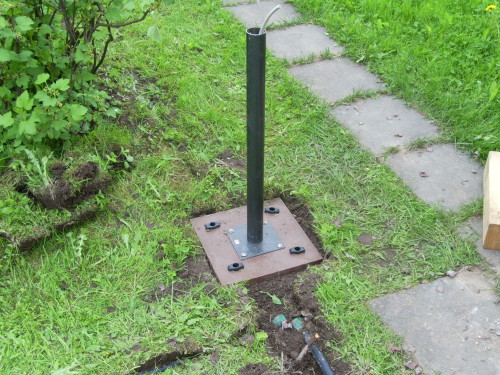
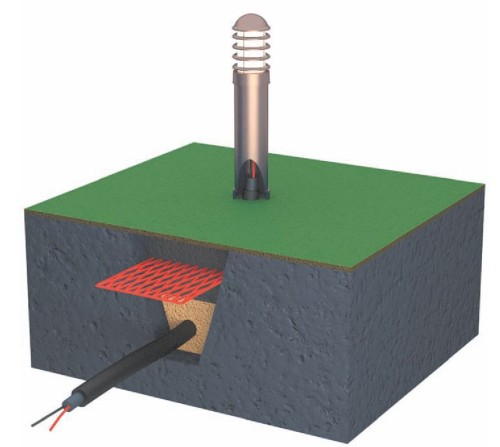
- At a distance of not less than 0.6 m from the house proroyte ditch depth of 0.7-0.8 m. The ditch will hide the cable under the ground and ask the route of.
- If you install the lights of the "lamp", the first set rack, and then begin to smuggle in their wire. Always leave the luminaire up to 0,5 m wire with reserve. To connect the ground lantern, simply bring the cable to the lamp and connect to the terminal block.
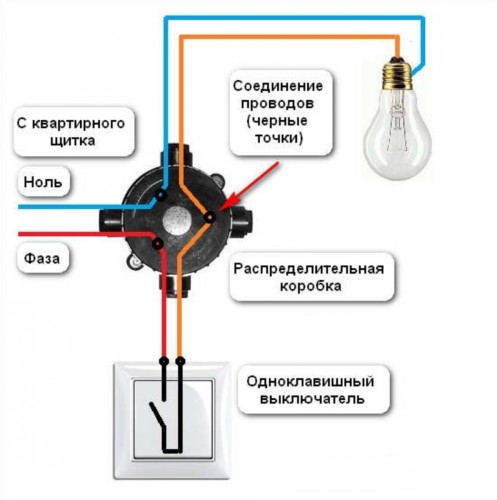
- Now, the lamp can be connected with a cable. To do this, use the terminal block and a screwdriver. Secure each core wire that extends from the ceiling, in a separate hole. In the same way, connect the connecting cables.
- For self-assembly lamp wall type, instead of the terminal block using a junction box, fixed to the wall surface. In this case, each connection must be carefully solder. All open connections, wrap the tape.
- Connect the wire so that the switch opens wire "phase". Most often, the wire marked in black, brown or white.
- A connected switch connect to the mains, after ascertaining the absence of voltage.
- The switch box may be necessary to install a special machine denomination, which will protect the light sources in the event of voltage fluctuations.
- Carefully check all connections and contacts. A few times, check the system performance. Check the insulation.
- Skip the trenches. When arranging a lamppost in soft soil, further strengthen the design with a cement-sand solution.
The following video describes an option to create a street lamp from the jar:
We hope that the assembly of the street lamp in its own drawing did not cause you with special difficulties. Performing work with your own hands, use any favorite materials and objects of life, used. It all depends on your imagination. Street lamp made personally, will be the original solution of the country exterior. Having made everything according to our own design, you will get a unique lighting element, not similar to any of those offered in the store.


