In various conditions, it is required to create partitions. This can be carried out in order to divide space in a private house, or within the office or a traffic point. As practice shows, a wide variety of materials can be used for these purposes, but the most practical option is the use of gypsum puzzle plates.
Content
- Installation of a partition from plaster discogeneous plates. Materials and tools
- Installation of a partition from plaster discogeneous plates. Marking
- Cleaning the room and surface preparation
- Plates for creating a partition
- Installation of partitions from plaster discogeneous plates
- Door installation
- Installation of plates to the ceiling
The laboriousness of works related to the creation of a partition is high enough, but experience for conducting such works is not required. Accordingly, it remains just to study the technology and try to prevent any errors in the process.
The prolonged part of the work lies in the preparatory activities, and often precisely from them and depends on the general success of repair activities.

Installation of a partition from plaster discogeneous plates. Materials and tools
For the installation of partitions, we will need the following construction resources:
- moisture-resistant gypsum puzzle plates (often their size is 667x500x100 mm);
- dry glue mix for mounting plates.
As for the tools, it is often the following list:
- roulette;
- plumb;
- building level;
- box and celma;
- hacksaw;
- plane;
- rubber hammer;
- brush;
- screwdriver.
In rare cases, there is a need for a drill and electric strokesse.
Installation of a partition from plaster discogeneous plates. Marking
As we have said, preparatory work is often becoming decisive in the process of creating partitions, and all in this process begins with room markup.
- To mark the markup, you need to have a roulette and plumb. With the help of these tools, all previously planned work plans will be observed. Also for applying markup exactly at the desired points you can use a laser level, which will allow several simplify the process.
- Experts note that when applying marking is most important to pay attention to the vertical lines. The thing is that when installing the puzzle plates, the vertical deviations will not be noticeable immediately. Accordingly, if the owners still venture to complete the work even with this problem, then it is impossible to exclude that after a while the design will come into disrepair.
- Therefore, in the case of the markup of the vertical elements, it is desirable to use a plumb, not a conventional roulette.
- First of all, control points are determined on the ceiling, after which you can move to the markup closer to the floor. All this is controlled by a plumb, since even minimal deviations from the point on the ceiling and on the floor are not allowed.
- If initially markup occurred with a roulette, then before the main works, everything should be checked with a plumb. If the deviations are present, then with the most likely it is a problem of roulette or other tool, but not a plumb.
- It is important to know that the markup should be the minimum of points or lines, since excess information does only harm and complicates the repair process.

Cleaning the room and surface preparation
Garbage and other contaminants present in the room can make a lot of problems associated with the quality of repair work. Perhaps a good solution will be the transfer of all things, including outdoor materials, to another room. This will allow some simplify the process, as well as create more free space for work.
Also, partitions are often created on the basis of elastic ribbon, so it is necessary to install it.
- The elastic noise insulating gasket can significantly improve the properties of the partition, passing through itself at least external noise. It is attached to the base of the walls, as well as to the surface of the ceiling. For installation, a binder solution is used.
- First of all, the solution is applied throughout the perimeter, where the gasket will be located. Most often it is not the width of the elastic ribbon, but the duration of the whole partition.
- Immediately, without losing a single second after applying the solution, styling elastic ribbon is carried out. At the same time you need to check the horizontal surface. The thing is that after applying the solution, small tuberculk can form, negatively affecting the final result.
- After mounting the elastic ribbon on the floor, it is attached to the rest of the surfaces, which we talked a little higher. Again, the most important thing is to control the position of the material and the absence of tubercles.
Experts recommend to lay the elastic ribbons using roller. You can spend several times with this tool on the surface of the ribbon and get the perfectly flat base for the partition.
If the base is uneven, then you will have to perform several steps of work to bring everything in proper condition.
- First of all, the entire perimeter, where the partition will be installed, must be cleaned. You should throw away the entire garbage and clean the surfaces.
- Immediately after marking the places where the partition will be located, concrete-contact is applied using a painting brush. Next, you can immediately use the cement-sand mixture, which the floor is aligned. The thickness of the layer should not exceed 30 mm.
- After drying the tie from above, you can apply a primer layer. Next, when all this is driving, you can make the styling of the elastic ribbon.
As for the width of the elastic tape, then if the partition has a thickness of 100 mm, then the ribbon material must be limited to 90 mm.
To facilitate the installation process of the partition, you can use a device called Metrostat. It is installed on some kind of corner of the future partition, after which, with the help of the clamp on the rail, its extension takes place to the ceiling. Further, fixation takes place, as well as additional control with the help of a construction level located on the rail.

Plates for creating a partition
It should be borne in mind that the preparatory work in this case concern and the puzzle plates. The bottom line is that the installation of this material may occur groove up. With this scenario, it is required to cut a spike using a hacksaw with a large tooth.
Also, the difficult task is to align the surface on which the spikes were cut. Most often, these irregularities may be more than a serious threat to obtain a reliable partition.
Puzzle plates are produced based on plaster, therefore, it will be easy to process such a material. But at the same time it is worth understanding that it is necessary to damage this surface - the problem is elementary, so it is worth being careful.

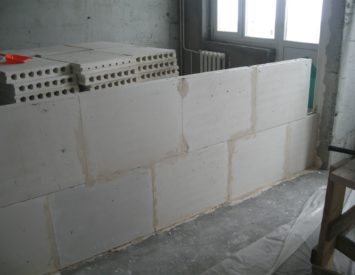
Installation of partitions from plaster discogeneous plates
It is necessary to note in advance that the installation of puzzle plates does not have any serious restrictions. It is possible to carry out the installation and the groove up and spike down. However, the first option is preferable because the convenience of applying the solution.
The solution that is necessary for creating a kind of base is applied to the elastic tape, or simply to the floor, if there is no need for insulation.
- If the laying occurs from the angle, the binding solution should be applied immediately under two plates.
- The first stove is located on the Metrostat. Accurate alignment is accounted for this device, and if necessary, adjust the initial values. During this process, you need to catch up to the end of the material with a rubber hammer, which will allow a little to align the slab horizontally.
- Setting the next plate with a spinal spike occurs in such a way that it is tightly adjacent to the first unit of material. Again, to ensure the fit of this slab to the rest of the surfaces, you need to arm a rubber hammer and tapping at the necessary directions.
- After installing the plates, the solution is removed by a solution, which can create problems if it is not lost on time.
- The most difficult thing in the process is an integral plate connection. The situation is such that partitions can be sufficiently specific, so it is often necessary to combine 3 plates with each other. In this case, the same installation occurs, as we indicated above, but in addition occurs the tapping of two lateral discogeneous plates. This allows you to provide sufficient density of the future partition. Also, a good solution will first install the side slabs, and only then mount the central, which should be tightly logged in the installed framework. Ultimately, this most central stove should create 2 symmetric angle of 90 degrees.
- Fastening can occur not only with the help of binder solutions, but also based on steel corners. Practice shows that it is best to immediately combine the two above-mentioned method of installation to obtain the most reliable result of the attachment.
- After installing each single slab, you need to take the construction level and control the position of the material. While the binding solution is not yet frozen, you can produce small adjustments.
- Immediately after we installed the plates around the perimeter (equipped the entire first row), you need to create places for installing spikes. These are the very corner connections that we spoke a little earlier.
- To pose into the groove, it is necessary to make 2 feeding, and ultimately the gap will be equal to the spike width. Now we have 2 perpendicular grooves that are ideal for plates of the second row.
- In this process, as in the case of brick masonry, you need to create a breakdown of vertical seams. The essence of the task is also to save the material, and not make it cutting when laying near the walls, so the offset compared to the past can be minimal.

Door installation
The problem of creating partitions is often lies in the fact that the standard length of the puzzle plates is 667 mm, while the doorway has a width of 900 mm. Therefore, if there is a need to create a doorway, you need to purchase plates whose length is 900 mm.
The essence of the idea is that with the standard plate length we get a fairly unreliable design, so you have to use a special jumper, for the arrangement of which there will have to make a lot of effort. In the case of wide discharge plates, the jumper acquires a slightly different design, which creates favorable conditions for obtaining a qualitative result. Despite this, it will still have to perform a cutting tile, since the blocking of the material in the places of the opening will be about 440 mm. The cutting need to be performed is verified, since small deviations can significantly affect the external component of the design.
Jumper mounting process Next:
- A plywood or board is used as the main material to create the jumper. This design should have a P-shaped form.
- The mounting of the P-shaped jumper occurs to the ends of the partition slabs using two screws, and on each side. In parallel, it is necessary to control the horizontal of the reference part using the construction level.
- A knitting material is applied to the ends of the slabs, then the first top plate is set, which is tightly pressed against the jumper. Again, the construction level should be involved in a small period of process.
- The second stove above the doorway is established on the above principle.

After the partition is fully equipped, the jumper can be deleted. It is done simply enough, but at the same time it is necessary to take into account the fact that caution in this process is clearly not excess.
Installation of plates to the ceiling
Experts recommend to leave a gap between the ceiling and the finishing layer, which will be approximately 20 mm. Thus, the completion of the process occurs in the following order:
- The space that we received after creating a partition from the puzzle plates, you need to fill out using the mounting foam, however, all the dust and other contaminants are removed before it, which can significantly affect the final result.
- After using the mounting foam, as well as the pouring, the residues need to be removed. For this case, you can use a regular knife, but it is necessary to keep it at some angle so that there is a small recess. This is the most deepening then will be filled with putty.
- Well, ultimately the seal of this very junction takes place using putty. Ultimately, the surface should turn out to be smooth.
You can also carry out the same works, but somewhat in a different way:
- The process of mounting the finishing layer of plates begins with marking on the material. Ultimately, there should be a crucible tile on 2 parts at an angle of 45 degrees.
- By markup, using the hacksaw, there is a sawing material to 2 equal parts.
- On the penultimate number of the partition, the layer of binder is applied, and then the cropped tile is installed in such a way that the space of the sleeve was directed upwards.
- Ultimately, the empty gap, which turned out as a result of the work, is filled with putty. The material is applied by large layers to ensure high density.


