
Everyone who has ever been engaged in an independent finish of his own apartment, probably faced with the issue of arrangement of doorways. A new material came to replace the cumbersome brickwork and monolithic forms, allowing all installation work quickly and easily. Plasterboard will perfectly cope with the question of the decoration of arched outlook, since it has a number of advantages. This material is very often used to create radius structures and other complex forms. In addition, it is easy to work with GLC, which allows you to spend all installation work on your own, while safely saved.
Content
General characteristics of Arok.
Arch as part of the architectural form, appeared in the second Millennium BC. At that time, in ancient Mesopotamia, the construction of buildings has grown into something more. The houses already served a person more than just a box that protects against external factors. More wealthy residents tried to stand out among ordinary citizens, and began experimenting in creating original forms for some parts of buildings. The experiment also affected the doorways. Since then, technology has moved to ancient Rome, and then to Europe.

On the replacement of the already arrived rectangular doorways, more and more new design solutions come, characterized by a special style and outlines. If you want your room or apartment to look different, to begin with, it is necessary to decide on the future design of the doorway. If the interior style will range with the design of the Arch, the room will look "absurd." Therefore, first, it is better to set a common style for all elements of the room, so that the apartment is turned out to be decorated in your personal taste.
Arch design selection
If you decide to make arched opening on your own sketch, we advise you to pay attention to the main types of this architectural structure. All of them appeared in the process of forming a style at different times and in different peoples. Each style adopted certain outlines of the previous one. Often you can meet and mixed style. In any case, no one has canceled experiments, the future species of the arched loyalty and completely depends on your imagination and skills.

Next, we suggest you familiarize yourself with the main design options for Arches, from which you can select the following:
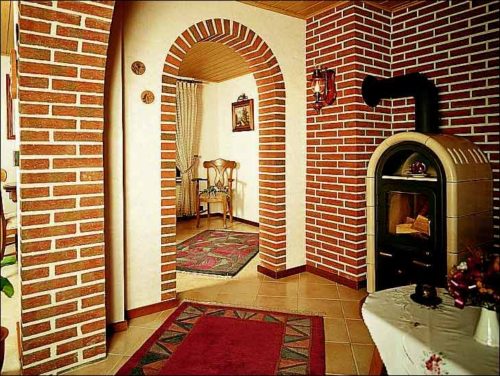
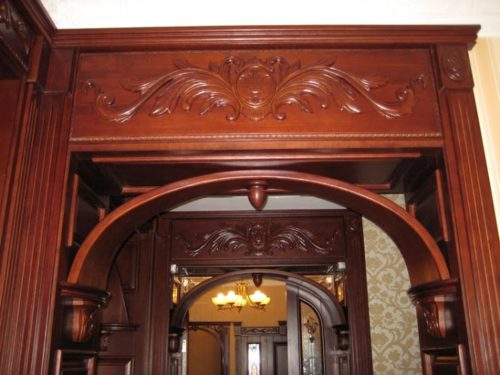
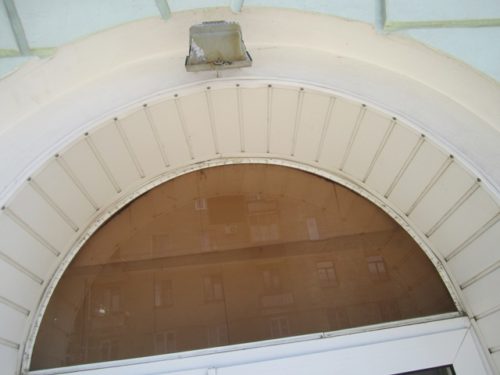
- dome (classic variant of the arched loop finishes. It is a symmetric semicircle, with minimal finish with embossed elements);
- asymmetric (in this case, the arch is made with a displacement of the doorway center. It is also a fairly common option, because it does not require complex finishing works);
- gothic (outlines are very similar to the gothic architecture style. It has more sharp forms that are achieved by connecting two planes at a low angle);
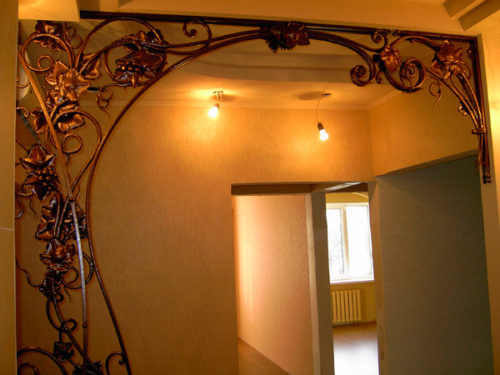
- openwork (arch has through holes that are located along the door of the door. It often contains glass elements, such as stained glass windows, mirrors and others);
- multi-level (contains several elements located in different planes. Materials are most often used by plasterboard, which is painted in different colors after the finish finish. Such arches are often called designer, as they can be made using several design solutions).

If you decide to mount the original arched opening in your apartment, then it is better to choose several options. In case you independently make a sketch of the future arch, then your design will differ in particular originality. It is better to first experiment on paper, after which it is allocated for yourself 1-2 suitable options. Do not forget that the arch can be separated in almost any way: tiles, painting, wallpaper, decorative plaster, drawing, stencil. With a special desire, you can combine several options to one, but it is better to experiment again, since they do not always harmoniously combine with each other.
Selection of material for arch
The modern building materials market includes a huge variety of campaign options. The choice of this or that type is due to the peculiarities of your room, as well as its location. A wide variety of mounting elements and mixtures allows the design of the Arch to combine several materials, without spoiling the overall interior of the room.
To better get acquainted with the materials that arched the arched outlook, we suggest you pay attention to the following types:
- Stone. This species can be attributed: tiled, porcelain and marble plates; Brick, artificial and natural stone; concrete. The finishing of these materials is strongly distinguished in the total row, since it often involves an additional increase in the doorway, which is not always possible. This is due to the large weight of the material.
- Metal. In order to separate the arched punishment, you can use both ordinary metal and its color views. But note that this material is expensive, besides, you will have to be pretty sweat over the assembly and installation of the frame, since the installation of metal structures often involves welding work.
- Wood. Excellent material for your arch, as it has excellent indicators of ecology. With proper processing, wood coating will serve not one dozen years. It is worth paying attention to that the tree has a huge variety of varieties that differ from each other density, durability and other indicators, among which can be distinguished by the main price. The life of the wood directly depends on its value, so it is better once again think about the choice of this material.
- Plastic. PVC panels are mounted very quickly, while have a low cost. But note that by choosing this material, you do not protect the arched work in due measure, since plastic is unstable to mechanical damage.
- Sheet material. This species can be attributed: plasterboard, clay plate, chipboard, phaneur, fiberboard, aquapanels and others. Mounting such material is much simpler and faster, and the decoration will not require a thorough preparation of the foundation.


In addition to all the above methods, materials can be combined by any way you like. There are also ready-made prefabricated designs of standard size, but most often they are still needed to be customized for the required size. To give the Arch a special kind, it is possible to mount the LED backlight. Decide on the design of the future arched loyalty, select the desired material. Consider the cost of finishing material, as well as the presence of additional design elements. It is better to first draw a sketch and a little experiment, then you will pick up an optimal option that will delight you for a long time.
Arched with their own hands. Step-by-step instruction
To make the arch itself in the doorway, it is necessary to prepare to prepare for a start. If you decide to mount the corner for the arched loyalty with your own hands, it is better to immediately get everything necessary. Next, consider the method of assembling and installing the Arch, on the example of a plasterboard coating, using a metal frame. We chose this method that we consider it the most optimal. Glk is simple in the finish, besides sufficiently cheap. Assemble the "skeleton" of the future of the outlook by anyone who can keep drill and level in the hands.

Tool and consumables
If you are going to do everything yourself, then without a utility tool simply do not do. We also advise you to purchase all the consumables in advance to save yourself further from unnecessary trips to the construction store, which you will spend precious time.
To assemble the arch of the doorway from drywall, use the following tool set:
- perforator, screwdriver, Bulgarian, mixer, electrolovik, stapler;
- shirling, hammer, metal scissors, pliers, construction knife;
- spatula, Kelma, Needle roller, Holder of skins, bath, shoulder, brush Flace, McList;
- rule, construction level, plumb, roulette;
- gloves, special equipment, safety glasses, respirator.
Such a simple set will simplify the process of assembly and installation, besides will be useful for the further finishing of your apartment.

To be fulfillment, it is better to immediately buy all the finishing material. Buy only high-quality fasteners and plasterboard, then the arch will last you for a long time.
By installing the arch in the doorway, take the following materials:
- plasterboard (it is best to suit the arched version of HCL with a thickness of 6.5 mm. Such a sheet is specifically designed for radius structures that will not succumb to additional loads);
- metal profile (UD 27, CD 60, UW 50, CW 50 and others, it all depends on the type of construction and the intended load);
- fastening elements (suspension P 125, dowel-nail 6x40, self-tapping screw 25x3.5, seed 9.5 mm, liquid nails), thin nails with a narrow hat;
- metal perfoch, arched PVC corner;
- sherryanka tape (also suitable paper or fliselin), seam sealing solution;
- malyary Scotch, Pencil, Kalay Staples 8-12 mm;
- grinding, grinding machine (p 60, p 80, p 100), shplanke (dry or finished acrylic), sealant for sealing seams, paint or wallpaper.
Such a set of tool and material will allow you to qualitatively mount the arched discourse without resorting to additional efforts. The list can change slightly because it all depends on such parameters as: the finish finishing material of the coating, the presence of additional design elements, as well as the location of your arch. Match all these parameters to pick up the optimal set. Our list is relevant for plasterboard arches indoors, which we will paint. This method is the fastest and inexpensive, and the finished coating is practically not inferior in quality to other materials.
Creating an arc radius
Regardless of the material selected - whether it is plywood, chipboard or drywall, the radius for curved areas of the design is created by the same principle.
To create a radius from HCL, use the following ways:
- With the help of rope and pencil (Also suit a piece of metal profile or wooden rail). On the one hand, to the rope, tie a pencil, and to another, take a screw. The distance from the screw to the pencil should be equal to the value of the radius of the future semicircle. Memore from the middle of the ceiling at least 100 mm. From this point you will be repelled when you draw a circle. Screw the screw in the plasterboard in the middle of the arch, is equidistrated from each wall. Stretch the thread, and accurately pull the pencil around the circumference. Now you can cut off the sheet along the planted line.
- With the help of a flexible item. Perfectly fit a piece of plinth or plywood. Attach the long end of the plinth to the plasterboard edge. Give it the necessary form, after which you circle it on the one hand to draw a semicircle. It is better to do it together - one holds a blank, the second draws.
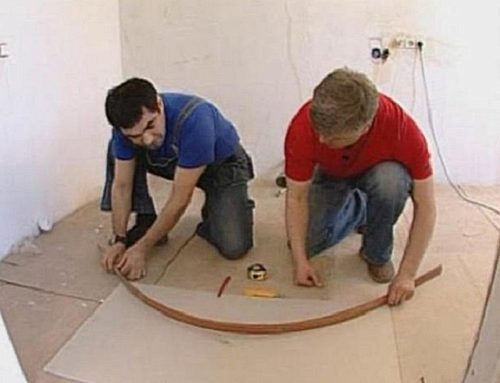


The choice of a method for creating a radius element entirely depends on your skill. The first way will be easier if you are working alone, to fulfill the second - ask the partner to help you.
Building carcass arch
Installation of reliable base for the future design is an important stage in arched arocardial arocardial. Choosing the right material to create a "skeleton" Arch, you will receive a qualitative basis that the interior of your apartment transforms. And with the correct surface finish, your arch will become unique, becoming envy to friends and neighbors.

To collect a reliable basis for the arch, go as follows:
- Transfer the outlines of the future Operation in full compliance with the size and forms specified in the arc sketch. Follow all lines with a pencil. Move all values \u200b\u200bto the floor and walls to visually present the scale of the future design.
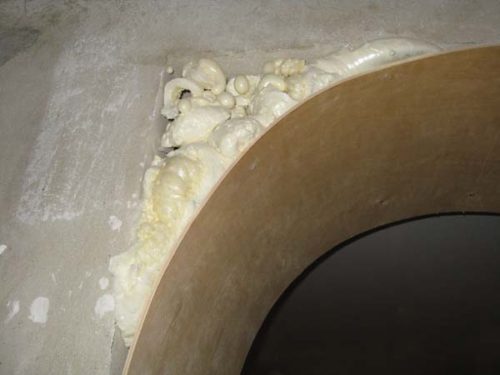
- Remove the repellent parts of the day, if any. Slices of fittings cut with a bulgarian with a disc on metal. Concrete bulbs escape with a hammer or perforator. Old door box dismantle.
- Start mount the frame from the bottom. Planks must be parallel to make the future design to take the right outline. Install in the floor guide profiles at the required distance from the wall. Cut the necessary piece with a grinder or scissors for metal, then fasten it with the perforator and dowel-nail. Step 300 mm will be enough.
- In the upper part, in the same way, install the second pair of guides. First drill a hole, then insert a plastic dowel, after drivening the nail. Do not forget about layers parallel.
- Now you can install rack profiles. Cut them on the needed length so that they are fluent in the guide, but did not fall out of it. Check the vertical plane plane, then secure it from each side to the guide. You can do this with a screwdriver by screwing "seed" through both profiles.
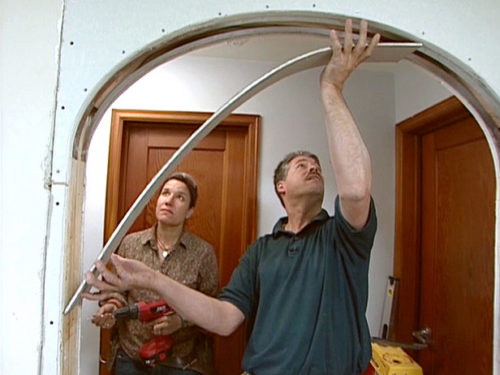
- Depending on the configuration of the Arch, start mounting the top of the frame. It is often done with the content of radius elements, about the method of which we talked above. In our case, you need to cut a profile to bend it under the desired radius. It is better to cut two profiles at once so that the structures side are subsequently acquired the same outlines.


Qualitatively assembled metal frame - the key to the long life of the arch. By installing qualitatively, you relieve yourself from additional difficulties associated with the restoration and alteration of the design. Rehend to this stage with all seriousness.
Installation of plasterboard
When the "skeleton" is installed in the doorway, it is important to enjoy it correctly. The more accurately the metallic frame was assembled, the smaller the plaque to spend on the finishing of the surface.

- Now the plasterboard should be mounted at the top of the portal. To do this, secure on the half-sheet profile of the plasterboard. Use screws for metal 25x3.5. Note that the fastener hat should go into a sheet of no more than 0.5-1 mm.
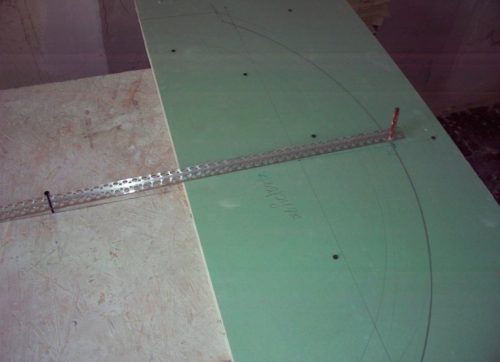
- With the help of a piece of profile, equal to the length of the radius of the future arch, applied the outline of the arches to GLC. Also fit the thread and pencil. We have already described this method above, so there is no need to explain everything again.
- Now, on the lined line, we begin to cut off the sheet. Take advantage of a hack or electric lobby. Be extremely attentive at this stage and be patient. Move slowly to the outlines were smoother.
- Sliced \u200b\u200bpieces of profile Start mocked in flush to the radius part of the sheet. Start from the middle and move to the edges, consistently bending the bar on the cut. Make it all exactly that the arched outlook is attractive.
- Similarly, mounted the second part of the arch. Observe the parallelism of the lines. Do not forget to use the level.
- Now you need to connect both parts. To do this, you need to strengthen them with a transverse profile. Cut several pieces of metal strip, then start screwing to a radius profile with a step of 200-300 mm.
- Measure the floor from the floor to the middle of the arch, if the height of the future design allows. If not, then cut the GCC on the length of the straight vertical parts of the design without bends. After that screw the drywall to the frame.
- To install the curved part, cut a piece of the required width and take the parallel lines across parallel. The step should be no more than 50 mm. It all depends on the benutness of our design. To create more radius parts, step must be reduced. You can also use a needle roller, which you need to walk along the sliced \u200b\u200bpiece of GLC; After that, the sheet is mixed, give the necessary shape and give dry.
- When the part is ready, it is mounted to the bending area of \u200b\u200bthe design. It is better to use the help of a partner at this stage, since the item can be brought or completely broke into two parts during the installation.


Now that we have got a ready arch in the doorway, you need to give her a pleasant appearance. But before doing this, you need to prepare everything to the finish finish.
Arched Opera
Everything is ready for the final stage, so it's a small thing. Consider the method of finishing the arched outline on the example of the color of the surface.

To paint the arch in the color you like, act as follows:
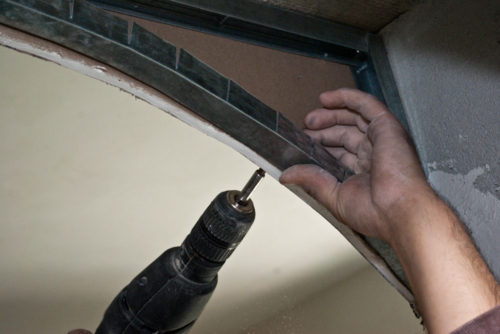
- Mount the metal perfoch in the corners of the direct parts of the structure. For curved areas, use a perforated arched PVC corner. In both cases, the angle is fixed to the plasterboard with a construction staple on the brackets. It is so that one part of the brackets passed through perforation, thereby pressing the corner to the plasterboard sheet.
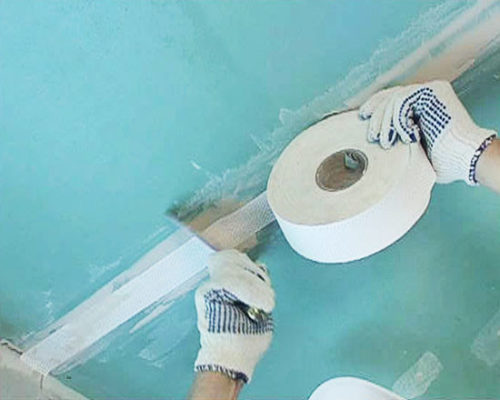
- Sheet joints strengthen. Use the sickle or any other reinforcing tape. Glue the paper along the seam on the PVA, pre-embedding the junction with the putty. Fliseline tape is fucked on the plated solution, consistently pressing.
- The whole design must be treated with a primer, it will help to achieve better adhesion. Using a roller or maclovers, apply primer to the entire surface.
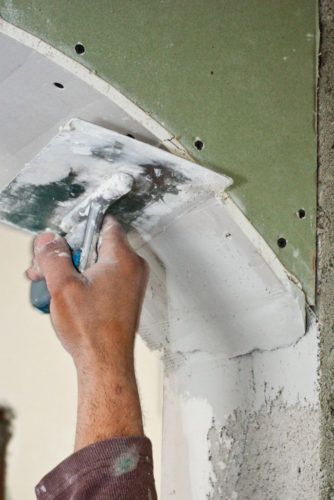
- Armed with the shtlock, start aligning the surface. Do not forget that perfoch should be completely closed with a solution.
- Sand the surface to get rid of rude areas, after which it is again proper.
- Now you can paint the arch. For wide sections, use a roller, for a narrow - flint brush of a small width.


The final finishing of the surface is entirely hanging on you. There will be it wallpaper, or artificial stone, choose to you. The main thing is to properly prepare the basis and calculate the estimated load on the design.
As you can see, assemble and mount the arched opening is easy enough. It is enough to take into account all the parameters of the future design, to correctly carry out measurements. It is also important to choose the appropriate decoration material and auxiliary tool. In any case, the end result directly depends on your skill and fantasy. Do not be afraid to experiment, then the result will be for joy.


