After installing new windows, the old slopes are in almost any case come into disrepair. This is especially true of brick houses in which plaster was used as a finish. When dismantling the old window, it usually falls completely, leaving a bare brickwork. In order for the room to look more neat, the slopes must be restored. It can be done quite independently, while not making "supernatural" efforts. A large selection of available finishing materials made it possible to use various techniques for the restoration of slopes. About how to properly restore slopes for plastic windows with your own hands - hereinafter.
Content
Restoration of slopes by applying plaster

This method is perhaps the most difficult and long, however, it is he who brings the most stable and beautiful result. The plaster will not only allow you to restore the slope, but also provide good heat and sound insulation. Restoration of damaged sections of the window opening with the help of applying plaster can be divided into several stages.
Preparation of materials and tools. For work on the restoration of slopes with their own hands, with the help of plaster, you will need:
- Drill with a nozzle mixer for mixing the solution.
- Set of spatulas.
- Stucco with a plaster grid.
- Plaster.
- Putty.
- Paint is water-emulsion.
- Roller for painting.

Procedure for installation work:
- Preparation of discovery to recovery. After the installation is completed and before the start of work on the repair of the slope must pass at least 3 days. During this time, the mounting foam should finally dry, which will ensure the fixedness of the window block. Initially, you need to crop all the protruding pieces of the mounting foam. To do this, it is necessary to neatly cut off its stationery knife. Its thin and bent the blade will allow you to cut off the foam residues to the level with the window block. At the time of work, you should not remove the protective film from the window frame or the windowsill.
- After removing the foam, it is necessary to remove the remains of the old plaster, which can be lagging behind during the dismantling process of the old window block. Finding the stucco sections of the plaster are very easy. It is necessary to simply cut the whole slope with a small hammer. Damaged sites will be published by a ringing sound. They must be knocked down with the help of a hammer.
- The whole slope is cleaned from the remnants of the construction garbage and dust, then ground. The primer is necessary for the best adhesion of plaster with the surface. The projected surface must completely dry. To do this, you may need up to 4 hours depending on the time of year.
- Stuccoing of slopes of windows. As soon as the primer dries, you can prepare a solution of plaster. If such a slave is performed for the first time, it is better not to prepare a lot of solution so that it does not grab before it is applied to the wall. The consistency of the solution should be quite thick so that it does not drive from the surface, but it is easy to smooth with a spatula. A small amount of putty is applied to the spatula. It is close to all the places on which the old stucco can be removed from the remaining. Smoothing the plaster must be carefully so that there are no bugro.
- After the end of the work, it is necessary to leave the surface to dry. This may take up to 1 day depending on the composition of the solution. After complete surface drying, it must be sanded to get rid of irregularities.
- Next, the old paint or whitewash is removed from the surface of the old slop. This is done with a wet rag. After that, the slope is allowed to dry and soak. After drying the primer, you can start applying putty. It has a smaller grain size in comparison with plaster, which provides a smoother surface.
- Spacure is applied using a wide spatula to the entire surface of the slope. After the end of the work, it is given to dry and rub with the help of a skirt with a skirt. If, when stomaching, it was revealed that there are furrows on the surface, they are sealed with a solution, with a more liquid consistency. To do this, you can use a small plastic or rubber spatula.
- After drying, the putty is rapid and ground. As soon as the primer is driving, the slope on the windows is fashionable to paint. To do this, use water-emulsion paint. Apply it with a roller in several layers to achieve uniform color without spots.
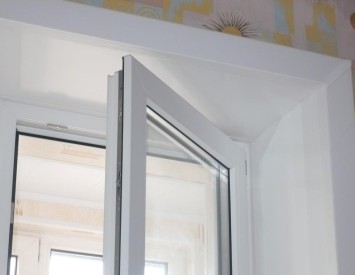
Installation of slopes on plastic windows

This option is one of the simplest. Due to the smooth surface of plastic panels, the slope looks quite attractive. At the same time, plastic is the most unpretentious to care. It can be easily washed with detergents without loss of initial appearance.
The opinion is that there is absolutely any plastic panel to restore slopes - erroneously. It should easily withstand the effect of ultraviolet, as well as be resistant to mechanical damage. Recently, these goals use plastic sandwich panels for slopes of windows, the reverse side of which has a coating from the insulation, most often from polystyrene foam.
Before starting the installation, it is best to remove the remains of the old slop.
To install the discovery, you will need:
- Starting PVC profile.
- PVC panel.
- Wooden rail.
- PVC platband.
- Acrylic white sealant and gun for applying it.
Procedure for installation work:
- Installation of plastic slope from installing a starting profile around the window perimeter. To do this, markers are placed on the same distance from the edge of the window on the frame frame. On these labels, the starting profile is installed. With the help of self-tapping and screwdriver, it is screwed to the frame.
- Next is the case of a wooden plank along the edge of the window opening. To do this, with the help of a drill or a perforator, the holes and the planks are mounted with the help of a quick installation dowels.
- The next step is set up the top panel. With the help of an electrolybiz, the panel is cut into the width of the slope and is inserted into a narrow end to the starting profile, and the cropped end is screwed to a wooden bar using self-samples. Next are installed side panels. The process of their installation is similar.
- After the process of installing panels is completed, a decorative platband is installed throughout the perimeter of the slope. Before installing the angular platform, its docking ends are cut at an angle of 45 °. Next, the platbands are simply snapped on the panel.
- The last stroke will cover the gaps between the surfaces with the help of acrylic sealant. He will not give moisture to fly inside the discovery, which will significantly extend its service life.
- Tube sealant charged into the gun and carefully applied throughout the perimeter. Then, with the help of a special small spatula, the sealant is smoothed to look carefully. After that, the decoration of slopes with plastic is over.
Finishing of slopes of windows with drywall

Plasterboard is one of the most commonly used finishing materials. Its positive parties can be safely attributed to a relatively low price, simplicity in processing, good performance.
Plasterboard is installed in two ways:
- Installation on the profile.
- Installation on glitter glue.
The first method is quite rare, as it implies the mounting of the L-shaped steel profile to the metal-plastic frame frame. In the case of an expensive window profile or wooden window, it is unacceptable.
On the perimeter of the window frame using self-samples, the profile is mounted. The next step is cut backs of predetermined dimensions. The panel is inserted into the profile and shape with a knife. Then, in a place where the slope is most damaged (usually closer to the window), an installation foam is applied, and the plot where the slope remains is applied for drywall glitter. Then the panel is installed and fixed.
After installing all panels, their surface is ground. Then the panels are putty. After drying the putty, the surface of the drywall is ground and painted with water-free paint.
The second method is most common among masters. If the slope is badly damaged at the window of installing the window, special brazers are installed for fastening, which can be made from plasterboard waste.

In order for the glue not to drive from the surface, the remaining part of the slope can be made to the hammer deepening. Then the glue is mixed. The shelf life of the glue for drywall is about 30 minutes, so it is impossible to slow with the panels. The glue must be applied, do not regret so that when pressed the panel, it could fill all empties.
First, the side panels are installed, which will serve as an additional support for the top. The panel is pressed against the wall and light tapping lines. The level of installation of plasterboard is checked by the level. After installing the top panel, the glue is allowed to dry a bit. So that she does not want, it will need to hold a little.
Next, drywall is ground using a roller or brush with primer deep penetration. After it gets dry, the finish putty is applied. To do this, it is better to use a wide spatula. As soon as the putty is driving, it is rubbing the grid for the grout. Small "flaws" close up with a more liquid solution using a rubber spatula and after drying again rubbing. Next, the surface is ground, and after drying the primer, it is painted with water-level paint in several layers. If there is a small gap between the frame and plasterboard, it is closed with acrylic sealant.


