Shower booths have recently turned from the "wicker of foreign civilization" in a frequent attribute of domestic bathrooms. Despite the habit of the population that did not think of the apartment without a bathroom (massively cast-iron volume under 200 l), shower cabins quickly gained popularity, despite the relatively high cost.
Content
Characteristics of shower cabins

The positive sides of this "Device" quite a lot:
- In conditions of small-sized apartments, the installation of a full-fledged bathroom practically deprives the bathroom of the place for maneuver. There is simply no area remains not only for the washing machine, but also in some cases for a washbasin. The shower cabin perfectly solves the question of the lack of area, as it takes much less square meters. By installing this accessory, you can quite find a place for the rest of the necessary items.
- Water saving. In the conditions of a constant rise in price of water, smoothly, as well as energy on its heating, the savings of the latter becomes more and more relevant. When making a soul is spent 3-4 times less expensive hot water in comparison with the adoption of the bathroom. Of course, "soaring in warm water" in the shower room is unlikely to succeed, but here it is necessary to place priorities.
- Convenience. A shower cabin is much more convenient for the elderly who climb the bathroom no longer allows health. In addition, there are several useful options in modern models, such as hydromassage, water temperature control, contrasting shower, etc.
About how to mount a shower room with your own hands next.
Mounting Options Shower Cabin

Montage of the shower cabin with their own hands - the case is not very cunning. With minimal handling skills with a plumbing tool, the entire operation will not take much time. The options for installing the cabin in the bathroom are several, and each of them depends on the area of \u200b\u200bthe room in which the installation will be carried out.
- Pallet and three walls. Usually this option is installed in large rooms. The three walls of the shower make it quite attractive, however, to save the square at the same time will not be able to save. You can buy a shower cabin with three walls in any plumbing store.
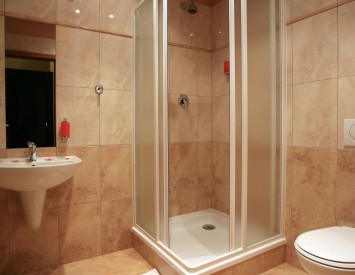
- For smaller apartments, you can install an angular cabin, which has only two glass walls. Through the use of the walls of the room, such a cabin does not take up much space, thereby saving the precious area.
- Cabin without a standard pallet. It will establish a shower room without a standard pallet possible. If you use firming materials (brick) and a bit of tiles, you can build a completely full-fledged pallet. At the same time, the cost of work will be minimal. The pallet is satisfied with the water drainage system in the sewer. All you need to buy or order is a curtain of plexiglas.
- Souls and shower cabins without pallet. In many public places, for example, such as fitness centers or pools, shower cabins are installed without pallets. In this case, the drain system is mounted directly into the floor, which is installed under the tilt. In this case, the water simply flows to the place of collection and flows across the drain. Such a shower cabin is the easiest and cheap option. Polyethylene curtains can be used as a fence.
Montage of a simple shower cabin

Such structures can be used in the baths, at dachas and other rooms, where the functionality is facing the angle, for which you can sacrifice design research. This option is the cheapest with the minimum value of the materials in comparison with the purchase of the shower.
For the manufacture of a shower cabin of a simple design, you will need:
- Brick (quantity depends on the size of the wall).
- Cement and sand for pouring pallet and brick masonry.
- Ceramic tiles.
- Glue for tile.
- Plumbing equipment (shower stand, low tide system, mixer, shower and corrugated hose).

Procedure for work:
- You can use a special plexiglass that will be opened as a door. For the budget option, it is enough to use the curtain fixed on the crossbar.
- The construction of such a booth is better to produce in the corner of the room, where there are already 2 walls. In this case, only one will have to erect. Standard shower size 0.9x0.9 m completely.
- The initial task is to arrange the pallet sideboard. For this, its boundaries are placed and one row of bricks is laid out. So that the masonry is smooth, use the markup with the help of a caprony thread. Brick stacked in one row on a solution from cement and sand. After the solution freezes. Crane shower shower. It is a neck and a pipe that connects to the sewage. When installing the drain, it is necessary to take care that its pipe has a minimal tilt. Otherwise, water will not leave.
- After the drain system is mounted, the pallet floor is filled with a screed. For her fill use lighthouses, arranging it in such a way as to ensure the minimum bias. If this does not succeed, the slope can be provided when laying tiles.
- After drying the concrete, the third wall is erected. Her height should not be "under the ceiling." Two meters are quite enough to protect the room of the bathroom from splashing water. The wall is laid out in the "Pollipich". During masonry, it is necessary to control its evenness. The correctness is measured using the level and plumbers, and if necessary, adjust.
- When the wall laying is finished, it is necessary to arrange a water supply. For this, there are special channels in the wall, in which the pipes of hot and cold water are invested. At their ends, the threads are mounted for the mixer. The thread configuration depends on which type of mixer will be used in the booth. As a rule, ball-in built-in mixers use. Locking work should be carried out as carefully as possible, since after the wall closing the plaster and tiles, it will fix the flow, gently said, problematic.
- After the water supply system is mounted, you can start the shower cladding. Its walls for a start are plastering, for this you can use a cement-lime solution or a special mixture. Before starting work on plaster, the wall is treated with a special primer. The solution should not save, but apply carefully so that it can deeply penetrate the structure of the walls.
- When the primer is driving, you can start the plaster. It is necessary to do it as smooth to make it easier to lay the tile. The accuracy of plastering is checked by the level and rule. After drying the plaster, it is neglected again.
- The next step is to lay the tiles. First floor is stacked, then the walls. Special glue is used for styling tiles. It is sold in the form of a dry mix and its preparation is enough to dissolve with cold water, stirring constantly. When preparing glue, it is necessary to take into account the fact that it is quite quickly grasped. If the experience of laying a tile is not enough, then it is better to knead less glue, since the speed of work will be small. In this case, the consumption of materials will not be too high.
- The tile is placed on the floor from the middle so that the cut slices are adjacent to the walls. The glue is applied both on the surface of the floor and on the reverse side of the tile. This operation is carried out using a special gear spatula. Then the tile is placed on the surface and pressed. After that, with the help of the level, its position is checked, and if necessary is adjusted.
- To ensure a uniform seam between tiles, special "crosses" are stacked. They are of different sizes depending on which the seam thickness is planned. You can cut the tile with stoveturis or grinder. True, the last method is very dusty.
- When laying outdoor tiles, it is necessary to remember that after the end of the work it is impossible to become at least a day until the glue does not dry.
- When the work is completed with the floor, you can start the walls. Laying tiles on the walls are made from below - up. The glue is applied in the same way as when laying a germ tile. The ends and corners are closed with special plastic moldings. In the tile, through which the mixer is connected, technological holes are made using special cutters.
- After the end of the laying, the seams are grouting. For this, a special mixture is used, which, like putty, is divorced by water. Currently, grouting mixtures are sold with the addition of a special coller, thanks to which you can choose the material under the color of the tile.
- When facing works are completed, you can start the installation of plumbing and curtains.
- At its workplace, a mixer and a shower hose with watering can be installed. To hold the latter to the wall, a special rack is mounted. Thanks to her, the watering can be in a user-friendly position, and simply regulated depending on the necessary direction of the jet of water.

After mounting the mixer, a curtain installation is carried out. If this is a budget option, the crossbar of a stainless steel is mounted between the side walls, on which the polyethylene curtain is dressed. Also as an agonation, you can use the door from the plexiglass. It is mounted on special loops, which are attached to one of the walls of the cabin. Usually the glass is mounted without a frame. You can order it in the glass workshop, where it will be cut on the specified sizes. From the door opening side, a handle and a metal bracket are installed for the door stop. Thanks to her, the door will not open inside, but will be fixed in the desired position. To prevent spontaneous opening, you can install magnets.


