
If you are the happy owner of a large family, but for one reason or another, you are not enough for living space, then the plasterboard partition will help you in solving this problem. It will help split a large room into two parts, for example, for a nursery and a bedroom. In addition to zoning space, it will allow you to do your affairs while children play or are engaged in lessons. To protect the space in the bedroom, everything can be done with your own hands. An independent installation of a plasterboard partition will not take much time, but will save money and nerves, because everyone will receive their own space, so necessary for recreation and self-development.
Content
General
Over time, other innovations capable of separating the room came to replace the curtains and wooden partitions. If the room has a large area, some of which is simply not involved, then you can play well on this. For example, to equip a small office or a room for watching movies. If you have small children, then there you can make a bedroom. Thus, coming home after work, you can safely relax, without interfering with the sensitive sleep of your baby.

The advantages of plasterboard partitions
Partitions collected from plasterboard plates are not only a convenient and fashionable design, but also perform a useful function. Thanks to its numerous advantages, more and more owners choose such a method of zoning to arrange small square apartments.
Next, let's talk about the advantages of plasterboard partitions, among which you can select the following:
- Practicality. Thanks to the "clean" method of assembly, work will be quick, without much noise and dust.
- Ecology. GLC plates are made on a plaster basis, without the use of substances harmful to human health.
- Efficiency. Plasterboard is relatively inexpensive, while perfectly aligns the surface, covering a fairly large area. Installation of the design is quite simple, which allows you to do everything yourself without spending money on a challenge of costly brigades and specialists.
- Lightness material. For such work, you will not need additional references and permissions. The plasterboard sheet has a small weight, therefore it will not carry a load on the overlap without disturbing the available engineering communications.
- Easy finish. The finished plasterboard partition does not need the surface plaster. It is enough to sharpen the design with a thin layer.
- Protection against external factors. The sheet material is often presented in several variations, each of which increases its protective function. In the modern market, you can meet both refractory and moisture-proof option, which significantly increases the scope of application of this material.

Since GLC is sufficiently supple and convenient for work, it is often used in the decoration of residential premises. Thanks to him, you can make two rooms from one big room. From the sheet is very easy to cut any shape and drawing. That is why it choose most of the designers as a finishing material when designing an object. In the partition you can install the door, window, backlight, glass blocks, as well as other useful and decorative elements that will help your room purchase an original appearance.
Selection of material for plasterboard partition
Gathering a partition from GLC with their own hands, it is important to prepare correctly. The choice of material for walls and frames is due to the characteristic features of your room. It is also important to note the goals and objectives that you set in front of yourself. To better determine the necessary material, it is better to disassemble everything in detail.
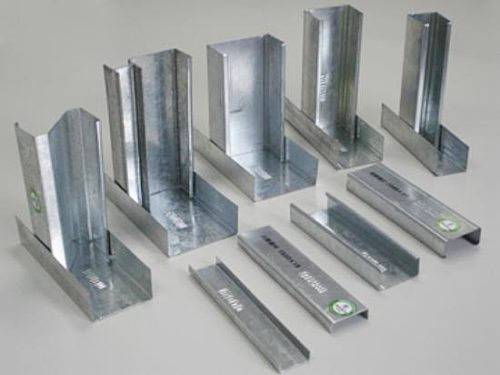
For assembly and installation of plasterboard partitions, the following materials are used:
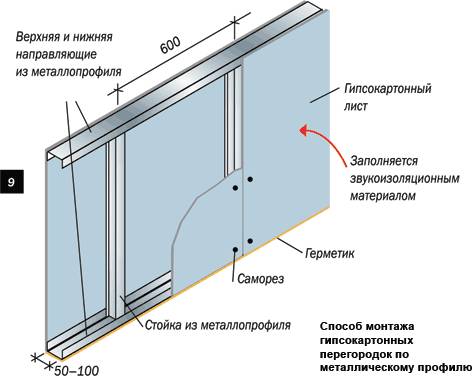
- Metallic profile. Used as frame structural elements. For mounting, the ceiling part is used: UD 27 profile (guide) and CD 60 (ceiling). To assemble the frame, use the following profiles: guide (UW 50, UW 75, UW 100, etc.) and rack (CW 50, CW 75, CW 100, etc.). The numbers in the name of profiles indicate their width. In addition, they are distinguished by the thickness of the metal (0.1-0.6 mm) and the length of the profile (2.5 m, 3 m, 3.5 m, 4 m). The choice of the necessary guide depends on the partition design, frame, as well as other features of your room.
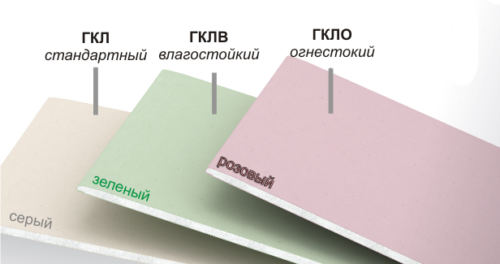
- Plasterboard sheet. Multiple thickness is made (6.5 mm - 24 mm) and sizes (1250x2500, 1250x3000, 625x2500, etc.). These indicators change and are combined, depending on the purpose of the plasterboard sheet.
HCL sheets are also presented in several variations, such as:- wall (the usual version of the drywall used in the arrangement of residential premises);
- moisture-resistant (often has a green color, and is used in rooms with high humidity, for example, in a bathroom or basement);
- refractory (represents a sheet of red, which is manufactured using special additives. It is used near objects potentially subject to fire, for example, fireplaces);
- arched (the thinnest sheet used in the assembly of radius parts);
- ceiling (as can be seen from the name, it is used to arrange the ceiling part).
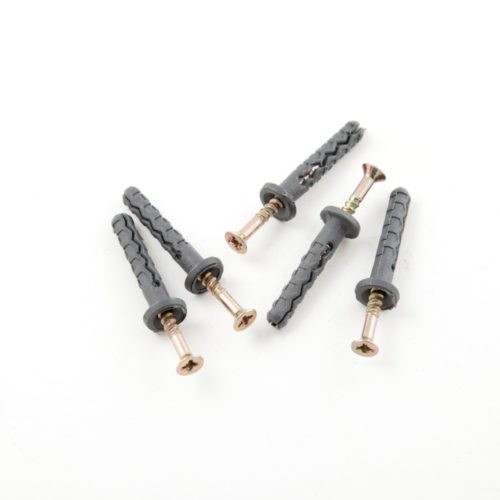
- Fastening. As connecting elements for plasterboard structures, various components made of metal (suspension, crab, butt) are used. To fix the frame to the floor, use: dowel-nail 6x40, 6x60, 6x80, etc. To install sheets, use special gauge of GLC of different lengths, it all depends on the surface thickness. Basically, it is 25 mm and 35 mm.
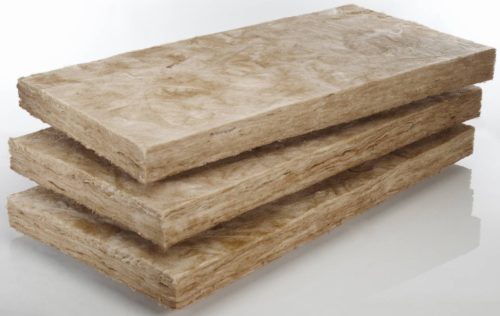
- Heattel. The mineral wool, laid inside the septum, will protect the zonored space from external sounds, while ensuring excellent thermal insulation. The material is presented both in the roll and in the matte version. Dimensions also vary depending on the width of the partition.


For our partition, the classic wall version of GLC is perfectly suitable, because it will perform the task of full. This is the most common type of drywall, besides one of the most affordable. It is also worth considering that for partitions it is better to use a profile with a metal thickness of at least 0.5 mm. Often, for the creation of doorways, the design is additionally enhanced by a 40x50 or 50x50 bar, everything again depends on the size of the partition and the profile.
Installation of plasterboard partition in the bedroom
The main task of the plasterboard partition is zoning the space of the room. In addition, it allows you to almost completely isolate a part of the room, at times reducing the noise level. Before entering the installation of the box, you need to carefully prepare the entire tool and material.

Tool
The modern instrument of the plasterboard is designed to simplify the assembly process associated with the assembly and the cutting of the frame for the partition. It is better to immediately get everything necessary, then the work will be faster, and the result will be the joy of any owner.
To correctly mount the partition from GLC, use the following tool set:
- perforator, screwdriver, mixer, Bulgarian;
- scissors for metal, screwdriver, construction knife, spatula, culma, hammer;
- rule, level, plumb, roulette, corner, cutting thread;
- vyron, brush Machova, disc on metal, replaceable blades, selflessness, dowel-nails;
- bits, nozzle whisk, pencil.

Such a simple set will allow you to make all the works faster, and the result is better. Do not forget also about security tools. When working with cutting out material, always use safety glasses, gloves and overalls. Compliance with safety regulations - a guarantee of good work.
To better understand the installation technology of plasterboard partitions, we advise you to see the following video:
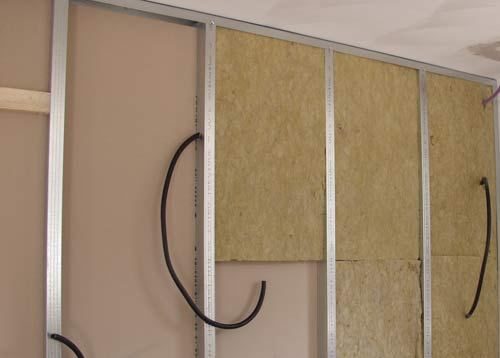
Build carcass
This stage provides for the assembly of the "skeleton" of the future partition. From how precisely the framework will be collected, the further level of the coating plane depends. When a selection of material, consider the thickness of the partition, as well as the estimated load. If the design provides for the presence of a doorway, it is better to strengthen it. Do not forget to additionally purchase a wooden bar with the calculation of the height and width of the day. For example, for the door 1000x2000 mm, you will need: 2 + 2 + 1 \u003d 5 m timber. Pick the thickness of the bar, based on the thickness of the racking profile.
To mount the frame for the future partition in the bedroom, there are stages, adhering to the next algorithm:
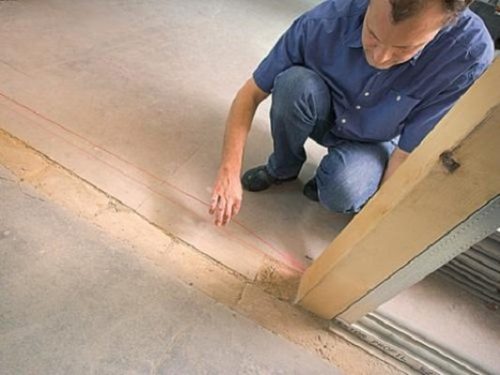
- Transfer the size of the future partition to the floor and walls. To do this, use a tape measure and pencil. Check the places where the doorway is planned. For calculation accuracy, use a plumb. To transfer the drawing to the concrete surface, use a folding thread. Pay attention to all the details and bends of the future partition. To schedule radius areas, use a thread with a tied pencil.
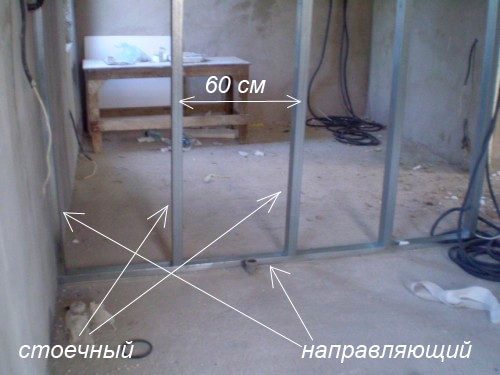
- Start mounting the guide profile to the floor. Move clearly on the markup line. Using a perforator with a brought concrete drill a hole through the guide to the base. In the holes first insert a dowel. Subsequently, the dowel is driven into a nail to securely fix the profile. Step 60 cm will be enough.
- At the location of the future door, bend a profile at a right angle. To do this, make cuts from each of the profile sides. This will help you bend it without unnecessary deformation.
- Similarly, start installing the guide to the ceiling. If the design is sufficiently massive, use ceiling anchor-wedges to enhance fixation. Note that both profiles (outdoor and ceiling) must be strictly in the same plane, then the partition will be smooth.
- To mount the vertical profile (rack), you need to measure the distance from the ceiling to the floor, taking into account the thickness of the profile. Now you can install a rack profile in a vertical position. Screw it to a bend corner of each of the guides. Do not forget to withstand level.
- Horizontal profile Install on the transverse bar of the doorway.
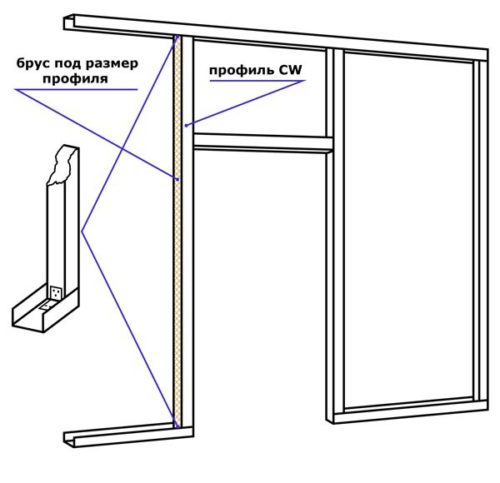
- To enhance the doorway, screw to the inside of the guide profile wooden timber. Screw the screws through the metal into the tree.
- Continue to mount a transverse profile with a step of 60 cm.
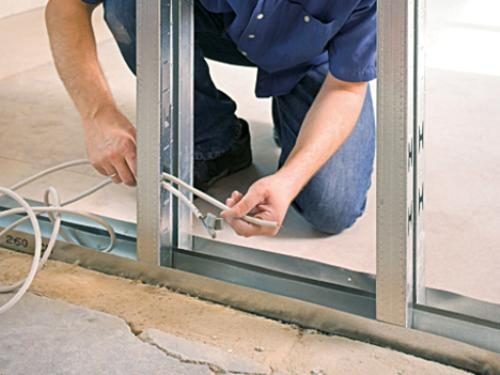
- Do not forget that electrical intercommunications can pass through the partition. Where corrugation will stretch, generate metal ears. If necessary, increase the hole in the profile with the help of a knife, but note that it should not lose its integrity.
- Check out the frame for the level drops again. Check each vertical bar, applying level.


Soundproofing partition
When our "skeleton" is ready, it's time to give the design form. To enlarge the partition, use a wall plasterboard with a thickness of 12.5 mm. The length of the sheet is chosen, pushing away from the height of the room.

To enjoy and insulate the partition, act as follows:
- Start mount sheets, starting from the wall from the bottom up. Note that they should fit tightly to the concrete surface. In the event that the surface has obvious bends - cut the sheet in the necessary sections.
- Sheets Mount the VD, based on the size of the future partition. Join each sheet of HL to the next one. If the junction is not a factory, do not forget to finally be treated with a planer or a construction knife, having stabbed under 45 °. For mounting drywall, metal screws are used, which screw through the sheet into the profile.
- Now, when one side of the partition is covered, start stretching the corrugation through the profile. Make holes in drywall, if the partition provides for the presence of lighting devices. Do not forget to bring the cable in them.
- Start to warm the partition. Squake in the "skeleton" between the profiles of mineral wool, pre-sliced \u200b\u200bin the height of the frame. Place the insulation in small areas. Consistently secure the sheets of Glk, then shove the minvatu. Avoid direct cable contact with insulation.


Clean trim of plasterboard partition
The partition for the bedroom is ready, but not completely. It remains to give her a nice appearance. To do this, it is necessary to handle it correctly. This will not only increase the performance of your design, but also the zonored space sounds completely.

The drywall surface is very easy to separate, because it does not need additional alignment. In any case, you must first close the docking seams. For this, use paper or fliesline tape. Spring or special solution is perfect. Crackers around the perimeter also need to be seen. Take advantage of a plastering mixture or special sealant. Watch the septum.

The prepared surface can be decorated for every taste. Get the wallpaper, or simply paint - everything is completely dependent on your imagination and skills. Separate attention to the markup and installation of the frame, then the further installation will not seem to you so difficult. We hope that in this article we fully disclosed the separation of the bedroom with a drywall partition. Following our instructions, do everything in stages, then the result will not wait.


