In the conditions of constant increase in housing prices, few people, especially young families, can afford a full-fledged large apartment. More and more families give preference to small small fleaments as starting capital. In the apartments of a small area during the repair and development of the design of the premises, practicality and functionality comes out. All furniture in the premises should take at least space and perform maximum functions. This is especially true of the kitchen. In small-sized apartments, as a rule, the kitchen does not boast of a large area and when it is planned, it is necessary to pay maximum attention to the details.
Content
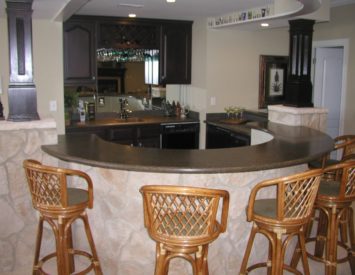
An excellent solution for this room is the installation of a bar table. It can act as a working or dining surface and as a conditional space separator into several zones. On how to make a bar table with your own hands - further in the article.
Advantages of installing a bar table

Bar tables have gained popularity relatively recently. If earlier such a type of furniture was mainly the prerogative of public catering institutions, then recently he became increasingly used in private residential premises. Before ordinary tables, these models have a number of advantages:
- An interesting appearance. Bar rack can perfectly emphasize any interior design by making it more presentable. Use when making chrome elements, decorative illumination - can make the kitchen one of the most beloved and frequently visited premises.
- Multifunctionality. It can be used both as a dining table and as a working surface. Moreover, since the height of the bar table is 1100-1500 mm, it is much more convenient to prepare on it than on the usual surface.
- Low size. Bar tables greatly saved space. With a small surface area, they are perfectly placed even in miniature kitchens "Khrushchev" apartments.
- The possibility of zoning premises. This option is perfect for apartments studios. Now there are studios from 25 m 2. For such a place, the bar table will become an excellent solution that will allow separating the kitchen area from the living room.
- The ability to expand the functionality. At the bottom of the bar can be placed several useful boxes in which the dishes or other kitchen utensils are hiding.
Types of bar tables

Designs and types of bar tables for each room are selected individually. It depends such a choice from the area of \u200b\u200bthe kitchen or living room, or from the expected rack functional. Basically allocate the following types of bar tables:
- Console design. The easiest of the bar tables. It is a worktop that is attached to the wall on one side, and on the other hand relies on the tube rack. This design can act as a light zone separator and as a working or dining surface.
- Island rack. Unlike the previous one, it is not a console, but an independent design. Moreover, it may be, both by the continuation of the part of the kitchen headset and separately worth the subject. The island bar often places a large number of additional boxes and shelves. Many owners use it as an additional surface to install a washing or a hob.
Forms and design of bar tables. Materials for their manufacture

Bar tables are different forms. It can be straight, angular, P-shaped either semicircular models. What specifically choose, it is necessary to decide on the basis of the general design direction and the area of \u200b\u200bthe room. Multi-level tables are very popular in our time, where the countertop does not lie on the base, and fixed on special racks. Such tables have an interesting appearance and excellent functionality.
Separately should be said about the materials that are used for the manufacture of bar tables. If there were no alternative to the tree, both for the base and for the countertop there were no, then there are currently a wide selection of natural and artificial materials for these purposes.
The list of materials from which bar tables are manufactured:
- Natural tree. Used for the manufacture of bar tables of a classic look. It is often decorated with threads and other decorative elements. The wooden bar desk will be an excellent addition to the classic interior of the kitchen or living room in English style. Conditionally to the natural tree can be attributed to Faneru. It has the same texture as an array, only worth it is much cheaper.
- Chipboard. If the tree and plywood seem too expensive, you can easily use plates from woodworking waste. Chipboard or OSB have excellent performance, easily processed. In this case, these materials are an order of magnitude lower. Laminated chipboard plates do not require further processing and ready to build a bar table.
- Plasterboard. If you plan to make a bar table with your own hands in color and the texture of the surrounding walls, then the most suitable material for this will be plasterboard. Thanks to this material, you can make any shape of the table up to the arc. Plasterboard is very easily processed, it is relatively inexpensive, however, requires additional processing: putty and painting.

The table top is made of:
- Stone.
- Natural tree.
- Artificial marble.
- Tables from natural stone They are distinguished by their beautiful appearance and almost eternal. They are not afraid of moisture, do not cut with a knife, do not affect the effect of high temperature. However, countertops from granite or marble are very expensive, which makes them not too affordable for a wide consumer. In addition, the use of a piece of solid stone, which has quite a big weight, requires a very powerful framework. This, in turn, can increase cost estimates during the construction of the entire table.
- Natural tree Recently, it is extremely rarely used. The reason for this is its operational qualities. The tree is very afraid of moisture, so it is not recommended to use it as a working surface, which narrows its functionality. If the bar table will only be used for cocktails, the tree is quite suitable, but not in the case of cooking hot food. In addition, the tree requires constant care and additional processing.
- Artificial marble. Artificial countertops are currently the most popular material for the manufacture of bar tables. With excellent performance, they cost inexpensively and weigh a little.
Making a cantilever bar for kitchen with their own hands

Make a console small bar table with your own hands is not too difficult. With a small set of necessary tools, this work is done literally in a few hours. For this operation will take:
- Tabletop made of artificial material. It can be ordered the necessary sizes and shapes depending on the design of the bar table. This method is more preferable because, having the necessary equipment, specialized companies will be able to cut the table top of any size and any form, process edges and polish the product. Make it at home is quite problematic.
- Chrome pipe. To install cantilever bar tables, chrome pipes are used as a support table top on the floor and decorative visor. Also on the pipes are fastened with suspended appliances for glasses, bottles, etc. Typically, the diameter of the pipe is 50 mm. It is quite enough to withstand the load for the bar.
- Visor. As a rule, serves as a decorative detail of the bar. Often the point lamps are mounted in it, which perform the function of additional backlight. Produce it from laminated chipboard.
- Wall corners. Serve for mounting countertops to a wall or kitchen headset, if it will act as its continuation.
- Flanges for fastening the pipe to the tabletop and the visor.

Procedure for work:
- Starting the installation of the bar table with your own hands with the definition of its height. The standard height of the bar table may vary from 1.1 m to 1.5 m, depending on the preference preferences. The height of the visor is installed at the height level of the kitchen headset.
- Having measured on the wall all the necessary marks, with the help of the level you need to hold the fastening lines of the table top and the visor.
- Furniture corners are installed on them. For their installation, wall dowels are used.
- Then the flanges of the rack pipe fastening are screwed to the tabletop. It is necessary to do it from the top and bottom of it. To do this in parallel, you can make through holes of one flange to make through holes and pull both flanges with the help of furniture screws.
- After that, the lower rack is attached to the tabletop, and the latter is installed on the workplace. To the corners, the tabletop is attached with the help of self-tapping screws, and the rack with the help of the flange is fixed to the floor.
- Next you need to prepare for a visor setting. With the help of a crown cutter, the holes are chopped on the installation of point lamps Mr, then you must install the wires to connect them to the network.
- The visor over the bar kitchen table is installed by the same scheme as the tabletop.
- The last stroke in the installation of the console bar will be installed on a chrome-plated suspended element.
Bar Backlight Mounting
To illuminate the bar table, it is better to use spotlights. They are perfectly mounted in his visor and illuminate only a limited zone. At the expense of this, you can achieve an intimate atmosphere during gatherings with friends, as well as use less electricity.
The electrical illumination circuit is quite simple:
- The backlight connection is carried out to the shared kitchen network through a regular switch. Moreover, the latter can be hounded into the wall, and hide under the tabletop.
- The voltage supply wire on the lamps can be hidden in the rack pipe. It is necessary to do this in the construction process.
- The connection of the luminaires is made in parallel. To do this, insulation is inspired in the contact wire, and the terminal is installed on the bare wire. The cartridge is already connected to it. In the manufacture of work, you should follow the way that the wires of the wires are not bare. The current supply cable to the lamps is attached to the visor with small clamps using self-tapping screws.
Light bulbs for lamps MR11 and MR16 are produced three types:
- Halogen.
- Gas discharge.
- LED.
The most optimal option will be the LED lamps with a capacity of no more than 3 W and a glow temperature of not more than 3000 K. They will be able to work for quite a long time and at the same time save electricity.
Bar table with their own hands for the kitchen: photo


