During the construction of a private house or arrangement of an urban apartment, it is important to pay special attention to the ventilation system. Many make focus on insulation, strength of walls or foundation, and it is correct, but neglected ventilation can turn into serious trouble. The result of insufficient ventilation will be the fumes air from which the head begins, then gradually on the walls, the ceiling and overlaps will begin to accumulate condensate, grow mold, and maybe even mushrooms. It is not necessary to talk about a comfortable and cozy life in such a stuffy and cheese house, and if you have noticed the first signs of insufficient ventilation - forever fogging windows, waste wallpapers and stool - it's time to take appropriate measures.
Content
Device and principle of operation
Make exhaust ventilation with your own hands is not so difficult, if you know the principles of its work and use suitable materials. Homemade ventilation systems are relevant for small apartments and private houses. Even if special double-glazed windows with supply valves are installed on the windows, this is not enough - it is necessary to ensure not only the influx of fresh air, but also the removal of exhaust vapors outside. If, on the contrary, make only the exit for the exhaust air, then where to get fresh from? Thus, it becomes clear that the full ventilation is possible only in combination with supply and exhaust holes.

The principle of operation of the supply and exhaust ventilation is as follows:
- Fresh air from the street penetrates the house through the trim valve. This can be carried out both natural and enforced way. In the first case, the air falls into the supply pipe due to the difference in temperatures outside and inside the house, as well as due to wind gusts. This is not the most reliable way because it does not allow to control the volume of clean air masses. To make it possible, organize a forced system running at the expense of special fans. They suck the air from the street and push it into the room in the required volume.
- Finding into the supply hole, fresh air passes the filtering system if filters are installed, heated, if there is heating equipment. Heating occurs in the recovery, the advantages of the installation of which we will tell a little later.
- Next, the purified and heated flow goes through the air duct and enters the room.
- At the same time, the exhaust air heats up and, according to the laws of physics, rises up to the exhaust hole. It can also use a natural or mechanical (forced) principle of operation. In the latter case, the air is sued with a fan, passes through the air duct and pushed out.

The arrangement of forced supply and exhaust ventilation can "fly to a penny", but one-time attachment will pay off quite quickly, and then will save on electricity and heating. The advantages of using such systems can also include ease of operation, absolute safety and efficiency. When the house continuously circulates the air, the tenants sick much less and generally feel cheerful, the service life of the walls and ceilings is becoming longer, the underwear dries faster, etc. Thus, establishing ventilation, you make the contribution to your own health and durability of your housing.
The degree of complexity of the ventilation system directly depends on the size of the room to be carried out. In the case of a private house, this is a total volume (not to be confused with an area) of all rooms on all floors.

Exhaust ventilation device:
- The trim valve is equipped with a lattice flap, which serves to change the bandwidth of the element. Through the trim valve, clean air falls from the street into the air duct. Detail may have primary cleaning filters. It is placed on the side of the house where the most often blows a strong wind (as a rule, it is the northern side).
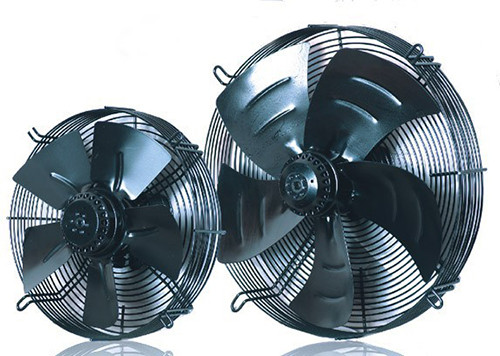
- A trimming fan - pressure equipment, which creates a zone of the vacuum in the valve termination, thereby driving the air into the air duct.
- Patch pipeline - pipes for which clean air moves inside the house.
- The mixer is a chamber associated with external supply air ducts and channels that remove the supply flows from the rooms. Channels are installed only in recycling systems that take air not only from the street, but also from the inside.
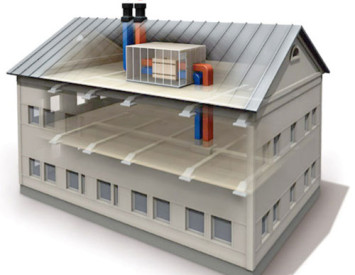
- The recuperator is a special unit in which the cold air from the street is heated to a comfortable temperature. The device operation occurs in such a way that the trimth stream is not mixed with the exhaust - they pass through separate channels inside the recuperator, as can be seen in the diagram below. The tributary cold air is heated due to the heated spent, outgoing. As a result, you save a significant amount of electricity to heating the room.

- Air conditioning - a device, cooling hot trim air in the hot season.
- Calorifer is a special device for heating the supply stream. Allows you to unload the main heating system in the winter season. Alternative to the recuperator, but in contrast to it, the canorifer does not take the heat from the exhaust air, and consumes electricity to heat the cold streams from the street.
- The collector is the distribution compartment in which the trimth flow is distributed through the air ducts going to different rooms.
- Exhaust diffusers - grilles embedded in the ceiling or the top of the walls. They take the spent air from the rooms.
- Exhaust fans - they are embedded in the exhaust channels to create discharge and pressure.
- Air ducts leading from diffusers to the recuperator, where the heat is taken from the exhaust air and the transmission of it with a cold flow from the street.
- The central ventilation pipeline is a pipe that is removed by one level with a roof skate. It passes the spent stream and is displayed out.

As you have already managed to understand, the installation of such a complex system with the presence of all nodes requires professional knowledge and skills, so the installation is better to trust specialists. You can make a simpler exhaust ventilation system with your own hands, but with a similar principle of work.
Recuperator
We have already hinted over a couple of times on the advantages of using the recuperator when the ventilation is arranged in the house. We suggest to consider this item in more detail. In the process of mixing the supply and exhaust ventilation, large losses of the efficiency occur. Recovery allows you to increase the efficiency of 10-15% and spend energy as much as possible.
The principle of operation of the recovery is very simple: the used air masses go out of the room and fall into a special heat exchanger, where they give their heat to the supply air moving along the neighboring air duct. The most popular firms offering similar energy-saving systems are Daikin and Mitsubishi Electric, but the cost of their products will be afraid of any economical owner. Therefore, the alternative option is brewing by itself - why not make the recuperator with your own hands?

The most simple is the plate design. With its manufacture, even a beginner can cope. Such a homemade recuperator consists of plates that can be made of thick foil, sheet copper, aluminum, textolite, etc. The device consists of several cassettes, in each of which an equal number of plates. Thus, the number of plates depends on the number of cassettes (about 4 m² plates leaves one cassette). If you want to immediately make a recuperator with high efficiency, put a double number of plates into one cassette.
Tools and materials required for the manufacture of the recuperator for exhaust ventilation at home with their own hands:
- steel corners for fastening flanges with racks;
- impregnated with olphic rail for the sewage of the plates (can be replaced by the technical cork);
- plywood or sheet steel 3-4 mm thick;
- mDF panel 20 mm;
- mineral wool or foam for filter;
- wooden bars 30x30;
- hardware;
- sealant on silicone basis;
- scissors for metal.

How to make exhaust ventilation with a recuperator:
- Using metal scissors, cut the plates for cassettes in the form of squares 30x30 cm. One cassette includes 70 plates.
- On the parallel faces of each square on the one hand, stick the rack impregnated with the olphoua. It will provide the necessary ventilation gap between the elements. The rail length must correspond to the length of the square of the square - 30 cm. Do not sample the last workpiece. If for the manufacture of plates you have chosen the minimum thickness corrugated line, to glue the rail to it optionally - the wavy structure and will no longer leave the required gaps.
- Next, glue the details with each other. So you will have an equal amount of ventilation gaps on each side and at the same time they will not intersect with each other. One will flow the cold air, along the other - warmly worked.
- The latter plate without a raka will close the cassette.
- In the intervals, pour silicone sealant.
- On the sides of the resulting cassette, make attachments for flanges.
- It is very important to establish a cassette at an angle (in the form of a diamond) and fix it in this position. In the process of heat exchange will appear condensation. Since there is nowhere to go, it will sow on the inner walls of the plates and sliding down - into the lower corner of the rhombus. To give an output, there it is necessary to make a hole and insert the drainage tube there. From time to time, check the drainage and remove the fluid released.
- If the recuperator consists of two or more cassettes, they all should have the same size and be located so that the angles are aslended as tight and tightly.
- When the cassette is ready, insert it into the box, the frame of which is made of wooden bars, and the skin is made of MDF or sheet steel. Cassettes should not hang out inside the box, and sit as close as possible, so try to immediately make it the corresponding sizes. At the inner wall of the box, attach a layer of filtering material (foam or minvati) so that clean air from the street passed primary cleaning.
- In the sidewalls of the box at points located opposite the flange connections on the cassettes, drill holes.
- Install the recovery unit into the guides from the steel corner, screwing them to the walls. This will allow you to remove the cassette for maintenance or repair at any time.
Installation of ventilation
Before being taken for installing exhaust ventilation, it is necessary to calculate the required amount of clean air, which is needed for all rooms in the house. There are certain air exchange rates for residential premises and depend on the specifics of the use of a room or another. For example, in the kitchen and in the bathroom, the air exchange must be more intense than in the living room or bedroom, because the humidity and the speed of air pollution is higher.
The table below shows the multiplicity of air exchange in accordance with the purpose of the room:

In a residential house on every person should have at least 60 cubic meters of fresh air every hour. In the office, this setting is reduced to 20 cubic meters. Air exchange industrial premises depends on the features of the working process. For example, if an employee is just sitting at the computer, he spends less air than the one who works hard physically. Calculation of air also occurs in accordance with the area of \u200b\u200bthe room: 1 m² should fall 3 m³ of fresh air per hour. If you know the total amount of supply air mass per hour, you can purchase the corresponding compressor power and performance. Depending on the air flow rate induces a compressor, one can easily calculate the cross section of the duct and the number of channels for exhaust.
The table below shows the cross section of the duct from the air in the room:

Since the calculation of the ventilation is quite complicated, many people prefer to entrust this job professionals, and installation of the equipment already produce their own hands.
The specifics of the installation
Installation of exhaust ventilation should not cause difficulties if you have calculated correctly and prepared all the necessary ingredients. Every detail, simply attach with brackets or standard hangers, and then collect the desired geometry of the ducts of the designer type. The only difficulty lies not in the assembly, and in the creation of the project ventilation, because it is at this stage necessary to produce all the calculations.
The sequence of assembly of the ventilation system:
- air inlet;
- a recirculation assembly;
- exhaust and intake manifolds;
- heat exchanger / heater / air conditioner / filters;
- distributing exhaust and supply air ducts in the manifold;
- lattice to supply and exhaust air devices.
Tip: In some areas it is more convenient to use not plastic pipes for air ducts and the corrugation, which can be bent at any angle and avoids the additional connections. For fixing the pipe, use standard drywall screws for screwing them "butt," after sizing seam sealant.
Remember that a successful result for the most part depends on the well-composed exhaust ventilation scheme. If you are unsure of their abilities or are confused when trying to handle it on their own, it is better to entrust the design professionals.


