
The first thing you see when arriving in a country house, it is a gate or gates. This seemingly insignificant detail, immediately forms a picture of the owners of the house - when the gate is nice and neat, and the inside should be all clean and decently. And vice versa - skewed creaking gate plunge into depression every guest. Any hard-working owner should make sure that the entrance to his country residence was neat, comfortable and functional. You can purchase or order from the gate master, but why not try to make them yourself, because it is not a complicated matter. To learn how to make the gate made of wood with your hands today and we'll talk.
Content
types of structures
To begin with - why a tree? Firstly, the material easy in processing, so with the creation of the design will cope anyone who knows what a drill and hammer. Second, wood is cheaper than metal, stone or synthetic materials from which to build a gate, and raw materials on a large-scale event will need quite a lot. Third, the natural color and texture of the wood to instantly create a feeling of coziness, comfort and security.

But before you go to the store or the nearest sawmill behind the wood, you need to work a little. Do you know exactly what gate will fit your home? And from which materials besides the tree, will you build them? After all, the gate must be fixed on something, attached, and the handles would not hurt the handles ...
Let's startperhaps with the listing of the main varieties of the gates:
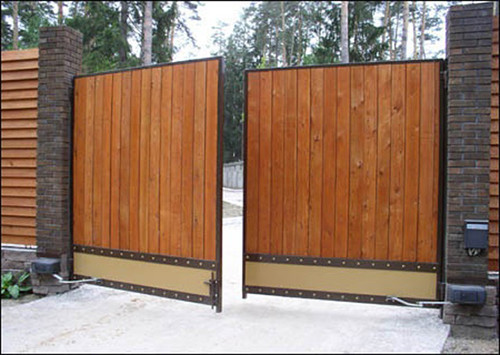
- Swing - can have one or two sections (doors). It is very common A type that can be found literally at every step. Doors can open inward or outward, as you will be more convenient. Locked such flaps on a cheek or castle. The lack of a swollen gate of the tree is that it is necessary to highlight enough space for the free opening of the doors, and the wider doors, the more they need space. That is why bivalve structures are in great demand than wide single-standing . Most convenient when The gate opens the inside of the site, because in this case they do not block the road or pedestrian part, which is especially relevant, when The entrance to the site is located at the road itself.
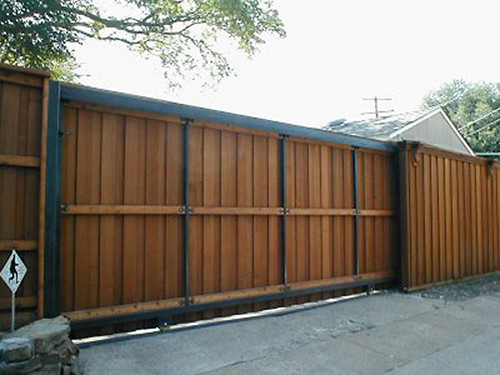
- Retractable - more compact option, if compared with swing gates. This design is a canvas moving along a wall or fencing with the help of rollers and guides. It saves a lot of free space, but, So that the gate worked well at any time of the year, guides have to constantly clean from leaves, garbage, snow and etc.. Yet One feature that is difficult to name the disadvantage is that for the movement of the gate you need a straight and free wall or a part of the fence, and the wider the gate will be, the more space they need to open the lash.
Installing such a gate can occur differently: With the help of a console panel above the web (a rather complicated method for the newcomer), way Hanging canvas with rollers onriding rails upstairs and installation on rail, attached down when the top with rollers Attached to the post.
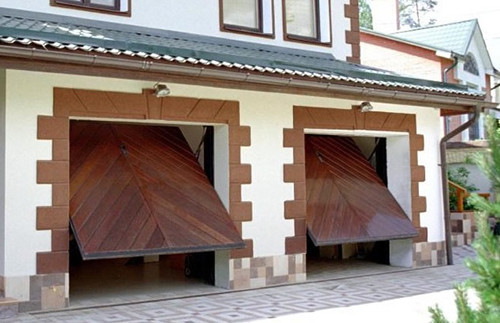
- Lifting - construction in the form of a monolithic canvase that opens, lifting up. Movement is carried out by tightening a special cord, attached to K. downwards, and hinges. However, it is very uncomfortable to use such wooden gates to enter the plot, but once such a kind has the right to exist, we could not her Do not mention. Best to make such a thing d Dla garage or shed.


We build swollen gates
Since the swollen gates are the easiest way in the manner, we offer in all details to consider the technology of their construction. First you need to draw drawing Or simulate an image in a computer program. Schematically depict the frame at first, then the web and the method of its attachment. Where will the handles be located, the casual, cheek, maybe in your gate need to make "peephole"? Allow yourself to fantasize and create an original design that you will be convenient to use, well, we will try to explain basic principles Construction of the simplest gate.

Since natural wood was decided as the main building material, stands up The question of choosing a specific breed. In this situation, it makes no sense to buy expensive species, especially if you make such work for the first time. The gate of the fence from the tree will look great, even if they build them from cheap Pines. Such wood is pretty soft, means, her It is easy to process, it is distinguished by a beautiful texture and pleasant color, which, if desired, can be changed with the help of the veil. But what would breed you chose necessarily Make sure the humidity level is at least 18%. Otherwise, after assembling the gate, wood is quicken, and the whole design turns. It is also a prerequisite for the processing of all wooden elements by antiseptic and antipiren means. The first will protect the material from insect pests, and the second - from fire.
Recommended protective impregnation for wood:
- Tikkurila Valtti-pohjuste is an antiseptic primer protecting against wood fungus, rot, mold. From above, you can cover wood with varnish or paint;
- Helios Boritex - antiseptic means Deep penetration. Protects against dampness, fungi and blue;
- Senezh Eurotrans - powerful antiseptic capable of stop wood decomposition processes onstudy stage;
- AURA BIOSTOP - universal composition from fungi and insect pest penetration;
- LIGNOFIX I. —Profi is a highly toxic agent from insects and fungus.
When buying one or another antiseptics, pay attention to the instructions and the validity of the protective layer. Upon expiration of the specified time, all the wooden design details should be processed.
Useful Tip: First process wood antipiremAnd then - an antiseptic.
In our case, it turned out simple drawingwhich you can see in the image below. Note, what on nem. Immediately affix the size of all sections and parts, what will significantly simplify work. In the height of the gate will be 1, 8 M.width - 4 M.. Gate width is not width opera (Passage). The latter will be less than the width of the gate on 2 —3 cm.

What concerns the gate supports, they can also be made of wood, but it should be taken into account what They must withstand serious Load. Accordingly, if you want to make them wooden, you should choose a more durable breed. In this case, in addition to the processing of the antiseptic part of the columns, bunting In the ground, it is necessary to deceive with bitumen mastic and wind up the rubberoid for waterproofing, otherwise they quickly rotate. Alternatively, many prefer to use metal poles, but so that they will serve for a long time, they need to carefully process them. To prevent corrosion, the metal is cleaned, degreased and coated with anti-corrosion paint or two layers of anti-corrosion primer.

Necessary instruments:
- roulette;
- plumb and level;
- drill SO drills on wood or metal;
- screwdriver;
- boer or shovel;
- bulgarian;
- welding machine;
- hacksaw.
Since in our case the support pillars will be metallic, then the list of tools was switched on welding machine. Production of a gate from a tree requires minimal access skills with such a technique, but if you do not have them, it is better to make supports from wood.
What materials are needed for construction:
- pipes 150 mm for supports;
- pipes 50 mm for frame;
- 10 mm reinforcement rods to enhance the frame;
- steel corners;
- powerful loops - 6 pcs;
- bar. 50x50 mm - 4 pCS;
- plaque for the collar of the gate;
- weatherproof varnish or wood paint;
- cement M300 or M400;
- river sand;
- crushed stone;
- fittings (locks, deposits, cheeks, etc.).

How to make a gate of wood with your own hands:
- Start from the installation of the support pillars, cutting out from metal pipes with a diameter of 150 mm parts of the desired length. Do not forget to cover all metal components of primer or anti-corrosion paint. Consider that the length of the pillars should be greater than the height of the gate at least 1m - This part will be buried to the ground. If the gate is large and heavy, depth can be increased to 1, 5 M..
- Drop the pits whose diameter will be at 20 —25 cm more diameter pillars. To do this, you will be useful to the bobbed or shovel.
- Poons pumped 15 cm layer of rubble and thoroughly sink it, slightly watering with water.
- Install the formwork inside the pit and insert the operating column exactly in the center. This work is better to perform together - One will hold a pillar and adjust its position, while the second will work the level and set the direction of adjustment.
- Prepare a classic cement-sandy solution in a 2: 3 ratio and fill the space between the formwork and the post. To prepare a more durable concrete, mix cement, sand and shubeble In proportion 2: 2: 3.
- After pouring the concrete, brew on the hinge supports, and the upper ends overlap the plugs so that moisture and garbage penetrate inside. Caps can be made of sheet steel or buy ready. For each goal sash, you must install three loops on equifferent Distance from each other. The upper and lower loops must be located in 20 —25 cm from the ends of the support pillar.
- For the manufacture of the frame of the first sash, cut the pipe 50 mm on the desired number of parts and decompose them on a flat surface as they will be in the gate. Check out the correctness of the geometry, vertical and evenness of the angles, then boil the parts with each other.
- By analogy, collect the framework for the second sash, tracing In order for the diagonal of the rectangles of both parts of the future gate coincided.
- We weld the reinforced rod on the diagonal of the frame - so the gate will be more durable.
- We weld to the "ears" frame in accordance with the location of the loops on the support pillars. This will require help. one-two The man so that they hold the sash while you make the markup on the frame.

- At the top and bottom of the frame welding 2 steel corners in 20 —30 cm from lateral elements.
- Drill in the corners of the hole and secure on them a wooden bar with a bolt. The length of the bar must match the width of the sash.
- Attach the boards to the tree with screws on a tree. You can arrange them close to each other so that the gate look like a solid canvas, or with a small distance. If you chose a second option, it is better to mark on the bar that the distance between the plating boards was the same. Boards must be a little longer frame at the bottom and above.
- Left Just hang out the flaps on the loop and make the fittings for the fittings. By the way, cover the gate of the tree with varnish or paint should be touched by castles and handles. The coating update procedure should be repeated annually if you want the design to serve for a long time and saved a beautiful appearance.

Useful advice: between the surface of the earth and the lower edge of the sash must be Withstand the distance of at least 4 cm so that the small litter, the earth, plants or stones from the rain, did not interfere with the movement.
Decorating the gate is tree
Wood - unique building material, which is perfectly combined with most types of decorative processing. If you build a pine gate, but you want to give her a more noble view, you can todded The surface of the mourn, making imitation of cherries, ash or oak. So, from the usual building you can make the original gate from the tree under ancient or stylish supplement of the landscape.

If you are not alien to the carts for visual art or applied creativity, you can put on the web painting or decorate it with multi-colored mosaic. And for thread lovers it generally, Wide field for activity. However, in this case it follows yet Carefully protect the wood from the effects of atmospheric phenomena, since water and dirt will accumulate in recesses.

If you want to save and emphasize the natural beauty of the texture of the tree, cover the gate with a transparent or toned varnish. Be sure to choose the weatherproof varnish. For this purpose perfectly suitable Yacht - it does not allow the tree to burn out under the sunny rays and protects well from moisture. For forest reliability It is recommended to apply lacquer in two layers (second layer Apply only after complete drying first).
Finally We advise you to see useful video by Making a gate of wood with your own hands:
Tree Gate: Photo
We tried to describe in detail how to make a gate of wood, and now we propose to be inspired by the original works of hardworking owners Duty sites and private possessions:


