If you want to turn a balcony in a cozy recreation area, where you can spend time in summer and winter, it is worth thinking not only about the interior of the walls, but also about the insulation of the floor. In this article we will tell you how to warm the floor on the balcony and what materials can be used for this.
Content
Types of materials for thermal insulation of the floor
If you do not know, the better to insulate the floor on the balcony, we suggest you consider several types of materials that are well suited for a similar purpose.
Polyethylene foamed
The insulation, created on the basis of foamed polyethylene, is often available in the form of rolls. The thickness of the sheets is several millimeters, and the thermal insulating properties of such a material are not the highest, that is why it is used in the complex with other means.
One of the popular insulation based on foamed polyethylene is a foam, one side of which is covered with foil. Rolls should be laid so that the reflective layer was at the top - so in the room there will be more heat. In addition to thermal insulation properties, the foam also has water-repellent qualities. The minus it is that it has bad vapor permeability.
On sale Penofol is represented by three main types:
- penofol "A" has a reflective coating on one side of the sheet;
- penofol "B" is distinguished by the fact that it is covered with foil on both sides;
- the Penofol "C" on the one hand is covered with foil, and a protective substrate is pasted onto its second side.

Polystyrene foam
Foam polystyrene foaming is often used for floor insulation. It has a number of advantages, the main of which are considered low weight, good thermally insulating ability, simplicity of installation, as well as low cost. The polystyrene foam is available at a price and sold in almost any construction store.
One of the varieties of polystyrene foam is a penplex - foamed material with low thermal conductivity, high density, good water repellent properties and a small mass. This type of insulation has excellent performance and long service life, but before insulationing the floor on the balcony of the penplex, it will not hurt to read it with its disadvantages:
- material has bad vapor permeability;
- low-quality expanded polystyrene is released to the external medium toxic substances, the same applies to the combustion process;
- many fasteners do not differ in high strength.

Mineral wool
Many consider mineral wool to be the most acceptable option for the insulation of residential premises. First, its thermal insulation qualities are at the height, secondly, it is completely safe in terms of burning, eco-friendly and harmless. Mineral wool is easy to work, its light weight and elasticity allow you to easily insulate any spaces and even the most hard-to-reach places.
By cons of the material, it is necessary to mount it necessary in workwear, protective glasses, respirator and gloves. Wool fibers will easily crumble and can damage the skin, mucous membranes, eyes. Among other things, low-quality cheap wool is made with the addition of formaldehyde, and it is very dangerous to health.
Before insulateting the floor on the balcony by this material, it is worth familiar with his varieties:
- There is a mineral wool that is made from domain slags, but it is practically not used for the insulation of residential buildings and premises.
- Glasswater is another subspecies of Minvati. It is environmentally friendly, light, but its fibers are too brittle. This means that it is necessary to work with it, observing caution, and the external layers of the insulating cake must completely protect the room from the micro-faceted glass ingress.
- Basalt wool is the optimal version of the insulation for residential premises. It is more expensive glass, but on its operational characteristics exceeds the previous analogue.

Ceramzit
Ceramzite is used for the insulation of the balcony floor is not so horny, since it has the worst thermal insulation properties than Penoplex, Penofol or Minvata. However, this material is distinguished by environmental purity and ingrediability. Ceramzite is relatively lightweight, although heavier than the above are the analogues.
Before insulationing the floor on the balcony with a clay, you should choose the appropriate option. This material is characterized by the size of the fractions. The smallest elements are from 0.1 to 5 mm, there are larger fractions that reach a length of 4-5 cm. In some cases, the clamzite interfere in the concrete solution and apply a layer of screed on the floor, and sometimes arrange on the floor of the lags, space between which they fall asleep insulation.
If you do not know how to insulate the floor on the balcony under the tie, think about the use of clay. To date, the so-called "dry screed" technology becomes more and more popular. In the process of its execution, the floor is first coated with a layer of fine-flow clay, on top of which plates from the gypsum fiber.

Floor preparation work for insulation
Before the start of the immediate process of thermal insulation of the balcony floor, its surface must be prepared. This includes such actions:
- The working base is aligned. The protrusions are cut or spilled, cracks are smeared with a solution. Before climbing the slots, the surface is thoroughly cleaned from garbage and dust.
- The gender is then covered with primer deep penetration, after which they are embarking on the lubing of problem areas.
- To close the cracks most qualitatively and reliably, they are recommended to expand to a depth of up to 10 mm, and then fill the appropriate repair makeup. This composition uses concrete solution, putty, sealants.
- After frozen the means of its excess is cut and grind the surface to one level.
Before insulationing the floor on the balcony under the tile or other finish finish, it must be hydroizing. Sometimes for waterproofing it will be enough to simply cover the base of the primer layer, but in some cases it is worth performing more complex work. With poor moisture waterproofing, the moisture can fall into the insulation layer, which happens, destructively affects the material.
Floor waterproofing on the balcony can be made by several methods:
- Apply a layer of penetrating material to the working base, for example, "hydrochp" or "penetron". This method can be used for concrete floor.
- Cove the floor with a layer of coating waterproofing made on bitumen or on a polymer basis.
- Mount on the floor layer of inlet rolled isolation. It is important to make it so that the sheets of the material are very tight and over the entire area lay to the surface.

Floor insulation using P-shaped racks
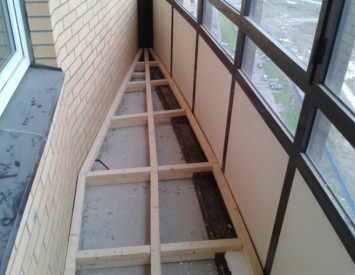
One of the simple methods of insulation of the floor on the balcony with their own hands is the creation of a frame of P-shaped string brackets. Under such a frame, an additional space remains where you can lay a layer of heat insulating material. We describe the process in the form of a sequence of actions:
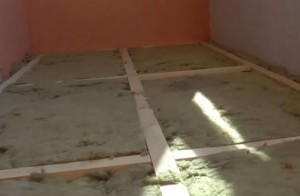
- First you need to calculate the required number of racks. They are installed every 50 cm on each longitudinal lag, as well as 1 piece on all transverse jumpers. On the balcony, as a rule, it is sufficient to mount 3 longitudinal lags. The jumpers are based on the P-shaped racks and are attached to the lags of metal. When installing jumpers, it is important to take into account the location of the junctions of plywood, which will become the top layer of the insulating cake. It is advisable to draw a scheme for the location of all elements on paper before starting the installation.

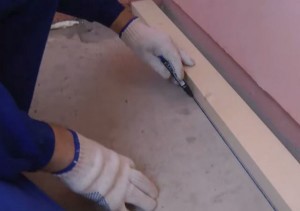
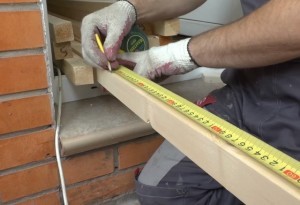
- Before starting the frame of the frame, the floor should be cleaned of garbage. Then the marker is marked with marker. Noting the place of laying Lag, it is worth considering that the bars are mounted not close to the wall, but with a gap of 5 cm. On the wall, it should also be noted the "zero line", using the construction level.

- Applying the line of the future position of the lag, you can also designate the place of the jumper installation. At those points where the brackets are attached, you also need to apply the appropriate markers. If you are not mounted non-solid lags, but you kill individual fragments of bars, then in the places of their connection, it is necessary to put on the P-shaped rack.
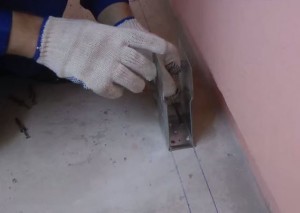
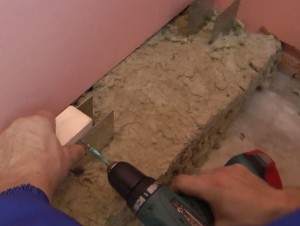
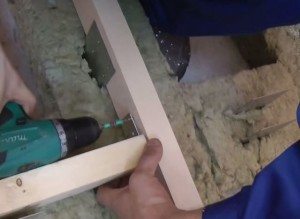
- Through the holes in the brackets on the floor should be scheduled to screw the dowels. Subsequently, the holes under the fasteners are drilled there.

- Then, when the holes are done, the P-shaped racks are fixed on the floor. Without twisting dowels to the end, check the smooth location of the elements. If everything is in order, the dowels are screwed down to the stop.
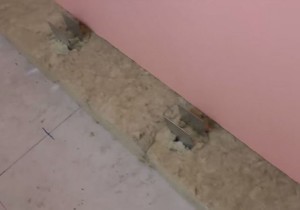
- Installation of the insulation and installation of the lag should be carried out at the same time, so anywhere there are no gaps and pockets, through which the cold will penetrate the room. In the process of creating a frame, you should chop the insulation to the elements suitable in size. These details make slits where the vertical brackets will enter. After that, the insulation is mounted on the balcony floor, putting on the racks.
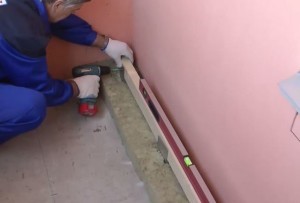
- Between the halves of the P-shaped rack insert wooden lags, even its "zero line", marked on the wall. The bar is fastened to be slightly using only 1 fasteners. After that, the lag is aligned on the opposite side. The construction level check the accuracy of the installation, after which the bar is finally fixed with self-draws.
- The opposite wall has a rack insulation and lags are fixed in the same way. In the process of work, it is important to check that all bars are in one horizontal plane.
- The third longitudinal part of the frame is laid in the middle between two extremes. Works are carried out in the same way: at first, the P-shaped brackets are attached to the floor, they wear a strip of the insulation, and the wooden timber is mounted on top. The larch level is checked for two extreme raids.
- So that the framework was durable and stable, between longitudinal lags, it is necessary to pave the crossbars. They are attached to the same P-shaped racks that are installed one in the middle between lags. As in the previous cases, the insulation is first put on the brackets, and then the wooden timber is screwed down.
- The jumper cuts off such a length so that it is freely placed between longitudinal lags. When installing it is attached to the bars not immediately, but only after a thorough level check.
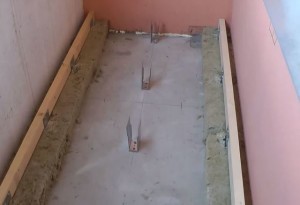
- When all lags and crossbars are mounted, the frame can be considered ready. At this stage, you can proceed to the final insulation of the balcony floor.

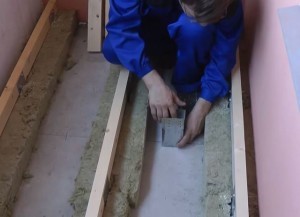
- Between parts of the frame remained unfilled zones. To pave there insulation, you need to cut fragments of suitable size. They are installed in the "windows", and then mounted the second layer of the heat insulating material, which should be placed in the lags.
- The final layer of insulating cake will be plywood. From it cut parts required size, which are then placed on a wooden frame and fixed with screws. Between the walls and plywood necessarily leave a gap of a few millimeters, which will compensate for linear expansion of the materials under the action of heat.
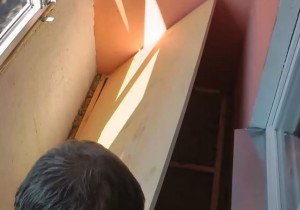
- Under the plywood, you can lay a vapor-permeable membrane, and then later to mount the sheets. Screws in plywood need to tighten very tight, literally vtaplivaya them into the timber.

- Finished floor can be finished in any convenient manner.


Warming of the floor with heating system
On the balcony, you can make so-called "warm floor", going on which will be comfortable even in the coldest weather. Particularly successful in this option if you decide to use as decorative trim tile. To learn more about how to properly insulate the floor on the balcony, you can from the video on the Internet, we also want to give a description of this process:
- First, the floor must be mounted skeleton. To do this on the floor cross member is laid, on top of which are set three longitudinal joists. Sleepers are cut such a length, that they are placed freely between the house wall and the outer wall of the balcony, and wherein there is a gap of 5 cm on each side.
- The transverse supports are mounted at a distance of 50 cm from each other.

- Over the cross bars stacked logs. Two in each wall and one in the middle. As in the previous case, the joists must be located at a distance of 5 cm from the wall. To the cross beams attached with screws.

- After that, through the lower rungs in the semi-drilled holes where to insert expansion anchors. Beams are fixed anchors on both sides.

- On the assembled frame can be mounted heater. In this case, the insulation will perform penoplex. From it cut parts of the correct size and is placed between the beams on top of the cross members. Penoplex to be adjacent to the frame is not too tight, there is a clearance allowed up to 7 mm.

- When the heater is installed completely, a gap to be filled with foam and wait for its solidification. After that, the excess must be cut.

- Penoplex lay on top of the plywood sheets, pre-cut pieces of desired size. They attach to the wood screws, that are screwed in increments of 15 cm and a utaplivajut sheet to a depth of 1 mm.

- A system of infrared "warm floor" can be laid on the finished plywood. To do this, on the working base at first a layer of foam, placing it with a foil side upwards. At the edges, the foam is glued to double-sided adhesion, and with the joints of sheets.

- Infrared film heaters are stacked over the substrate. Like the foam, they are fixed on the edges of bilateral scotch. If there are several segments of the material, it is prohibited to apply them to each other.

- After that, the free ends of the wires are isolated, all conductive tires are connected to the thermal sensor, then, according to the scheme, commute the cable part. Wires commute on block terminals, which are placed in a convenient place for use.

- Upon completion of all work, the floor is checked for performance. If everything is in order, the power is turned off and the installation of the finish coating continues. For a start, infrared wires are covered with film waterproofing, so as to protect them from accidentally entering water. Film in all places should provide complete tightness. Fragments are stacked by braziness, all seams are sinking with waterproof scotch.

- The next step of insulation of the balcony with warm floors is laying of decorative finishing material. Trying not to damage the film, the finishing layer is mounted on top of it, for example, laminate.

- The final step will be the installation of the plinth after the decoration of the balcony walls.


