
If the mixer broke into the bathroom or in the kitchen, do not hurry to cause plumbing and pay him for work - installing the mixer with your own hands is so simple that you will be surprised how deftly you will succeed! Of course, we are not talking about elite plumbing products with special designs. In this article we will touch the installation of classic mixers, which are in every second apartment of Russia, and also tell me what to pay attention to when choosing a model.
Content
How to choose a mixer
First of all, it should be noted that the kitchen faucets and for the bathroom differ. In the kitchen, you absolutely do not need a sprayer for the soul and the hose, but in the bathroom without it can not do. The mounting height of the mixer also plays a large role - if there is a fairly low crane in the bathroom, then in the kitchen, this design will be extremely uncomfortable, because under the mixer it will not be possible to wash the dishes. You need to select a model not only in appearance, but also the material from which the crane and handle is made, the method of switching hot and cold water, etc. Let us dwell on all these nuances in more detail.

Material for the mixer
Today, such a variety of models of mixers are presented on the market, that the head goes around, and to understand the novice plumbing will be very difficult. If you do not want a crane to rust through a year or other exploitation, in no case choose the silhumine mixers. Silumin is a material obtained by alloy aluminum and silicon with the addition of other substances, such as lithium or sodium. Even the most expensive mixers from the well-known world brands are not insured against intercrystalline corrosion, which manifests itself first in the form of small white spots (similar to the lime bloom). But under a glossy coating, the metal destruction is slowly, and one day the mixer is simply falling apart in his hands or bursts until the owners are at home.

How to recognize the silhouette mixer? Pay attention to the color of the cervix - if it is gray, then you are dealing with a silhofin. Spin is a detail located above the sealing ring on the root part of the mixer. More such mixers are much easier than from other materials, so we stick in the hands of several models for comparison.
To not guess, choose bronze or brass faucets. Models from these metals are able to work well for decades, needing only in periodic cleansing, like any other plumbing.
Another important point is the material of seals. They must be made of dense rubber, but in no case are not from plastic, even if the seller argues that it is an ultra-modern and durable material. To date, only rubber is capable of providing a reliable and hermetic compound.
The spacer ring is in most cases comes with a mixer separately and lies in the package with fasteners and small parts. Many inexperienced plumbers do not understand why it needs and do not install it, as a result of which the dilapidation is very quickly loosened and begins to leak. Therefore, it is necessary when buying a mixer, check for the presence of this ring.

A split spacer should be very tight. It is placed on the root of the gland before insert it into the nest. Since the ring is tight, it can not enter the hole from the first time, so it must be squeezed on the sides and push with a click.
Shut -ling fittings
The device of the faucet crane plays the last role when choosing a model. And the speech here is not at all about the convenience of operation - the fact is that various ways of opening and overlapping water affect the deadlines for the operation of plumbing. Previously, there were only valve two-handed taps, and recently appeared cork with one lever.
Professional plumbers recommend choosing a mixer with two handles, only if you do not imagine your kitchen or bath without it. Modern lever models are superior to double-paced in all respects.

Why lever mixers are better than double-paced:
- They save water economically - in a mixer with two handles, you first open the cold water, and then gradually add hot (and it rarely starts to flow at once), at this time the water is rehasty. In the lever mixer, you can immediately open up so that warm water poured, and then only slightly adjust the position of the handle. In addition, overlap water with a lever mixer is much faster - you just need to lower the handle down, and the cranes will have to be twisted much longer.
- Efficiency - In the valve cranes, the spool and knee with the saddle give hydraulic resistance 5 times higher than in the valve crane where water goes well. If the system falls the pressure, then in the two-handed tap water will be bapt, and a normal jet will remain in the lever due to low resistance.
- Convenience - most of us have grown into the times of valve cranes and needed to be gradually used to the lever. They were in a novelty to use, but if you figure it out, the process of turning on / off / adjusting water and the pressure began to demand much less effort. No longer need to twist two handles - it is enough to press the lever more slightly or turn it away. Now, frowning the head, with closed eyes it will not be turned out to open hot - the handle is only one.

In general, wherever look - some advantages. But some users complain that if you sharply open the lever crane, it can provoke hydrate and all pipes burst. This is a partially true statement that over time the myths and guessing, and now misleads inexperienced people. In the very first plumbing urban systems, and truth, plug cranes with a longitudinal slot in a conical traffic jam, and they gave hydroedar with clear consequences in the form of burst pipes with a sharp opening. Since plastic pipes were not yet invented, the plumbers found a single reasonable way out - to replace traffic jams on the screws that open gradually.
In aviation, more than 100 years ago, cranes were invented with spherical, and not a conical, cork and round, and not longitudinal, hole. That is, in fact, such a tap is not able to create hydrate. Moreover, it is not even able to proceed, because in the process of wear, the pressure of water coming out of the pipe, presses the plug to the saddle throughout the circumference. And the latter is such a "aircraft" much cheaper and easier in production. It is not clear why, but the aviators did not want to share their invention with plumbing for a long time, but during the restructuring it was drunk from a dead point, and today spherical cranes almost completely outlined spool valve structures.
Soul scatter
So, when you stopped looking towards the valve cranes, it's time to decide on the "sunflower" of the shower mixer. The water diffuser must necessarily be equipped with self-cleaning nozzles. It is very easy to determine them - on each hole there is a soft rubber or polymer nozzle with a hole. When you turn on or turn off the water, the nozzles are revealed and narrowed accordingly, throwing the lime flask. If the nozzles are made of hard static material, then they will be scanned sooner or later, and the head will start splashing in different directions.

Replacement of the mixer in the bathroom
In this chapter, we will look at various ways to install mixers for the kitchen and the bathroom. With all of them, any owner or hostess will easily cope, making sure that sometimes with their own hands you can do what others pay impressive amounts to plumbers.
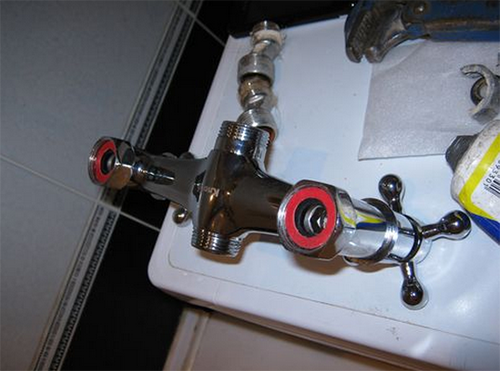
Before starting to work, it will be useful to familiarize yourself with the installation scheme of the mixer. The image below shows the assembly diagram of a 3-h-composed bathroom mixer. We remind you that the specificity of the installation depends on the type of construction and its location - in the kitchen, in the bathroom on the sink, on the side of the bath itself, etc.

To work, you will need a gas (adjustable) key, vinyl tape and hammer. The tape is needed for winding nickel-plated nuts before they are tightened. This will save the coating safe. By sending the key, you will dismantle the old mixer.
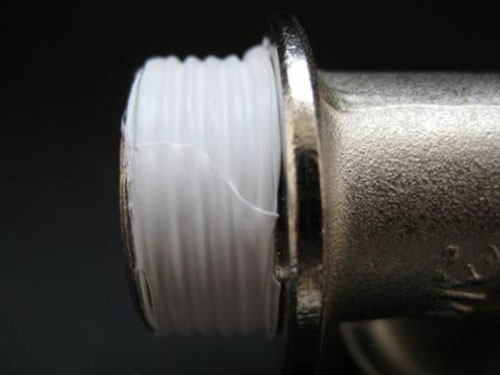
Particular attention should be paid to waterproofing locations of the mixer elements. If earlier it was used for this linen cubicles, today it is better to buy tape-fump. It is winding at 15 layers clockwise (as a thread goes) so that when screwing the nut the tape seal the thread and did not give the water to the slightest chance of leaving outside. To understand that you wrapped the tape is not very easy - when screwing the nut, it will slide, and any waterproofing in this case cannot be speech.
Dismantling of an old mixer
Before proceeding to the disassembly of the old mixer, be sure to break the water in the pipes! The most important problem when working with structures that did not change 20-30 years are their reluctance to unwind. For many years, salt precipitations tightly sat down in the places of fasteners and turned into real stones. And if you can't unscrew the mixer with a gas key, then you should not tear your hands and risk breaking the pipe - there is a proven folk remedy. Take kerosene or brake fluid and drop 5-7 drops to the petrified joint. After 10-15 minutes of waiting, try working again to work again - the fasteners should succumb. If it does not help, use the VD-40 tool, which instantly removes rust, plaque and other blockages from metal surfaces.

The mixer is better to substitute a bucket or pelvis so that the water remaining in it does not hit the floor. After you unscrewed and removed the mixer, disconnect hot and cold water hose hoses from the crane. Sometimes it is easier to do before unscrewing the mixer. It is better to do this work on the basin, because water almost certainly remained in the hoses, even if you blocked the valve.
Installing a new mixer in the kitchen
Before installing the mixer in the kitchen, prepare a free space and cover with a film or a rag. All spaced surfaces that can be damaged by water or an inadvertently abandoned tool. The technique at the time of work is better to rearrange in another room (the refrigerator can be left in place).
One filler key can be not enough, so it's better to stock up a couple of screwdrivers, passups and a set of wrench keys. You will also need a drain corrugated or all-metal hose (2 pcs.), And its length should be determined in advance. The hose will go from the drain hole of the sink to the sewage drain, and it is desirable that it does not bend, otherwise the bend will create a potential location of the bed.

Cross hot and cold water. If possible, slightly move away the sink from the wall to free up more space for work.
Installing the mixer on the sink:
- Podlet hose Connect to the mixer from the side of the short fitting (this is a metal rod with thread).
- Remove the bronze nuts from protective spills and tighten the studs until you stop.
- Through the opening in the sink, skip the hose on the mixer, and the second hose is connected from below to the corresponding hole in the mixer.
- When the mixer is already on the sink, two hoses are connected to it, put on it a rubber sealing gasket and pressing the metal plate, screw the bronze nuts on the studs.
- Tighten the nuts with a suitable key, but do not drag them so as not to damage the sink or do not thread the thread.
- Connect the hoses leaving the mixer to the water supply. The most difficult thing here is not to confuse them. To do this, turn the mixer with a crane on yourself: right hose - cold water, left - hot.
- Attach the hoses to the plumbing pipes.
- Check the density of the compounds (2 at the mixer and 2 in pipes).
- Turn on the water and check the performance of the mixer. Before switching on, make sure that the tap is spinning or the lever is omitted.
Video on the installation of the mixer will give a complete picture of this work:
Installing a new mixer in the bathroom
Installing the mixer in the bathroom occurs a little differently than in the kitchen, and the installation methods can be somewhat on the wall above the bathroom, in the washbasin and on the side of the bath. If you need to put the mixer in the washbasin, use the instruction set out above - there is no particular difference there.
Consider the installation of a shower mixer, which is attached to the wall, as this is the most common option:
- Cross hot and cold water. If the taps are tightly rotated, process the threads with lubricant and try again. After that, check whether the water flows at open valves of the mixer.
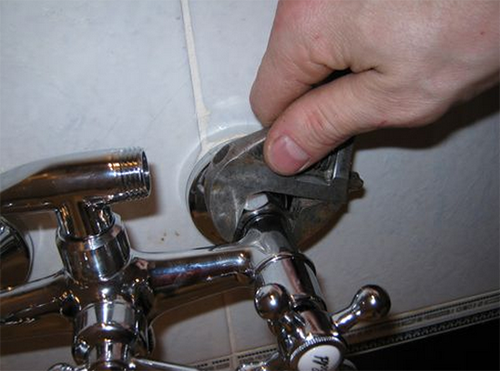
- Using the adjustable key, unscrew the two nuts on the eccentrics.
- Remove the old mixer.
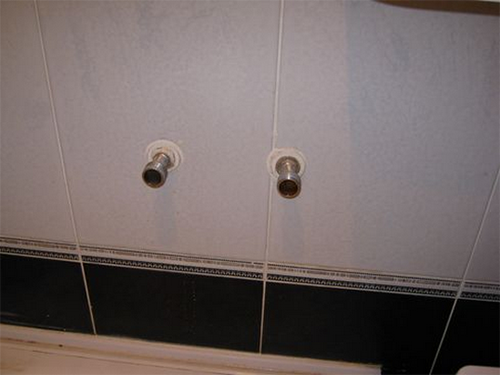
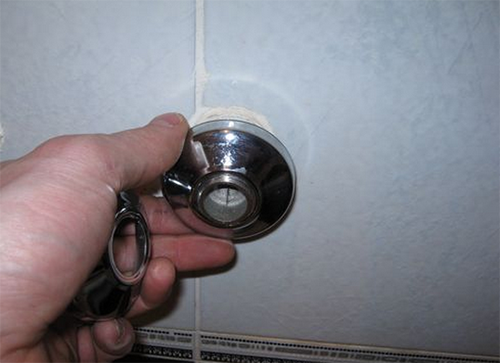
- If the eccentrics are in good condition, they can not be changed (brass). Unfortunately, in most cases, the eccentrics have long left much to be desired, so they should be replaced. Slap the gas key closer to the wall and start turning counterclockwise. Remove very carefully not to break the eccentric - if this happens, you will have to disassemble the wall.
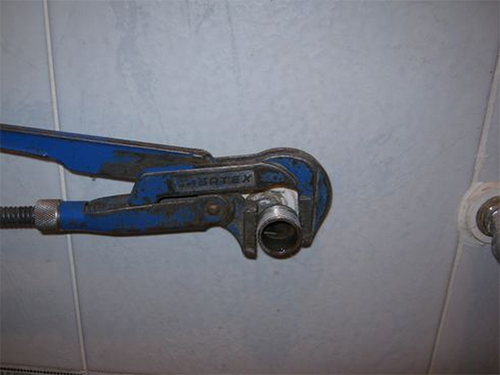
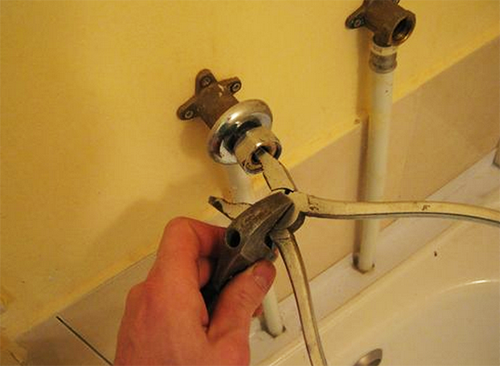
Useful advice: If the old iron eccentric is not amenable to heighten it with a lighter or candle flame and try unscrew again. - To unscrew the old Soviet eccentrics, insert one pliers in the hole and try to turn it out from the inside. If there is not enough strength, clamp the pliers with a gas key, which will act as an additional and more comfortable lever. More understandable, the process is visible in the image below:
- In the pipe after removing the eccentric you can see the old linen winding. Remove it, otherwise the new crane will challenge.
- Clean the inner surface of the pipe from the plaque and wrap the tape-fump on new eccentric.
- Screw the applied eccentric tape into the thread clockwise. Watch that the eccentrics are strictly symmetrically located. For convenience, when twisting the first eccentric, consider the number of revolutions.
- To properly install a horizontal mixer, screw it off without a sealing tape for one eccentric, cut to the second and check the horizontal level.

- If everything is smooth, remove the mixer and set the gaskets on it.
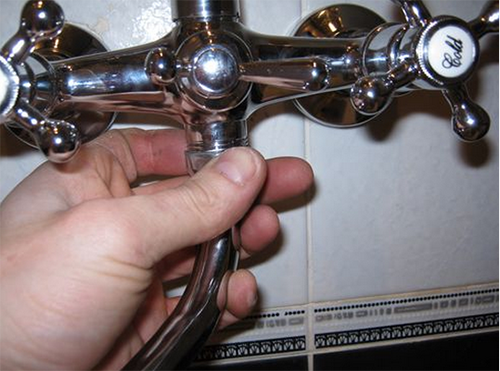
- On the eccentrics, screw the decorative cups to the end of the thread.
- Start screwing the nuts of the mixer on the eccentrics first manually, and then the confront key. Tighten only slightly, so as not to thread the thread.
- Attach the hose with shower and the remaining elements.
- In order not to cut the glands, supervise them with liquid soap.
- It remains only to unscrew the fifth and cold water valves and check the functionality of the mixer.


A more vivid process is shown in the video below:
The installation of the mixer on board the bath occurs on the same principle as on the sink, the only difference is that the hole for the crane is not located in the sink, but in the bathroom housing.
Hidden mixer
More and more people prefer to replace ordinary mixers on the design of the hidden type - they look very interesting and aesthetic. However, the installation of a hidden mixer requires knowledge and skills, so it is better to trust it with a specialist, especially if you have not previously changed to plumbing before that.

Any hidden mixer consists of three components:
- mounting box;
- functional part (mixer);
- decorative exterior panel.

The main difficulty is that the universal method of installing such hidden mixers does not happen - it all depends on the configuration of the model and from the species of the mixing node. Therefore, if you are not sure that you will deal with the installation instructions attached to the mixer, it is better to use the services of professional plumbers.


