Due to its high aesthetic indicators and practicality, hinged ceilings are widely popular. Their design consists of two elements - the canvas and profile. At the same time, such structures are very durable and easy to install. We will tell about all the intricacies of the installation of mounted ceiling in this article.
Content
Features of production
The ceilings are manufactured in two ways depending on the material used:
- When using a polyvinyl chloride film, the size of which is 1.5 m, several fragments are connected by welding. The amount of film cloth depends on the size of the ceiling. At the same time, the seams in the connection places are completely invisible. Fragments are stitched quite firmly, which allows you to maintain the integrity of the coating for a long period of time.
- In the manufacture of polyester-based cloths impregnated with polyurethane, the coating in most cases does not have seams, since the material width reaches 5 m. The fabric is sewn if the ceiling in its dimensions exceeds this indicator.
The pattern on the polyvinyl chloride and polyester cannons is also applied by different methods. The first material is painted during the production period in an industrial method, the second - after installation with the help of special paints. Also for mounting use aluminum or plastic profiles. These elements are divided into three types depending on the place of attachment:
- universal;
- wall;
- ceiling.
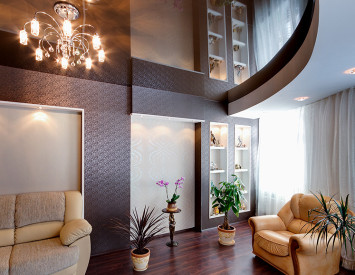
Hinged ceilings. Photo:


Advantages of stretch ceiling structures
The use of similar products in the design of such products has a number of indisputable advantages that are reduced to such as aspects:
- Installing the mounted ceiling allows you to eliminate various defects and get a perfectly smooth surface.
- The ceilings have high strength, because They are able to withstand 100 kg of weight on 1m 2.
- Resistance to moisture. In the case of flooding, the material may become under the severity of water to the floor level without disrupting integrity. After pumping moisture, the coating will take its original form, while the need for repair does not arise. This property allows you to install such ceilings in rooms with high humidity.
- Stretch-type ceilings create heat and sound insulation effect.
- These designs are also resistant to ignition, so that they can be installed in rooms with increased fire hazard.
- With the help of mounted ceiling coats, you can visually adjust the room. For example, if the room has low ceilings, the attachment will help visually the space.
- Another important advantage of this coverage is simplicity of installation. For example, mounted ceilings from plasterboard are characterized by a more complex installation process. The work is conjugate with a significant amount of construction garbage and the need to clean the room from furniture, which is certain inconveniences. The use of plastic material does not imply similar features.
- Among the advantages of mounted ceilings, their aesthetic indicators occupy a special place. Today there is a large selection of colors and textures of cloths. The consumer has the ability to establish a ceiling, imitating marble, wood, metallic or other materials.
It is worth noting that the wide variety of color solutions makes it possible to create a design in any style. The greatest popularity is the effect of the starry sky. For its achievement, two methods are used. The first is based on the use of a light generator and light guide, the second - LEDs. The color of the material does not fade over time, which will save the coating in its original form for a long period of time.

Methods for fastening the ceiling
There are three options for mounting the attachment. Consider each of them in more detail:
- The first is called the harpoon method. It is used when working with a polyvinyl chloride film. In this case, fasteners are used in the form of harpoon, which are fixed along the edges of the canvas. Next, these hooks cling to aluminum baguette, as a result of which the film is stretched. The cloth in size should be slightly less than the ceiling parameters, approximately 7%.
- The stroke method is based on the use of wooden stroke and aluminum profile of the P-shaped form. The fixation of the web to the profile is carried out by means of a special tape, which provides the coating tension. In the process of work, you need to ensure that the stroke does not jump out of the groove.
- The clip is used when installing ceilings from polyester. In this case, in contrast to the two previous options, you need to use a plastic profile. This method is convenient because it does not require accurately measuring the web, since it should be larger than the ceiling. After tension, the surplus should simply cut off.

Preparatory stage
Before making a mounted ceiling, you need to remove measurements. When performing this work, maximum accuracy should be observed, since the structure will depend on the results. It is necessary to prepare a sheet of paper to apply the scheme and do such manipulations:
- Initially, it is necessary to determine the ceiling perimeter and apply the sheet data.
- Next, all surface diagonals are measured. This is performed as follows: the distance from each angle to other available corners is determined.
- The data obtained is fixed in the drawing.
- After the sizes of the ceiling surface are defined on the scheme, the locations of doors, windows, communications should be applied.
- This will help in the process of work, the most optimally placed the seams of the canvas.

How to make a mounted ceiling with your own hands
The fastening of the stretch ceiling is not the most difficult task with which even non-professional can cope with, given the features of the workflow:
- Initially, the profiles should be fixed. Fasten these parts is needed throughout the perimeter of the surface.
- Before that, it is recommended to align them in terms of level. At its length, profile elements must be 2 cm less than the side of the ceiling.
- When working with low ceilings, the fastening can be made in bulk, it will help save several centimeters. But in the event that the size of the lamp will exceed the height of the profile, then a certain distance from the ceiling is still necessary to retreat.
- Not always profiles are well joined in the corners area. If such a problem arose, you need to cut them under 45 °.
- To do this, with the help of the ruler, you need to measure at height from the base of the baguette distance of 0.5 cm. Then from this mark to trim the profile at the desired angle.
- Next, you can move to fixation. In the process of screwing the baguette to the wall, it is necessary to track its location. This is done with a level.
- The distance between the fasteners depends on the material from which the surface is made. If the walls have a metal or tiled coating, the mounting step must be 12 cm. When working with a brick, concrete or drywall surface, a distance of 8 cm is observed.
- The subsequent installation of mounted ceilings involves the installation of the racks on which the lamps will be located. Work should be started with the definition of light bulbs.
- Then the racks are mounted to the surface of the ceiling, after which electricity is supplied to them. At the same time, it is recommended to mount the hidden wiring, since in this case the communication will be protected by finishing material from various influences from the outside. In addition, such wiring will not affect the interior of the room.
- This process provides the following actions:
- first you need to do in the walls of the groove (shoes). To do this, use a perforator with a nozzle in the form of a chisel or blades, a brown or channel chisel. In the absence of data tools, the Bulgarian is suitable, equipped with a disc on concrete;
- with it, you need to cut two lines, located in parallel to one to the other. Grooves are made according to pre-prepared markup.
- The wiring is fixed by means of special clamps. They, in turn, are attached with the help of a dowel of nails.
- Next you need to install sockets and branching boxes. Receptions for sockets are made using a perforator, which dresses a special nozzle.
- Then the prepared places should be cleaned and moistened, after which it is lubricated by alabaster or plaster. The junction box is installed in the almost similar way, with the only difference that it has another form and dimensions.
- Next, using a laser or a plumb, the points should be built on the floor that correspond to the center of the lamps. This will be required to determine the location of the lamps after the tension of the canvas, which will close the rack. It should be remembered that lamps whose power exceeds 60 W cannot be applied for stretch ceilings.
- At the next stage, the installation of the canvas is carried out. Work begins with an angle designated in the scheme. Fastening is performed by fixing locks on profiles. On each side of the angle, 15 cm of the canvas is attached.
- Then the film must be pulled into fastening baguettes. Previously, it should be warm up. For small-sized cloths, you can use a normal hairdryer, in other cases a hair dryer is suitable or a gas generator.
- In a preheated condition, the area of \u200b\u200bthe material increases by 10%, as the coating will be cooled and a smooth surface is formed and thus produced. But when performing this procedure, it is necessary to observe the measure, it is not worth overheating.
- If the material has a varnish surface, it should be "glossy". This process is performed using a hair dryer, which should be driven over the film until its surface becomes shiny. As a result of this procedure, the appearance of the ceiling will significantly improve.
- After the mounted ceiling is installed with their own hands, there may be chances on it. To correct the situation, the coating should be heated again. If not all defects disappeared after that, do not worry, after a certain period of time, the coating will become smooth.
- At the final stage of installation of the film, it is required for the last time for 20 minutes. After cooling the canvas, it is necessary to ventilate the room.
- Now go to the installation of point lamps. This will require marks that were previously made on the floor. With the help of a laser, you need to detect the middle of the lamp on the canvas and mark these places with a marker.
- Next, you should take the rings of the lamps and apply cyanacrylate adhesive composition on them. .
- Then these elements are glued to the surface of the ceiling coating. At the same time, the noteworthy point should be in the center. It is also necessary to trace the ring by glue completely connected with the web.
- Next you need to wait until glue dry well.
- After that, a fragment of the film is cut inside the ring. As a result, a hole is formed through which the height of the lamp can be adjusted. Then you need to screw the bulbs, and on this work is completed.

Recommendations for the process
In order for the installation of the stretch ceiling was made as correct and efficiently as possible, such aspects should be taken into account:
- The canvas should be stored in a warm place, after removing the packaging material from it.
- Do not put any items on the film.
- As a result of transportation or long-term storage on the canvas may result. This will not affect the quality of the material, but in its normal state the film will come after half a year.
- It should also be borne in mind that the coverage of large sizes is prone to sagging.
- Plastic hinged ceiling has a fairly high strength, but at the same time it can be damaged by cutting and stitching objects. Therefore, when working with this material should be accurate.
- If damage failed to avoid, then this should not be a reason for concern, since the tensionable structures can be easily repaired.
- Contaminations should be avoided. During operation, it is not necessary to bring to the film to the close distance of heating devices.

Conclusion
Stretch ceilings have high aesthetic properties. With the help of such a finish, you can noticeably transform the interior, make the room design with original and aesthetic. In addition, these ceilings are rather functional. They are resistant to various impacts, as well as fireproof. This makes it possible to mount coatings in rooms where there is a chance of fire. The installation process provides several steps and is simple enough to learn. Therefore, in order to supplement the interior with mounted ceilings do not necessarily have qualified knowledge.
Hinged ceiling. Video:


