It is impossible to imagine the kitchen without washing. Sink - this essential attribute in the kitchen is designed for washing dishes when cooking. Even if a person works a lot and he has no time to prepare, all the same washing in the kitchen. Wash out vegetables and fruits, cook the fragrant coffee or spend the evening with friends for a cape of herbal tea - still have to wash the dishes. For these purposes, and serves sink in the kitchen.
Content
You can install the sink in the worktop yourself. For this you do not need to possess special skills and have a special tool. But it should be borne in mind that in any case when installing washing there are nuances. First we learn what kinds of sinks exist.
Types of kitchen miles
There are many options for kitchen sinks. They may differ in shape, material and type of insert.

To choose to choose the sink, which will be harmonized with the kitchen interior, consider the main aspects:
- The depth and size. This will depend not only on the willingness of the owners, but also opportunities. If the kitchen is small, then install a massive sink (2 or 3 bowls) will not succeed. Ideal for small kitchen - corner sink. It may consist of 1 or 2 vials of rectangular shape. They can be arranged to each other or at an angle. This wash - great solution to use the space in the corner. From the corner kitchen sink will look more compact.
- When choosing a sink is necessary to take into account the depth of the bowl. Washing should not be too small (exception - a small kitchen). It will not only wash dishes, forks and plates, but more headroom utensils - pans, pots and other kitchen utensils. Too deep sink is inconvenient for short people - will always have to bend down. Small bowl - also can not go, because it will not put utensils. The ideal depth - from 160 to 200 mm. This comfortable and spacious sink.
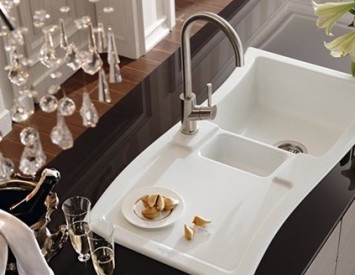
- The form may be different. If there is, you can make a reality of any fantasy variety of modern materials. Want exclusive sink in the form of heart? Now it is not a problem, just be aware that care for the sink with bends will be more difficult. Let's go back to the classics - it sinks square and rectangular shapes. The palm of the season kept the oval and round models. They look compact and stylish. Less commonly, you can find the kitchen sink with a triangular bowl. When selecting a model should take into account the fact that each of them will be responsible for the convenience. So, round wash of the same volume as the square will appear at the same time compact and capacious. It will organically look in any interior.
- Number of bowls. Washing can be a standard bowl 1 or more (up to 3). Select your option tells your intuition, kitchen size, and financial capabilities. Keep in mind that a good washing, made of quality materials with 2 or 3 cups will cost more than the standard model with 1 bowl. This sink - comfortable and functional than the standard. Washing with 3 cups will work center in your kitchen. This model has 2 large bowls, and between them - 1 small. Naturally, this will look harmonious sink in the spacious kitchen. This model was chosen housewives who love to cook a lot and often.
- Material. The choice will depend on the family budget and the style of your kitchen. For example, it will harmoniously fit into the interior of the kitchen of composite materials washing stainless steel, and on a strict classic kitchen or in the style of Provence - metal, ceramic or stone washes. Popular shells - stainless steel with a spraying of porcelain. For example, the sink itself can be made of high-quality steel, and the coating is made of natural stone. The ideal version of such a washing is a nickel-plated spraying from granite. By the way, artificial stone is used as the top cover. You can also meet washing from glass and acrylic.
- By the method of installing a sink under the tabletop can be attached, overhead and mortise. Hinged washes are extremely rare, as they are more suitable for communal apartments, cafes, restaurants and other public institutions. For personal use, mortise and overhead sinks are installed, as they are considered to be reliable and harmoniously fit into the modern kitchen interior. The mortise sink speaks for itself - it is installed inside the prepared opening of the table top, and the invoice simply "puts on top to the kitchen cabinet. By the way, for those who have not yet plans to change the furniture in the kitchen, the overlaid wash is suitable.
- The location of the mixer - this question must be solved immediately, as the crane can be placed in the sink itself or separately from it. Popular sink option when the mixer is located in the sink itself. Decide in advance and with what form will be your mixer, as well as with the presence of other devices in the kitchen - filter for water and waste waste.
When choosing washing, it is also worth paying attention to strength. It must withstand temperature differences, possible blows and exposure to chemicals (detergents). Find out how quality washing, you can right in the store. Take a small magnet and attach it to the sink. If it is made of high-quality material - the magnet will "sit" firmly, and if the steel is poor-quality - even with the slightest fluctuations it will fall. Based on this, you can make the appropriate conclusion - stainless steel washing is the perfect option for the kitchen. It is easy to install and easily maintain clean.
Installation Tools
It is necessary to prepare such a set of materials and tools for installing washing at the tabletop:
- sink;
- electrode with a set of drills;
- lobzik (manual or electric);
- paper tape with sticky edge;
- marker (you can use a pencil);
- tight cardboard sheet;
- screwdriver and screws;
- sealant.
Now consider the main working moments.
This plan will help you to navigate in the works and do not miss anything:
- Installing the sink in the worktop begins with a selection. Buy a suitable model.
- The next step is to cut the hole in the tabletop under the sink.
- Processing lines with sealant.
- Fasteners regulation.
- Washing processing from the inside.
How to install a sink in the tabletop
Let's start with the main thing - the selection of washing. After determining the type of shell and its size, it is advisable to choose the product yourself. This will help to avoid such unpleasant moments as deformation (it can significantly affect the installation).
The washing installation can be made in different ways: valuable and simple. The first assumes the presence of special grooves on the washing and the touches itself. They are located on the side of the washing and the facade. For fastening the sink to the cabinet, there should also be special holes on it. After assembling the furniture, it is necessary to "plant" the sink into the hole so that the grooves come out. That's all, now it remains to connect the mixer and other devices.
This is the easiest and most affordable way to install washing in a worktop, which is actually rarely implemented because you can meet with such a moment as the inconsistency of the grooves. As a result, it is no longer possible to firmly firm the shell. Therefore, consider the second, common option to install the washing when you need to cut it into the worktop.

How to cut under the sink countertop
Often when installing washing, you can encounter so much as the cutting of the tabletop. This work is responsible, so it is better to familiarize yourself with the nuances in advance. Washing is sold in a package package. Open it carefully, because its inside of the packaging is a template for sinking in a worktop. Arm yourself with scissors and cut the cardboard on the contour.
How to cut the sink in the worktop:
- Take the template and put it on the worktop. Align it and decide on the place. It is important that nothing bothers both the installation itself and the further operation of the sink.

- Take paper scotch, secure the pattern on the surface.
- Cock it with a pencil or marker so that when you work the jigger, the lines do not erase.
- It is more convenient to cut a hole in the worktop with an electric jigsaw. To work it was more convenient, first make some initial holes, so the blade will be free to pass into these holes.

- In order not to damage the worktop, it is advisable to protect the painting tape.
- Work the jigsaw does not rush. It is better not to hurry, because the carriage can deviate aside and gets a slant cut.
- You can protect the cut by water-repellent silicone sealant. After processing with silicone, you need to wait for the edges completely freeze.

- It often happens that it happens that cutting the desired hole to install the sink is necessary not only in the top of the table top (the lid itself), but also the inner partitions. Try to do this as accurately as possible not to damage the design.
- During operation, periodically apply the template - if everything is fine, you can try to wash.
- If the washing came up - it can be consolidated thoroughly. We collect a completely washing (we install the siphon, connect the mixer). To install the mixer in the sink itself, you must drill the hole.
- Fix the mixer and connect it to communications.
- Separate attention - fasteners. A standard fastener can be sold with a sink, which will not cope with its task. Therefore, if you hold plastic parts in your hands - put them aside. We will need metal fasteners. Mounting washing to the countertop can be purchased separately. Better buy more fasteners in advance.

- After the washing is installed on fasteners, check your work again. You may need to pull the sink to the table top so that it is tightly fixed. To do this, it is necessary to adjust the fasteners ("crocodiles") to form a sharp angle.
- Tension washing. When it is well attracted to the tabletop, you will see silicone droplets. Immediately remove them with a clean cloth. It makes no sense to attract more fastener, because if you overdo it, then the thread can be disrupting and spoiled all the work.
- Table top processing - immediately after installing the washing, it is necessary to remove the remnants of silicone outwards from the table top. If you lose time and knead at least 10 minutes, it will start to stick and delete it will be very difficult.
Important: If you have already embarrassed the sink in the worktop, then do not rush to install it immediately. First, insert the mixer, because then this part of the work will do inconvenient.
How to install washing at the tabletop - Watch the video:
Other Mount Motion Methods
If you bought a mortise sink, it can be installed above by the method described above or at the table top. This type of shell mounting is considered time consuming and requires a certain experience, since the top layer will have to be removed from the table top.
In the event that it is decided to install a sink below the surface level (under the tabletop), then this item independently does not work out - you will have to invite a specialist. To work, you will need a special tool - saw with diamond spraying or jigsaw. Muffd up washing on special glue. This installation is acceptable for expensive models of miles made of artificial or natural stone.

What else do you need to know
If you wish to cope with the installation of the sink yourself, consider these recommendations:
- Instead of rubber seals (included) it is better to use a silicone colorless sealant. It will provide a more dense adjacent and fill each fracture. In addition, he has a longer service life.
- Sinks from the stone is better to install with the assistant, so that it is not enough to damage the heavy shell.
- Try to attach the sink to the tabletop is not a screwdriver, but manually to control the pressure.


