The tile is perhaps the best finishing material for the bathroom, which is currently available. It is ideal for premises with elevated moisture level - does not absorb moisture, withstands the cleaning with aggressive chemicals, it serves for a long time, and if it is correct to pick up it, decorates the room. We were not in vain mentioned about the intricacies of choice, since it is precisely a good half of the successful finish. In this article you will find answers to all questions regarding the right choice and installation of tiles in the bathroom.
Content

Laying the tile in the bathroom itself is quite simple, and even unprofessional will cope with such work, so we decided to start an article with the councils on the choice of finishing materials. Not only the aesthetics of the future interior, but also the complexity of the installation depends on this. So, for example, if you really like a large tile, but the bathroom has, to put it mildly, modest square, then such a finish will turn it into an even darker room, and when layout it turns out that without cutting the tiles can not do.
Pre-layout allows you to choose the optimal amount and sizes of tile specifically for your bathroom. It is quite simple to do this: you need to calculate the area that is subject to finish, and after mapping it with the size of the selected tile model. It is best to do this job in a computer program for interior design - for clarity. But if you do not care about the delights of interactive progress, you can simply arm a pencil and make an imperceptible pre-markup on the wall in accordance with the dimensions. This principle will help you measure any bathroom for any tile.

As you understand, the bathroom is a specific room with high humidity, so the tile for it should be difficult. What you need to pay attention to when choosing:
- Strength - any tile is classified in five wear-resistance classes, where the most durable products belong to the last fifth grade. It is them that should be chosen to cladding the floor in rooms with increased permeability. The cost of such a tile is quite high, but fortunately, for the bathroom it is not necessary to buy so durable coating. For the floor, the tile 3 class is suitable, and for walls - 2 or even 1.
- Moisture absorption - despite the apparent absolute hydrophobicity of the tile, it can still absorb some amount of water. It occurs very slowly and completely unnoticed, and the moisture absorption from the composition of the product depends. There are 4 class of moisture absorption, and the most waterproof products have the first class (the information is indicated on the packaging of Roman numerals). Next to the figure there is always a Latin letter a or b. In the first case, it means that the tile is made by the method of extrusion, in the second - pressing. For the bathroom with its special "climate", products with marking IA, IB, IIA, IIB are suitable.
- Dimensions - we have already said that a large tile should not be chosen for a small bathroom, otherwise it will visually make the space even less. In this case, it is better to restrict ourselves to conventional products or make the way of shallow tiles in the bathroom with your own hands.
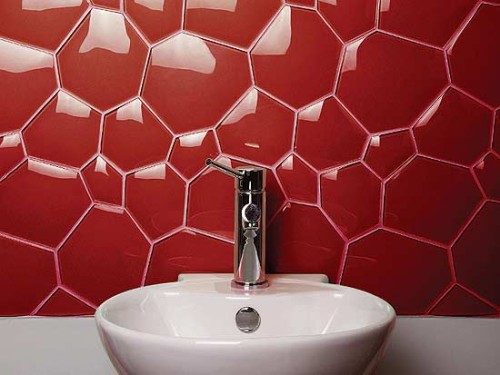
- Form - Traditionally, the tile has a rectangular or square shape, but if you want something extravagant, can be found on sale polygons, triangles and other unusual figures. It is worth noting immediately to warn that for the original finish such a tile will have to pay not only from your own wallet - time on the installation will go much more, and work will require professional skills. Therefore, if you never put a tile, start better with products easier. By the way, and with their help you can create original interior compositions and "play" with visual perception. So, if you put a rectangular tile vertically, the room will seem higher than it really is.
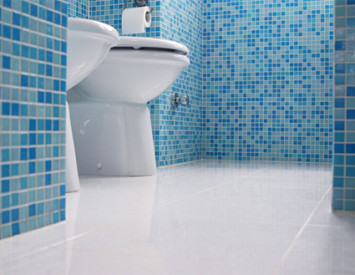
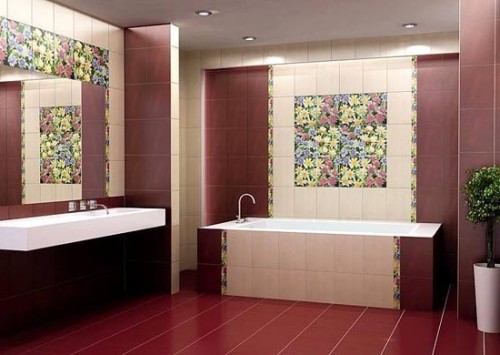
- Color - here you need to repel not only from personal preferences, but also for considerations of practicality. If there are small children in the house, which are still lying to deceive the toothpaste of the wall or cut out that it is better to give up a stylish black matte finish. In addition, the bathroom is a place where you wake up in the mornings and are preparing to sleep in the evenings, and therefore it is better that the lightweight, but if possible, a relaxed atmosphere. The decorative wall tile in the form of a panel is popular with popularity.
- The relief is the last on our list, but no less important position than the same strength. In the bathroom constantly sheds something, and therefore it is good that the floor is non-slip. Otherwise, all sorts of rags, rugs or walk very carefully, risking slipping. Anti-slip embossed tile can cover the entire floor, and maybe only the part that adjoins the bathroom or shower.


What glue is suitable for the bathroom?
The insightful reader will surely think that if the bathroom needs a special tile, then the glue for it must be appropriate, and will be completely right. The adhesive mixture should be chosen not only for considerations of the increased humidity of the room, but also depending on the material from which the walls are made. For concrete, for example, there is nothing better than cement-based compositions.

The mixture is applied to the surface of the wall or the back side of the tile. There is no strict rules here, and every master makes it comfortable. But for application it is recommended to use not ordinary, but a toothed spatula, in order to get high-quality clutch.
The floor of the bathroom will be exposed to much greater loads than the wall, so the glue for it needs to be selected separately. By the way, it is also necessary to do this depending on the base material. The optimal option will be a glue flexible mixture (universal or specifically for concrete, warm floors, metal or wood).
Installation tile in the bathroom
When you were determined with the choice of tiles, you can proceed to the preparatory work - make measurements of walls and gender. If you are also planning to separate the space between the floor and the bathroom, you will need to make a special box.
Stages of preparatory work:
- Measure all surfaces requiring finishes, construction level. They must be perfectly smooth, otherwise the tile will not hold. If the differences are more than 2-3 mm, the surface must be aligned with plasterboard plates. There is a special plasterboard for premises with high humidity, so when buying take into account this moment. Buy ordinary cheap material, and the walls will very quickly come into disrepair - the gypsum will replete, softening, and the tile falls off. If we are talking about a very small area, align it easier for special plaster mixtures.
- Remove the old tile coating, if any. This work is not easy, noisy and dusty, so they are armed with a bump stop, warn the neighbors and bring patience. If the mechanical tool did not succeed, the usual lomik and the hammer will come to the rescue.
- When the wall is smooth and without defects, cover it with the primer of deep penetration. It will create additional protection against moisture and will provide good adhesion with adhesive mixture for tiles. The primer must be precipitated, and even better - antiseptic so that the walls are not covered with mold.

Laying on the wall
Laying the tile in the bathroom with your own hands always starts from the walls, then the work turns to the floor, and the last place is separated by the box. The first element can be laid from the corner, the bathroom itself or near the floor, but wherever you have started, it is necessary to make a chalk markup in accordance with the dimensions of the tile.
Useful advice: Before sticking the tile, lay out the lower row along the wall without a solution so that you can see, all the items are placed, or some of them need to trim. How to cut the tile, we will tell at the end of the article.
At the bottom of a wooden rail or fasten plastic profiles - this will be a support for the first row. Tile rests on the floor in no case should not be. Remember that the floor has not yet faced, and direct intimate contact of the two tile surfaces will lead to premature wear of both. Take a plumb and draw a vertical line, which will help to control the evenness of packing.
Tip: If you use tiles of different colors or upload a mosaic pattern, it is better to make the layout of the entire wall and immediately chalk mark the place of attachment parts of a certain color.
The video below is a tutorial on tiling in the bathroom with their hands:
Installation tips:
- Experts recommend start laying the tiles on the wall from the second row on the floor, drawing on elements of pre-fixed rail. The first row of long passed.
- The adhesive mixture in this case it is better not to smear the tile and the wall using a notched trowel. Thus it is necessary to capture an area, the size of which is slightly greater than the dimensions of the tiles a few centimeters on each side.
- Do not push the tiles to the wall too hard, otherwise it may crack.
- After installation, the next tile or series immediately remove speaking glue with a damp cloth - when it dries, it will not be easy to do.
- Do not forget to insert slip crosses between the tiles. weld width should be 3-5 mm.
- After laying each row, especially the first one, check its horizontal building level. Even if the first number turned out perfectly flat, it does not guarantee that the same will happen with the rest. Warping can arise due to defects in the most tiles. When buying imperceptible differences in the measurements, but this often happens with the products of domestic manufacturers.

Tiling in the bathroom at the corners with their hands it is often necessary to cut. The same applies to difficult places, such as behind the toilet, or around pipes. Not be able to avoid it, and at facing outlets.
Laying on the floor
When finished with the walls, you can proceed to the floor lining. Start work also need to prepare the base - it must be perfectly flat, clean and dry. To achieve this on the floor is more difficult than on the walls, so it is often a question solved by means of leveling compounds and cement screeds.

How does laying tiles on the bathroom floor with his hands:
- Draw a chalk line on the edge of the laid tiles of the first row of the wall.
- Mark the location of the items that will differ from the main if you post the drawing.
- Stay from the very far corner from the entrance to the bathroom.
- It is necessary to make a preliminary layout so that the input be placed a one-piece element (unscrew).
- When laying and calculations, also take into account the width of intercutric seams.
- The solution is more conveniently applied to the surface of the floor, and not on the tile. It is better to capture the area equal to the area of \u200b\u200bone element, and not to deceive several rows at once - you just do not have time to close it before drying the glue.
The process is shown in more detail on the video on laying tiles in the bathroom with their own hands:
Laying around the bath
If you want to close the space under the bathroom (most often there is quite a bit there, so that cabinets for the storage of household utensils will not work), it will be necessary to first build the frame for the box, and then hever it with smooth panels. To create such a screen, you can use the same moisture resistant plasterboard or foam (polystyrene foam) blocks. Also ready-made bathing screens can be found in specialized stores (solid and sliding).

The frame can be made from metal profiles. If you were given it with plasterboard, you can immediately lay the tile. Installation technology is no different from working with walls.
Shutdown of seams
Finally, when the tile is surrounded from all sides, you can proceed to the final part of the work - grouting seams. It is necessary to do it only after complete drying of the glue, that is, a few days after laying. If you pelt a "fresh" tile, it can shift.
The thread for the tile is as much as the tile itself - different compositions, colors and cost. But again - for the bathroom it is necessary to choose moisture-resistant compositions on cement, epoxy or silicone basis. The choice of color depends on the color of the tile. You can choose an invisible grout of a neutral shade (white or grayish), and you can emphasize the beauty of the tile, turning it with contrasting seams. Very juicy looks like yellow tile with green grout, and a black and white combination will create a unique elegant style.

How to make a grout of seams after laying the tile on the floor of the bathroom with your own hands:
- Fully clean the lined surface from glue and dust residues. With the latter, the usual vacuum cleaner will help you.
- Pour the edges of the tiles with paint scotch, so that then again it did not have to wash it off.
- To apply grouting, you will need a rubber spatula. Mark them a little mixture and with a slight push, spend on the seam to press the grout inside.
- By the same spatula, remove the surplus, spending on the seam again, but without much pressure.
- When the grout is completely dry, remove the greasy tape and remove the residues of the mixture with a damp cloth.
How to cut the tile
As you can see, the laying of ceramic tiles is not so difficult, if you should prepare and correctly calculate its quantity. The only thing that may cause difficulty and that embarrassment of many self-taped masters is the need to cut the tile. This will require special tools and some skills to work with them.

Cut the thin wall tile can be easily ordinary glass cutter, which cannot be said about strong outdoor products. It is good that there are no sockets on the floor and not so many sophisticated places, so try to make the flooring tiles in the bathroom with your own hands so that it does not have to customize.
If you at least cut the glass with a hand tool, there should be no problems with the tile, because the technology is almost the same. First, you need to make marking on the glazed surface, after which it is done with a glass of it with a glass cutter. Tile at the same time should lie on a flat surface. When you managed to cut a strong layer of glaze, it remains only to make a neat layer over the line.
Useful advice: it is better to get a tile cutting tool, and not glass, because the styling the diameter of the sharp wheel is much greater.
If on this complexity were limited, then it would be nothing to say about. But besides smooth cuts in the tile, you have to do curly holes for sockets, wires or to bypass the tap pipes. Such work will require great effort and concentration. First you need to make markup, then with pressure to hold the wheel of the tile cutter, after which the pliers bite off the small piece until the desired form of the product is obtained. Of course, the cut in this case will come out uneven, and therefore it needs to be smoothed with a file or sandpaper. It is much more quickly to do this with a special circular diamond nozzle on a drill.

The entire useful video will summarize the above information, in which it is about the intricacies of the choice and technology of tile laying:


