Plasterboard has always been extremely popular among the entire range of finishing materials. With it, it is possible to create the surfaces of any geometry and complexity, and the work takes up the minimum of time and time. But in order to get the perfect result, you need to learn how to do smooth gypsum corners. This is necessary not only with aesthetic, but also from a practical point of view. Today we will talk about how to make a corner of drywall do it yourself.
Content
The need to create smooth corners
When lining the walls of plasterboard or creating separate structures, such as a box or partition, it is very important to correctly mount the angles. Otherwise, the work will look at least unattractive. Uneven or fastening angle also will lead To the fact that the construction quickly falls apart or deformed. Special installation technology provides additional fasteners. They strengthen the strength of the entire design and allow it to withstand various loads.
If you make the walls of the walls of plasterboard, but do not pay enough attention to the corners, then cracks will appear very quickly in the places of crossing sheets. Below we describe in detail several technologies for creating plasterboard corners, which are applicable to the construction of niches, boxes, walls and even cabinets.

There is an external and inner corner of drywall, whose creation technology has its own characteristics. Consider each of them in more detail.
Inner corner of plasterboard
If you are trimming the walls, make a wardrobe or niche, without arranging neat inner angles just do not do. Make them pretty simplyThe main thing is to follow the instructions and stock the necessary building materials. Fortunately, they will need a little.
To work, you need to make a metal frame from a rack profile. Depending on the functional purpose and the load on the future design, different types of profile are chosen. So, to mount the durable internal corners of the ceiling of plasterboard, you must purchase rack profiles PS. or CD. It is important to choose a high-quality profile, if you do not want it to be deformed, and with time, cracks were mounted on the wall.

For installation, you will need to connect two profile segments by self-pressing metal for about 90 mm long. Self-tapping screws install in step 25 —30 cm is no more that the design is sustainable. The distance between the fasteners is greater depends on how much tough is the basis, and for internal plasterboard corners you need the maximum rigidityOtherwise they will be twisted under their own weight.
Yet One mandatory requirement for installing profiles in inner angles is the presence of an ideal even and smooth surface. Fortunately, the plasterboard itself is perfect in this regard and does not need additional alignment.

How to make an angle from the profile for drywall:
- Take a pair of PS racking profiles and mark them with a marker in the places of future mounts.
- Place the profiles perpendicular to each other in such a way that one of them the side side firmly lightened to the front part of the second. As a result, a straight angle should be.
- Drill a drill with a nozzle of a suitable diameter of through holes in the intended places.
- Connect profiles with self-draws.
- At the perimeter of the corner, install the guide profile N and insert the resulting hard injection.
- Secure the angle in the heading profile by self-draws.
- Pick the sheets of plasterboard. In the corners, it is best to install plates with "native" edges, sharpened under 45 ° to the seam came out neat.
- If the plasterboard sheets are already cut off, use the knife and sandpaper to remove the champions under 45 °.
- Shoot the grid on the jack strobe, smeared there a little spikelAnd press the corner spatula. Thus Go through the entire area of \u200b\u200bthe inner corner.
Outer corner of drywall
To make the outer corner of the walls of plasterboard, you need to act somewhat differently. To do this, you will not need to create a separate connecting frame, as profiles outside are not attached. The arrangement of outer angles involves the use of two metal or plastic perforated profiles, which are simply attached on both sides of the wall (it is better to choose metal, as they are more durable and durable).

During fixation of drywall, you follow it to be with the uncircumcised edges. Otherwise, you will need to remove the chamfer to the depth of ½ sheet thickness. To attach rack profiles to perimetral Use screws for metal.
When you attach the profile, then the clutch area spikel With a plasterboard wall, it will be increased, which will create an additional guarantee of the strength and durability of the finish. Consider that during fixing sheets to corner frame profiles, the distance between self-drawing should be reduced. Will also be nelfish take care of the extra sound insulation of the walls, especially if speech gone About repair in the urban apartment. The plasterboard itself is poorly protected from noise, therefore, it follows the soundproofing material between the frame and sheets until their consolidation.
Yet One feature of the design of external corners from drywall is that empty space occurs between the sheet and overlap. It can idle without doing Or bring the benefit, hiding in itself various communications and wires.

IMPORTANT: FASK under 45 ° needs to be removed without fail. It is necessary so that the metal corner does not drank and placed well in the desired deepening. Also as shptelsania The seams area of \u200b\u200bthe clutch of the solution with the surface becomes greater.
How to make an outer angle of plasterboard with your own hands:
- Prepare the necessary materials and instruments: Construction Rule, Roulette, Level, Selfless, Glue on a plaster basis, perforated metal profile.
- Check the corner profile on the forwarder along the entire length. Since it is made of flexible material, it could be brought during transportation. If the slightest bending is detected, it does not make sense to align - it is better to postpone this material for more gross work.
- Measure the length of the angle of the roulette. The angular profile must be shorter of the length of the angle by 2 —5 mm.
- Apply the profile to the surface of the angle and grant strongly along the entire length of the construction rule so that in the interval did not remain Not the slightestimes.
- Not holidaying rules, attach the level and check the vertical of the corner. In case of deviation from the norm, press or release it.
- Secure the corner in strictly perpendicular half position And attach it with self-draws to the plasterboard wall. Only after the profile reliable enshrined, You can remove the rule.
- Prepare gypsum glue, collecting it to a consistency of thick mastic. Apply its spatulas on the armor shelves with a rather thick layer. It is important that glue filled all empties between the profile and plasterboard sheets.
- Like a little to glue started Classm, and then unscrew the screws and wake the holes left by them. Remove the excess glue with a spatula until it frozen so that the angles are smooth and neat. To do this, apply top Spatula strictly perpendicular to the corner and spend in one movement top down"Cutting" glue.
When the glue is dry, carefully stabbing the surface. After that, you can proceed to the primer, shpalian and decorative finish.
Methods for fastening plasterboard
The method of attaching plasterboard when creating angles depends on the nature of the device of this angle. So, if you cover the frame in one sheet, then the adjacent elements of the outer angle will be superimposed on each other. For this reason, the end portion of the drywall in the corner must be cut to the gypsum itself (you need to fully read the cardboard shell). If this is not done, put the corner will be much harder.

When mounting inner angles, plasterboard is also recommended to be cleaned from the cardboard layer. If the T-shaped dock, the end pieces are cut under angle 45.° for more comfortable shpalian.
If you enhance the frame of two sheets of plasterboard, the elements will certainly shift.

Finishing of plasterboard corners
If you coped with installation, the trim of the angles of plasterboard will seem plevum Business. Even one who never worked with spikel Woven, can easily cope with the trim of a plasterboard surface. But before taking a spatula, design and angles to be covered with adhesive primer deep penetration. It will protect the material from moisture from spikel And give him great strength.
The primers of the German manufacturer of Knauf are very popular, which can be 100% confident, although at a fairly high cost. You can apply primer with a roller or a wide construction brush, thoroughly processing each centimeter of the surface. When drywall dries, you can proceed to shpalian.

How to put plasterboard angles:
- First apply pluckle At the deepening left by self-drawing in the corners, and then proceed to the processing of seams and joints.
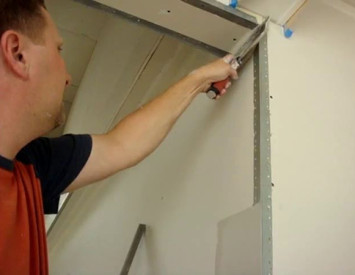
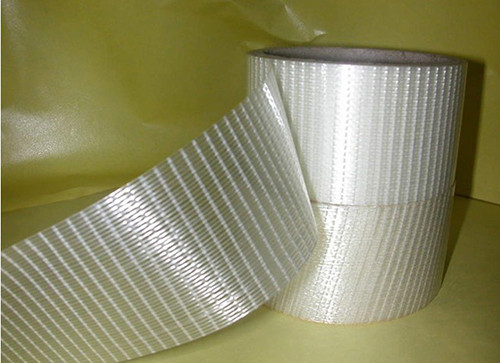
- When working on joints, use the reinforcing grid, cutting her On the part and gluing over the compounds of sheets, including in the corners. Glue mesh can be on the usual construction Plow.
- After drying the glue, apply a layer spikel And crush it as much as possible. Do not try to immediately get a perfectly smooth surface - even professionals are output not always. When finishing the outer angles, first check the level with a level and only then proceed to grinding. If deviation is detected, apply to the right place. yet Little spikel.
- After drying spikel In the corners of drywall, stick the surface of emery paper with small grain. So you get rid of peksov and tubercles.

To summarize, we suggest you familiarize yourself with the useful learning video about gypsum coals and the specifics of them. spikel:
Junctions In constructions from gypsomocate are the most vulnerable component. Due to the high fragility of the material to get the perfect articulation of the corners is very difficult. At the same time, the corners are the most noticeable part of any structure where irregularities and defects are immediately striking. That is why it is important to use straight metal profiles and do not regret the screws for their attachment. Only so you can get neat internal and external angles in plasterboard buildings.
Corners of plasterboard: Photo


