Often, people complain about the lack of space in a small apartment, and meanwhile the corners in the hallway, in the kitchen, and are empty in the rooms. By building a wardrobe in the corner, you can solve the problem with "superfluous" things that have nowhere to attach. The article will be discussed about the corner cabinets, about their advantages and the device with their own hands.
Content
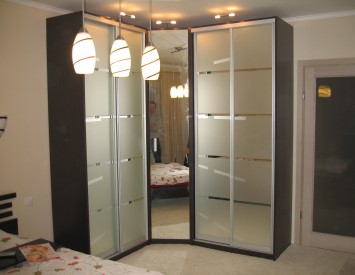
Classification of corner configuration cabinets
By configuration, angular cabinets are:
- triangular;
- M-shaped;
- trapezoidal;
- 5-wall.
The latter refer to classic. They fit well between furniture.
Corner Cabinet with your own hands
Consider the process of making an angular cabinet.

For a start, we will conduct preparatory work:
- Let's make a circuit of an angular cabinet.
- We define how much material must be ordered.
- Production material and tool. And you will need the following:
- Chipboard, MDF or board;
- dowel;
- glue;
- self-tapping screw;
- mirror;
- fittings;
- rollers - high-quality, otherwise they will quickly fail;
- profile - better steel.
4. Stop the following tool:
- perforator;
- drill;
- roulette;
- level;
- hammer;
- hacksaw;
Reasonable cutting cabinet parts in the workshop or right in the store, but for yourself to leave only an assembly. It's a very troublesome and time consuming.
How to choose the size of the cabinet
For an angular cabinet, the sizes are determined depending on the area where it is planned to collect, but still some general recommendations should be followed:
- The minimum width of the compartment, where it is planned to store upper clothes - 0.8 m.
- The height, convenient for the location of the raincoat, fur coats, coats, at least 1.4 m. Here you should consider the growth of family members so that they can reach the Rigel freely.
- The space inside the cabinet is used more rationally if the riglel is located in the width of the section.
It is better to navigate with dimensions will help an exemplary scheme of an angular cabinet:

Collect cabinet
Build an angular cabinet in the following sequence:
- Mount steel corners in places where the side walls of the cabinet are subsequently attached to the ceiling, walls and sex.
- We use the level in the process, otherwise it is easy to allow the skew to the doors.
- We collect the frame from the finished parts. If the performers fell competent, then there will be no problems.
- Break at the door of the rollers.
- We mount the guides.
- Install the door.
It remains to equip the cabinet inside and install accessories:
- install partitions;
- fix hangers, shelves, mirror;
- screw the handles.
All, functional and convenient wardrobe at your service.
Corner kitchen cabinet
The kitchen is a place where the organization of small spaces is especially acute. Consider 2 examples of the design of the corner kitchen cabinet. To obtain a quality product, assembling the corner cabinet on the following considerations:
- to order the details of the kitchen corner cabinet with their own hands, the drawings will be required;
- will not drink anything alone. Specialists are better able to abide by geometry;
- we will perform measurements for the order of the blanks only after aligning the floor and the ceiling, slothing the irregularities on the wall, otherwise the cabinet may not fit.
- we will select high-quality accessories, although it costs more, but quite justifies.
In the design of the angular kitchen cabinet there are 2 types of connection:
- at an angle of 90 degrees. Under it is set to install a standard countertop;
- at an angle of 45 degrees. Under this type of angular cabinet, an angular sink is installed.
The difference between the angular design with the compound at an angle of 90 degrees from the standard

The corners have the following design features:
- the presence of additional elements in the form of inserts that tighten the boxes between themselves and are partially a facade;
- the presence of a ledge in the upper and lower part.
Features of the corner cabinet connected at an angle of 45 degrees
This type of cabinet has 2 essential features:
- Dimensions. So, if the bottom cabinet has a width of 600 mm, then attached - 900x900.
- Location of parts. If the side elements are located between the upper and lower, then the opposite is the upper and lower between the side. There will be no other way, because There will be no possibility to install the facade.

Under such an angular cabinet and the table top has the same form.

Corner cabinet made of drywall do it yourself

For the manufacture of carbon cabinet of the corner cabinet with their own hands, the drawings are needed first. For this:
- we define the place where the cabinet will be located;
- we carry out a detailed scheme on which the dimensions and dimensions of all parts are indicated, even very small;
- we are determined with the number and place where the retractable boxes will be, hanging baskets, doors;
- indicate the thickness of the material. Without this, accurate calculations are impossible;
- we compile the specification of all the elements included in the cabinet design.
Help in choosing the design of the angular cabinet photo in special directories. There is an opportunity to download ready-made drawings of cabinets on the Internet. And viewing this video, you will learn how to design an angular cabinet yourself, using special programs:
Mount the carcass
We perform in place setting the markup on the ceiling, the floor before starting work on the installation of the corner cabinet.
- We place where the lamps are provided, if, of course, their installation is planned.
- We glue into the guide profile rubber shock-absorbing isolation from the side, which will fall on the base.
- Fresh guides on markup lines. As a fastener, we use a dowel-nail.
- Reinstall direct suspension on the wall by preliminary markup. We choose fasteners depending on the base material. If it is a brick or concrete, then you need a dowel-nails, for wood, choose nails or self-tapping screws, for aerated concrete or a brick of hollow - special dowels having spacers and transverse notches. The right choice depends on how strong the design will be.
- We insert into the guides of the vertical racks and fix their suspensions using short screws with a press washer as fastener.
- Mount the rigid ribs between the rack profiles. What are them more, the construction is stable. Especially need to strengthen the place where the boxes, shelves will be installed.
On a note: It is possible to replace the purchased metal profiles on wooden rails, only the wood is needed absolutely dry, otherwise it will give a shrinkage and the closet is deformed.

Saving frame
In order to perform the trim:
- Cut the billet from the drywall of a wall thickness of 1.25 cm by electric jigsaw or hacksaw.
- We process edges with the edge planer.
- We set up ready-made elements in the place intended for them and pre-screw them with self-draws.
- Freaky sheets finally, having a self-tapping screw with a step of 200 mm. Hats of selflessness drowned by 1 mm.
- We set the corners of furniture in places where the shelves will be laid on them, made of two, glued among themselves.
- Mount the rods, lamps.
- We make measurements once again and order doors. It's not worth it, because Actual dimensions may not coincide with the original.
Finishing corner cabinet
So the corner cabinet is made with his own hands, it remains to be established. For what:
- bashed all surfaces both external and internal;
- close up of joints with gypsum plaster;
- we glue a stinguing tape;
- we establish paint corners on the corners;
- we apply a layer of putty, let dry and grind, and then put sand again;
- breast, and when everyone gets free, we perform the final finish. This can be anything, from painting to mirrors, and in the bathroom and tiles are facing.


