The use of tiles in the arrangement of the house is a serious step towards the vacation transformation. Despite all the negative sides of the material, the tile also has indisputable advantages, without which it is impossible to submit modern decoration. It is also worth understanding that some materials are simply not suitable in essence to one or another premises. A couple of dozen years ago, the ceramic tile was almost the only finishing material, but now everything has changed.
Content
At that time, this material was extremely simple and universal. Modern manufacturers represent a huge range of tiles, which can be selected in color, pattern and even form.
It is not so easy to make the laying of tiles on a brick or wooden wall. As a result, as a result we had a high-quality surface, which would last as long as possible, it is necessary to repel from some rules and tips.
Cooking the surface of the wall to laying tiles
Of course, laying the tiles on the wall begins with surface preparation. Many consider it the most difficult stage, because the surface evenness and the overall durability of the finishing layer depends on it.
In order for the process to be the most simple as possible, it is necessary to remove all the plumbing and other objects that interfere with finishing work. If the tile is already present on the wall surface, it is necessary to take a chisel and a hammer, and knock off the whole old material. This process is essential, because the sharp parts of the tiles often fly away from the wall. At a minimum, you should wear glasses that protect your eyes. It is also desirable to take advantage of gloves and closed work clothing.
After successful removal of the old tile, it will also be necessary to remove all the old glue. This process is performed using a hammer and chisel. It is understood that the glue layer may be too solid, so it is necessary to approach this process as careful.
Now the time of one of the most responsible stages comes. During it, the wall surface should be made as smooth as possible, otherwise we will ultimately get a terrible wall in our external qualities. Fortunately, this process is quite simple, so even newcomers in construction should cope with it. Plastering should also be durable. You can spend your finger on it. If she is attacked - it is clear to take a hammer and chisel again again, and start removing this layer up to brickwork. In the event that the integrity of the plaster does not cause any questions, it is uniquely to begin to the next step - checking the geometric surface parameters. For this process, we will need a special ship and a rope on which the first element is cling. With this elementary item, you can set as far as a flat wall. The rope is clinging to the top of the wall.
It is also necessary to check the angles to determine the necessary values. The square should be indicated everywhere that the angle of the wall is 90 degrees. Otherwise, it is necessary to carry out shuttering. It is worth understanding that the necessary value of the angle of the walls is an incredibly important factor. This will especially be felt if the washing machine or bathroom will be installed in this angle. Definitely, these objects will immediately focus on the fact that the wall is really a curve.
Already with a water level, it is necessary to check the surface of the walls on bulge and other negative features. Of course, here you can also apply the rope with the ship, which was mentioned a little earlier, however, it should be clearly understood that the water level indicates even the most minor flaws of the wall, which is very important.
Laying the tiles on the floor of the floor, like on the walls, is practically no different. It is really important that in this process the level is applied, which will provide impeccable surface evenness.

Important steps of the wall arrangement before laying tiles
Obviously, it begins directly the alignment of the walls. For this we will need some tools:
- drill and building mixer, which are necessary for the mixture kneading;
- capacities of various sizes for the kneading (plastic buckets);
- grater and trowel for the process of applying cement mortar;
- water level to analyze surface flatness;
- spatulas that will be needed for the application of certain building mixtures.
First of all, the technology of laying tiles on the wall begins with applying a cement mortar to the surface. This is done, first of all, to level the wall. It is necessary to type the solution using a trowel. For uniform application of material, a grater is applied to the surface. It is uniquely important to check the final result of the application, which is carried out using a water level. Too thick layer of solution is not the best option. It should be done to make it as thinner as possible, but not to the detriment of the geometric indicators of the surface.
Alignment of massive surfaces is carried out with the help of plaster. For the optimal result it is worth using special lighthouses. Bashed them need vertically. Obviously, with a smooth wall, they will look as much as possible. The device called the rule will help extremely simply remove the extra finishing material. You should know that lighthouses have various profiles. In the event that the surface has small flaws in terms of the field, it is necessary to use a larger profile.

The number of beacons can be unlimited, however, it makes sense to equip them at a fixed distance, but so that it does not damage the evenness. Fastening lighthouses occurs on the alabaster. A small problem occurs when cement dries enough time. At any moment, lighthouses can simply roll apart. In this case, experts advise to apply alabaster at several points of the plank.
Also special metal profiles will need to be equipped at the corners. Without them, it will be almost impossible to achieve a perfectly level angle (90 degrees). Immediately in several places of profiles, nails are driven and stretched with cords. It is worth checking the strength of the structure so that in the future, the collar did not occur under pressure. When the solution applied to the profiles solidifies, it is necessary to remove nails and cords. Next begins the final shuttering. The plaster is made by the movements "Up-Down". To achieve the most flat surface of the wall, plastering should be made, pushing away from the location of the lighthouses.

Features of the choice of ceramic tiles
Laying the tiles on the wall of the kitchen or any other room primarily is based on the material itself. It is uniquely important to choose how high-quality tile, which in all its properties would correspond to the requirements. First of all, we need to make measurements of the walls that need to be covered with tiles. When visiting a construction store, you should distinguish the floor tile and for the wall. At first glance, they do not have special differences, but the floor tile has additional strength, which the walls of anything. Also, the surface of the floor tile has some roughness contributing to comfortable movement.
Next, you need to pay attention to the grade of the tile. Often the 1st, 2nd and 3rd classes of material can be distinguished on the eye. For example, the 3rd grade of the tile looks quite modest and applied in cases where it is necessary to save on the construction process. The main difference between the existing classes of tiles is their caliber. To speak more precisely, it is their standardization. A fairly serious technology of production of tiles has its drawbacks. First of all, this refers to the size of the material. During responsible construction work, the tile must maximize the regulated dimensions and parameters. The 2nd and 3rd classes do not always have the necessary dimensions, but deviations are still minimal.
In order not to get into the unpleasant situation, you should take a little more tile than necessary. This is obvious, because during the process of the masonry process, anything can happen. The material can simply crack on the road, or break during the laying process. There is also the likelihood that the necessary tile volumes are simply incorrectly calculated. Several spare units of the material can save the situation even several years later, when one of the tiles will crack. The range of facing material changes quite often, so that a couple of years later, it will be difficult to find a similar coloring of the material.
Also when laying tiles on the wall we need a high-quality dry building mixture. Obviously, any products have its own purpose. If you are engaged in laying tiles on a brick wall in the bathroom, you should look after the mixtures for wet rooms. If the laying of the tile occurs on the outer walls of the dwelling, it is necessary to evaluate the parameters of the frost resistance of the building mixture. It is also very important to pay attention to the maximum allowable layer thickness, which must be specified on the packaging of the material.

Tile laying process on the surface of the wall
Before starting the process of laying the tile, we need to prepare adhesive material. In the water container should be added in small portions glue. At the same time, it is necessary to stir the composition. Large material volumes should be stirred using a drill or a construction mixer. If you fall asleep the entire volume of the mixture into water, then the tool will be made extremely difficult, it should be considered. Ultimately, the mixture should not be too liquid and too thick.
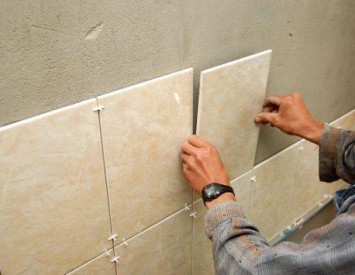
The laying of tiles from the bottom row begins. In order for each row to be as even as possible, it is necessary to use a wooden rail, which could be attached to the top of the material and verify. Corner rails must also be used. They will be needed after placing the first row of tiles. At the level of the top point of the first row tile, we drive nails in the rail. Accordingly, we carry out between the angles of the thread, which will indicate us even the slightest errors of laying.
Apply the adhesive mixture to the tile is needed by a toothed spatula. Press the tile to the wall must be gently. Between the tiles it is necessary to insert crosses that will provide small gaps between the material. The gaps are equipped in the case of even a small warm expansion that may arise. Then the tile can, at least, crack.
After each new row of styling, it is necessary to knock back nails into corner rails and stretch the thread. This should be styled to the very end. If in certain areas the whole tile does not fit - it is necessary to trim it. It is done using stoveturis. This adaptation is very similar to the glass cutter - the principle of operation is the same.
The amount of construction mixture applied must be small. It is also very important to check using the level of flatness surface.
After laying the tile on the wall, you will need to remove all the remnants of the adhesive mixture using a rag. The seams between the tile must be filled with grout. This material can be different colors, so that everything here depends on the colors of the tile and personal preferences of the owners. For dense filling of the seams, you can also use a rubber spatula.


