One of the main components of a beautiful and spectacular design of anything is the right lighting, especially if we are talking about furniture. Even the most non-fried cabinet lighting can turn into an interior decoration. Moreover, in addition to the aesthetic component, the backlight performs a useful function - illuminates the internal space of the cabinet and allows you to visually delimit it. In this case, conventional incandescent lamps or halogen lamps are not a very good idea, since they are heated with a temperature of 60 s. This can spoil the appearance of clothing from fine and delicate fabric, so it is better to give preference to the LED illumination of the cabinet. It is not difficult to make it easy, and in today's article we will tell about it in detail.
Content
Advantages of LED lighting
LEDs are specific conductors who produce light in the process of passing the electricity. The chemical composition of the LEDs may differ, and the brightness of the light flux emitted directly depends on it. Installing the lighting of the cabinet LED ribbon is not always carried out directly, due to the fact that the tape can crack or overheat. In this case, the voltage stabilizer should certainly use.
The LED tape is a peculiar plank of flexible material, one side of which is capable of sticking to the surface of the base (cabinet, mirror, ceiling, floor, etc.). On the second side there are LEDs with resistors. On any ribbon there are segments of 5 cm, on which there are 3 LEDs and a special markup is drawn, showing where you can make cuts. All LEDs are consistently connected by chain.

Advantages of the LED illumination of the cabinet:
- The tape is resistant to minor mechanical effects, and therefore it can be not afraid to accidentally hook clothes, hand or hanger.
- Durability - high-quality LED tape with the correct operation and the presence of voltage stabilizer is capable of working for more than 10 years in 15 hours per day.
- A diverse color palette of backlight - LEDs can burn white, yellow, red, green, blue, purple and other colors. You can choose the backlight for any interior. Also on sale are infrared and ultraviolet LEDs, which will be perfectly looking at modern interiors in the style of Hi-Tech.

- Bright lighting.
- LEDs do not need time for heating - they immediately begin to work in full force.
- Low cost - even the highest quality LED products are available in price.
- You can apply LED ribbons with different radiation angles.
- This is an environmentally friendly product.
- The tape is absolutely safe, so it can be installed even in children's cabinets.
- The LED tape is capable of operating at any temperature in the room (within reasonable limits).

Useful advice: If you plan to use RGB ribbon closet to highlight, keep in mind that it has 4 outputs: the bulk, for red, blue and green colors.
How to choose a LED ribbon
In most cases, SMD-LEDs are selected for highlighting, which differ in the number of crystals (from 1 to 4 pcs.), In size (from 1.06x0.8 mm to 5x5 mm) and by the nature of the glow (monochrome or color). Decide with the type of the desired lighting before purchasing the ribbon. So, for the LED backlighting for the kitchen under the cabinets, it is best to choose SMD 50x50 with three crystals, since such a tape gives a bright and uniform light stream. It looks very beautifully such a backlight under the bottom of the lockers, if a glossy coating is laid on the kitchens - light reflects from the surface and creates the effect of "soaring" furniture.

If you want to make the backlight rather decorative than the functional, then use the SMD 35x28 SMD 35x28 LEDs.
Depending on the frequency of the placement of LED elements on the ribbon there are the following varieties:
- 30 pcs. on 1 m pens;
- 60 pcs. per 1 m;
- 120 pcs. per 1 m;
- 240 pcs. per 1 m.
Accordingly, the more LEDs dispersed on 1 m tape, the higher the cost of the product. Also, the power of the power consumption and the degree of brightness of the light flux depends.

Also, ribbons are classified by the ability to resist humidity. IP20 marking products are not able to withstand high humidity, so it is better not to use them for the kitchen. IP65 tape is characterized by middle level of moisture protection and suitable for kitchen cabinets. But the marking IP68 means that the tape is not at all susceptible to the effects of moisture, so it can be used to illuminate the aquariums, lockers in the bathroom, pools, etc.

Power Supply
You should select the power supply only after you have determined with the power and characteristics of the LED tape. Blocks are different sizes and capacities. It is necessary to calculate the optimal option so that the operation forces of the transformer is enough for the full work of the tape, but it is important that it is not too powerful.

To calculate the appropriate power of the power supply, we take an example of a tape with a length of 5 m with a SMD 5050 12 W marking. Multiply the power of the tape 12 W at its length of 5 m - it turns out 60 W (total power). But if you buy a 60 W power supply, it will not be enough, so you should always consider a small supply. Multiply the total tape power on the coefficient of 1.25 and will be 75 W. It is such a transformer in this case and is needed.
Installation of LED backlight
Before making LED backlighting a wardrobe, kitchen furniture, or any other, a certain preparatory work should be carried out. Even experienced masters do not work "on the eyes." Think where you can position the LED tape so that it gives as efficient light as possible, but did not interfere with the wardrobe? Where you plan to place the switch, because it must be in a very convenient location, but preferably hidden from the eye, so as not to disturb the integrity of the cabinet design. Or maybe the backlight will be turned on automatically when the door is opened, as in the refrigerator? And, most importantly, how do you plan to supply feed tape to a total network of 220 V?
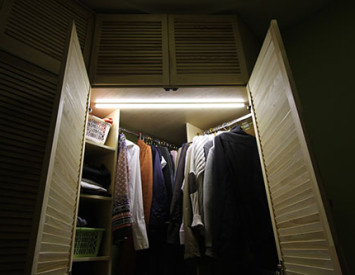
Useful advice: the most convenient to place the LED tape on the back of the shelves, that is, upstairs. This is the safest place that is rarely subjected to mechanical loads and does not create inconvenience at all. LEDs at the same time give good lighting of the entire shelf.
The switch can also be hung under the shelf or at all, hide between the wall of the room and the cabinet end. If you like the automatic backlight, you can purchase a set of LEDs equipped with motion sensors - when opening the cabinet, the light will light up independently.

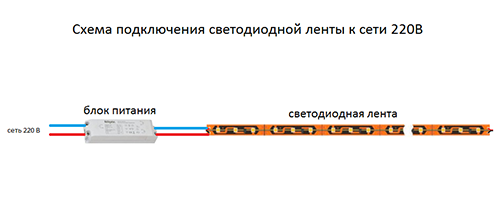
As for connecting the tape to 220 V, then here you need to know the foundations of electricians. Since the LED ribbon is functioning under a voltage of 12 V, it requires connection to a transformer power supply. It, in turn, connects to the outlet, however, if you wish, you can pave a separate electrical wiring cable to illuminate the cabinet shelves. If you decide to do so, the wiring must be open and pass along the wall to the closet. To aesthetically disguise the cable, you can use the cable channel to the tone with the wall decoration.
Only when you decide all the above questions, you can draw a detailed scaled lighting scheme, calculate the required amount of materials and go to the store.

How to make backlight in the closet with your own hands:
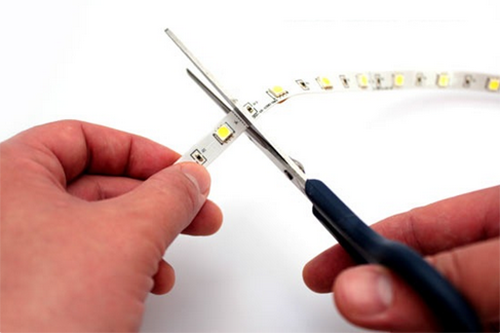
- Squeeze the required amount of LED tape and cut it on a special labeling. It is not worth mounting the lighting for all shelves or the perimeter of the cabinet with a solid piece of ribbon. In the process of work, it will consume more power and will be faster. Small segments serve much longer.
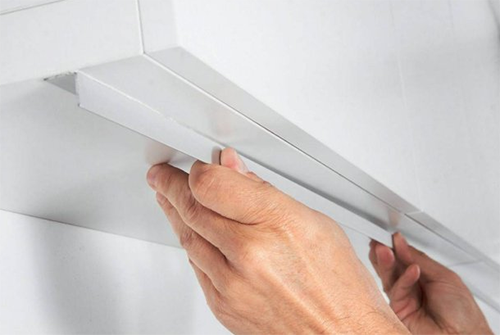
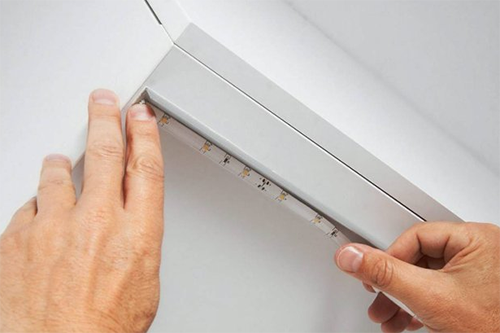
- In the intended location, fix the plastic corner, putting it on top-duty universal glue or liquid nails. The sizes of the corners are different, but it is better to use the minimum, for example, 10x10 mm. This is enough enough to hide and protect the LED tape. Plus, plastic corners are presented in a wide color assortment, so you can choose an option in tone with the cabinet shelves.
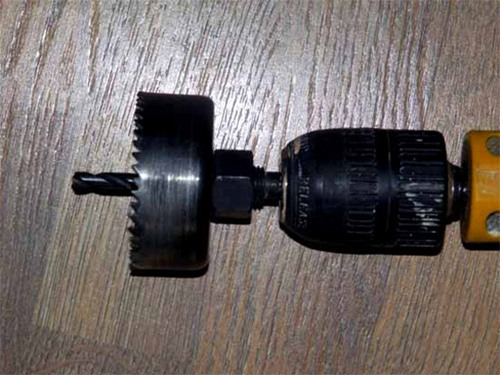
- Swipe an electrical cable into the closet. To do this, do the hole in the most invisible area of \u200b\u200bthe housing with a special crown-crown on a drill. If the wall of the cabinet is made of chipboard, then the hole is smooth and neat, first drill the crown to a depth of 5 mm, and then complete the reverse job.
- How to make backlight in a closet for all shelves? Just in the oldest corner of each of them drill holes for the wire.
- Start the wire through the holes done in the shelves and hide it into a pre-prepared cable channel. Plastic cable channels in the closet are best attached using liquid nails.
- Stick LED ribbon to the corner from the back.
- Connect the ribbon to the power unit.
- Attach the switches in advanced places in advance, connect them and spend the test test.


Here, in fact, all the wisdom. As you can see, make the backlight of the doors of the cabinet, shelves and housings are completely simple. For this, it is not even not necessary to use complex tools and have professional electrical knowledge.
The future appearance of the furniture directly depends on the location of the LED tape directly. So, if the cabinet shelves are made of glass, glue the tape directly to the ends. When the LEDs turn on, they will brightly illuminate the entire surface of the shelves and effectively divide them in space.

LEDs in combination with mirrors look very original. Reflecting in them, they not only create a visual illusion, they also provide more vivid lighting. This can be safely saved - put a ribbon with a rare location of LEDs and a small amount of crystals, and the mirror automatically "double" the result.
LED backlight wardrobes look very stylish and neat, even if they occupy a lot of space in a small room. With the help of light receptions, you can divert attention from modest quadrature and focus on interior items. By the way, in this again, mirrors can help - the LEDs can make the effect of "infinity", visually expanding the space.

Illuminated cabinets: Photo
We tried to paint in all details how to connect the backlight to the closet, and now it's small things to come up with where to adjust it. Such beauty can afford anyone, especially since the LED ribbon is quite a bit. Everything is limited to your own fantasy, and in order to "settle it a little, we have prepared a small photo generation of stylish backlight solutions for furniture.


