The era of personal computers is already coming to an end. Their place was taken by modern laptops, which are no less inferior in power and PC functionality, but they are much more convenient in operation. But keeping the device on the knees while working is not the best option. It is inconvenient, and the laptop is heated because of this is stronger. About how not to spend a lot of money and make a comfortable table for a laptop personally, we will talk further.
Content
In fact, people working at the computer, the tools in the hands take quite rarely, but with this instruction you can really make a beautiful and practical folding table for a laptop, even without any skills to work with a tree.
Choosing materials
Wood material
You will need two wooden shields with medium-sized bitch. Skin is fine for the table. It is strong enough and at the same time light. The future table will be able to endure a girl or child without any problems. Shield sizes choose the size of the future table. For a small clock table, you will rather be a shield with dimensions of 30x100 cm. You, in fact, you need to do only legs and a worktop, so much material is not needed. Wooden panels use optional. Full plywood or chipboard. It will cost cheaper, but the product will be less attractive visually.

Paint for table
The choice of paint is a simple question. In the store pick up the color that will harmoniously merge with the interior of your room. Please note that the color of the paint itself and the final result can be significantly different. We advise you to buy it in stores where there are samples of painted surfaces. It will be more convenient to take quick-dry paint, but it is not critical.
Getting to work. Sketch and his transfer to the tree
- To make a table for a laptop with your own hands you will need drawings. Naturally, the drawing is not the strongest side of many contemporaries, so find the drawing of the table in size on the Internet. Today there are quite a lot of them and without any problems can find the best option.
- Print the sketch on the widescreen printer and with the help of a simple pencil transfer to a wooden surface. You can not even print the sketch, but with the help of the ruler, place the control points and connect them with the lines by hand. But here there is a chance to miss a little, which is why the form of the table will be uneven.
Tip: It is better not to be lazy and make the right pattern in any convenient way, after which the drawing can already be transferred to the tree. It is also better to take a lineup of a larger to bother with the noveractions and intermediate labels. So it will be easier and faster.

Druple, painting and varnishing
- Dumping forms is one of the most complex parts of the work. The optimal option is to use an electric jig. You can do and hand, but so you will spend much more time and strength. Yes, and the result may be an order of magnitude worse. The main convenience of the electrolovka is that you can saw and deploy the shield at the same time. This allows you to make smooth bends and smooth corners even without special wood work skills. Do not hurry. Look, do you really go along the drawn line. Better if you leave the line than grab a piece greater than you need. Check with the drawing. He is your insurance. Therefore, the drawing that you moved to the tree should be identical to the fact that on paper. For convenience, you can fix the sheet with the drawing on the wooden shield of scotch and cutting it on it. So you will be sure that the drawing is correct. During pipes, the shield can be put on two kitchen stools, leaving the gap between them, where the pubsik fell will go. The workpiece will thus be convenient to turn as needed. If you do not have sufficient experience, we advise you to start with less noticeable details. Tabletop Leave for later, and start with the legs. They will not be so noticeable "flaws" of drinking. This also applies to drawing and coloring.

- Skuring surface. Very good to have a sanding machine at hand. Tension to rotating shafts skurt and fix it. It is necessary to work carefully so that the skin of the skins does not break. Otherwise, you will have to be either changed, or reached manually. It takes an order of magnitude longer. It is best to have several skins with different grains. A coarse-grained skin is suitable for removing major flaws when drinking, and small - to make the surface perfectly smooth and pleasant to the touch. Such a wooden table for a laptop will be not only comfortable, but also really beautiful.
- Painting. It is best to apply paint into several layers. Many types of wood are well absorbed by moisture, because of which the paint during drying is shining. Most of the paints dry over a couple of hours, but it is better to leave the painted surfaces to dry over the night, to see if it is better to see if it is necessary to go through it with a brush again. Sometimes the paint after the first drying happens barely noticeable. Do not be mistaken. It will still have to repaint anyway. Also, quite often, after the first painting, the tree is slightly "sophisticated". It can be hoped that in the end, the varnish will block the bristle, but we recommend it once again to ski the surface of a fine-grained skin. Do not worry, you do not have to repeat the procedure infinitely. During the second painting, the tree does not absorb paint so actively.
Please note that when you work with a tassel, you need to drive only along the fibers. At the same time, constantly monitor so that there are no inclination. Start with less noticeable places, and traveled, proceed to more responsible items. Very good if you use brushes of different sizes. You can do and alone, but for the ends and for surfaces it is better to use different.
- Opening with varnish. In order for the table to the stand for a laptop, it becomes more attractive to look, after drying, the paint is recommended to open it with varnish. An excellent option will be a matte colorless varnish. But you can choose any in the store. Popular today is also gloss and semi-shoes. You need to put the lacquer as itself as paint. The varnish itself is no longer absorbed into the tree, so the lacquer process is much faster and easier. But the sublists also need to beware, and the lacquer should also be applied along the fibers, and not across.
Assembling table
In order not to make a mistake, always make measurements. Do not hurry, recheck all the few times. Fold and decompose the legs, bringing them to the place of attachment, but not yet screwing. Make sure they really stand symmetrically and fit smoothly. When you put them correctly, make a marker with a marker, a simple pencil or put small serifs with something sharp. Next you can only fasten loops with screws. The main thing here is not to overdo it with long screw screws so that they do not get out of the tabletop or legs.

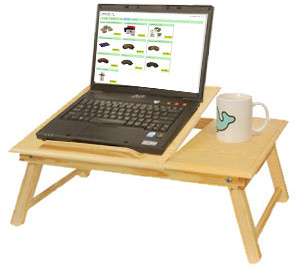
If you wish, you can even make a depression under the cup, which will not be superfluous. To do this, it is easiest to dry through the through hole of a suitable diameter and glue there plastic containers, then paint the same paint and open with varnish. Such a table will be perfect for lovers to comfortably lie in bed with a laptop and a cup of coffee.
Tip: If you want to get a table with a slope, the front legs can be a bit on the same level, and to attach the bar to you closest to you, the laptop does not go.
The main advantage of the table of such a design is the minimum sizes in the folded state and low weight. If you think about making a table for a laptop to independently, consider that the functional in a more complex design of the slightly larger, and there is a lot of compensation.

In any case, now you know how to make a table for a laptop in just a couple of days. Regardless of the selected sketch, the creation process is practically identical. It is usually complicated only by the amount of material used and more complex painting. Such a table will cost you 5-6 times cheaper than the purchase, but for convenience and functionality is not inferior. You can take it with you to the cottage or in nature and be proud that they themselves have created an excellent subject of the interior alone.


