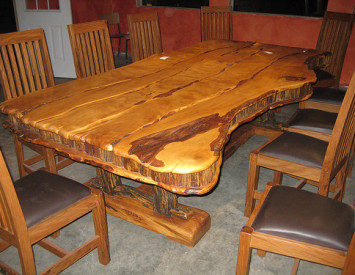
The need to make a tabletop made of wood with your own hands may arise for various reasons: you want to make the table with original size, update the old furniture or just practicing in furniture business. Be that as it may, everyone can build a countertop if desired. However, in addition to the desire, it is not bad to have clear instructions, carpentry tools and some skills of working with wood. In this article you will find all the necessary instructions for assembling the table top with your own hands.
Content
Choosing wood
Often, prefabricated wooden countertops and made of joinery are involved in the manufacture of furniture. Table tops from the wood array are very beautiful, durable and durable, and therefore is quite expensive, so used to build premium furniture. However, to work at home and without special skills, solid pieces of wood are not suitable, since they are very difficult to process.

Regardless of the design type that you plan to do, you must first choose to choose wood. The table should be solid and resistant to mechanical stress, especially if we are talking about kitchen furniture. If you want a countertop to serve for many years, preference is worth giveing \u200b\u200bhard rocks: oak, cherry, cherry, teak or nut. These are the most suitable trees to create tables. There are more solid rocks, but they are very long and difficult to process, and the cost of some exceeds the price of finished factory furniture. In addition, too solid wood can cushion or swell from temperature drops and humidity. Listed earlier types of trees not only have sufficient strength, but also able to effectively withstand various external influences.
Tools and materials
Depending on how you will produce a worktop, you will need various tools. So, if you do a tabletop from a joinery shield, you will have to get a fuguntome - a long plane, with which the finish finish (smoothing) of the surface is carried out. Shield method allows you to make durable and durable furniture of large sizes.
The optimal option for self-taught wizard is a fugoval machine. It can be rented, or if you do not have skills to work with such equipment - ask to treat a workshop of a specialist in the workshop.

So, what is needed in order to make a tabletop from a tree:
- automatic or manual milling cutter (if you plan to make a table for giving, which will stand outdoors);
- jointer;
- hacksaw, perforator;
- set of drills;
- hammer;
- fasteners (nails, screws);
- pliers;
- emery paper of different graininess (from №3 to №0);
- rayysmus;
- clamps;
- wood (boards);
- carpentry glue;
- morilka (if you tint wood);
- impregnation-antiseptic (to protect the tree from pests);
- varnish or paint;
- flat brush.
Useful advice: Choose the boards of the same thickness if you want the countertop to be durable. Before assembly, all the wooden elements should be dried, otherwise the tabletop is deformed with time.

Before you begin to work, select the type of connection of the elements of the future table top. In some cases, you may need additional wooden slats and fasteners.
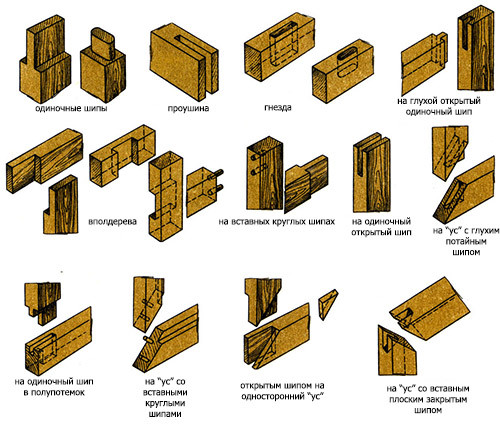
Methods of compounds
There are several ways to connect wooden parts in a joinery. Depending on the selected method, the technique of assembling the countertops will be different. Mostly for this work applied mating and rallying with the help of joinery glue and wooden brazing. A one or another type of compound for the manufacture of the shield is chosen depending on the functional load of future furniture. The easiest way is to share. It implies the gluing of elements with each other treated on a foam edge. To give a shield greater stability, on the ends of the boards, choose a groove and a comb or a quarter so that they come in each other. Also, elements are rallying on the plug-in bar from plywood, mounting it into specially trained grooves.
You can also lock the boards of the countertops on the plug-in spanks, the diameter of which should be half less than the thickness of the board, and the length is to exceed the diameter of 8-10 times. Install such round spikes every 10-15 cm.

Consider the main examples of splicing of wooden elements:
- End on glue - such bonding boards does not give high strength and applicable only in cases where the bars have a reinforcing fixation along the edge or plate. To strengthen the splicing, you can apply the connection to the "Us". For this purpose, the ends of the elements are bonded at an angle of 45 °.
A stepped connection on the "US" allows you to increase the fastener area, making it more durable.
The splicing in captivity is one of the most common techniques used in middle and angular fasteners. To increase the density, make an excavation boards on the ends under the protracted lock - then the wooden countertop will endure any loads. - If you need to connect the boards of full length, use a wedge or straight spike with a joinery glue. Sowing connections are used to fasten the boards to ends or end and a middle at an angle. To do this, you need to choose in the details of spikes and eye, spike and socket or groove and crest, that is, two parts that are suitable with each other like a puzzle. The spikes can be flat, trapezoidal (swallow tail), round or gear. The design distinguishes whole spikes, which are made on the end of the board, as well as inserts. The latter are called waders and pass along the entire length of the fastened elements. Ships have side faces (cheeks) and purses (cut ends of BROs). If the spike socket is open from 3 sides on the end, it is called an eye.
If you do a middle connection, choose a slot depth for spikes more than the length of this spike by 2-3 mm to leave a place for excess glue. At the ends of the spikes cut the chamfold - so the spike will be easier to enter the nest, and the glue will almost not be harvested to the cerebrals. The denser the docking will be, the stronger your countertop will be released. - Plug-in round spikes are used most often, since it is a simpler way of an angular connection. At the same time, they provide the same strength as if you choose the spikes in the end of the board with their own hands. In the image below you can see examples of thickening connections:

Fasteners for table tops
To ensure additional strength of angular thickening compounds, wooden brazening are used. These are small parts with a cone-shaped end that is destructed with glue and insert into specially harvested holes. Such a wooden nail is installed perpendicular to the sidewalls of the spike, as a result of which it passes through the whole spike and eye. So that the protruding ends of the bellows do not interfere, they are cut into the surface with the surface of the product.

In some cases, it is not necessary to do without the use of conventional nails. It would seem that it would be easier to drive a nail, but if you want to get a beautiful and even worktop, you need to know how to do it right:
- If you work with a solid wood, score nails in advance drilled holes in a depth of 0.5-0.6 nail lengths.
- If you fasten the details without punching through them through, the distance between the mounts should be 15-20 nail lengths; If the end-to-end mount with a bend, increase this distance by 2-3 times.
- With through breaking through the nail must be longer than the thickness of the boards by a third.
- Canceling the nails perpendicular to wood fibers, otherwise the boards are cracked. For the bend to the castle, take an unnecessary triangular file to give a nail with a hook form and then drive it into the tree.
- To increase the strength of fasteners, drive the nails under a slight slope. If you make a carpent shield with a lining, drive them into a chess order.
- Singing the workpiece on the weight, substitute the bottom of the big hammer.
How to make a joiner
Regardless of the selected method of the connection before proceeding with the assembly of the joinery shield, wood should be prepared. This implies work with a foam, grinding, treatment with an antiseptic. If you plan to tonnow the worktop and open it with varnish, it needs to be done after the assembly.
The most elementary way to collect furniture shield - glue items. And so that such a countertop served more, the attachments should be strengthened by one of the above methods, that is, to choose a spike and groove. In this case, the spike will be located on the end of the table top, and the groove is at the end of the head. As an alternative - you can glue the transverse staps from below to enter the grooves.

We will look at the method of fastening the comb-groove, because it is more reliable than ridge comb. The main difference is in a uniform distribution of the load, so that the places of attachment do not become potentially vulnerable points. To make grooves and ridges, use manual or automatic cutter.
If you want to attach the rail from below, first target the boards on the edges, and then make the cut into the cutter. In thick boards, the sizes of the groove usually make up 10x10 or 15x15 mm, and in thin - from 6 to 8 mm. This factor also depends on which cutter you use.
When working with a milling machine, always use the flight - it will help to show the boards as much as possible. Reiki can be made independently or buy ready-made. The rail width depends on the dimensions of the table top, and the thickness - from the size of the selected groove (the rail must be perfect in it). Instead of racks, you can take the linen Fane or a piece of MDF from 6 to 12 mm.

If you need to make a countertop for a cottage or apartment in the style of a hunting house, it is better to take a tipped board. It follows it by the same principle as the usual carpentry shield, only for the edge under the groove to use a spool. While creating the boards, screwing down the transverse pars with screws. So you can quickly build a massive, durable and rather rude table, which will give the flavor to the interior and decorate the summer veranda.
How to make the object
Any national countertop needs an oblast - protective edge that goes throughout the perimeter of the structure. For the object, you will need 4 bars made and solid wood, for example, birch, nut or beech. Oak is better not to use because it is too heavy. For tabletop 134x80 cm Make 2 parts with a length of 140 cm (with a small margin) and 2 - 85 cm.
Before installing the clamping bars, select a one-way comb on the entire perimeter of the table top. To do this, use the manual cutter or circular saw (it is recommended to put discs for working with laminate).

How to make a comb circular saw:
- Lock in the guide of the thick sheet of chipboard, put a height of 10 mm and as much on the distance from the guide to the outdoor divorce.
- On the opposite side, put a bar of 33-34 mm from the guide and fix it with clamps. It will be a kind of stopper for the design.
- Put a sheet of chipboard on the edge and go through the first side of the quarter, removing the unnecessary part of the wood.
- Follow the climb throughout the perimeter.
- Remove the lock bar and make a marble from the facade. As a result, you will get a spike of 22 mm wide.
- Make grooves in the inner ends of edging bars, calculating the depth in accordance with the thickness of the spike. To do this, use the fresher and the fourth mill with the support bearing. When you set the salary on the edge, make sure that the details performed behind the DSP bar for no more than 1 mm (ideally elements should go to each other).
- It remains only to mark the marking on the details of the edging in length and cut the ends at an angle of 45 ° for a beautiful connection.
- Stick the rails and roll them with clamps until the glue is completely frozen.
- To strengthen fasteners, pull the bond and countertop with self-drawers, screwing them into a slightly burned and hacking the hats in the wood. These places can then be shut-out with a putty on a tree in the tone with the color of the breed.
If you make a wooden countertop for a kitchen, glue the plastic panel on top to protect material from mechanical damage and humidity. In other cases, you can cover the surface of paint, varnish, make a beautiful decoupage or apply a decorative painting.

We hope that this article helped you figure out how to make a wood countertop. The furniture collected by their own hands is always valued more than that that was bought in the store. In addition, taking control of their hands, you can make tables of atypical configurations, as successfully fitting them into the interior.
Finally, we suggest you to view an interesting video about the manufacture of a round table top of a tree:


