
Working with the ceiling surface is the most time-consuming and specific, and therefore many prefer to get rid of "low blood" - stick ceiling plates or close everything with a tensionable web. However, there are cases when without plastering, it is not necessary, and here everything is not as simple as with the walls. In this article, you will learn all about the ceiling plaster with your own hands.
Content
Plastering the ceiling or not?
Few people know, but repair in any room should be started from the ceiling, especially if we are talking about plastering works. There are a lot of ways to finish, but almost all of them need preparatory work, namely, alignment by plastering and grouting.
Due to the high laboriousness and high cost of work, many doubt the need for its implementation. Thus, the cost of plastering the ceiling, taking into account the purchase of mixtures, their transportation and the work itself will be higher than the adjustment of the tensioning canvas or blending ceiling plates. But before making the final verdict, consider the advantages and disadvantages of this method.

Advantages of plaster ceiling:
- The cost of the mixtures themselves will be lower than buying a stretch or cassette.
- Plastering mixtures are absolutely safe for human health and the environment.
- The plaster practically does not reduce the height of the room - we are talking about several centimeters (5 cm maximum), which you can not say about stretch or suspended ceilings.
It turns out that it is a pretty inexpensive and safe way to repair the ceiling, but some nuances should be taken into account. For example, if the mixtures for finishing are cheap, then the work of the master who knows how to handle them will cost a round sum. The price of ceiling plaster will be higher than if you ordered suspended PVC ceiling. Another point - the plaster can cope only with small drops at an altitude of up to 5 cm. If we put a thicker layer of the mixture, it simply falls off under your own weight, and the consumption of materials will be significantly higher, not to mention the fact that a piece of falling plaster can Seriously spoil the health of residents.
And, the most important factor not allowing many economical owners to decide on the ceiling plaster - to obtain a qualitative result, professional skills are needed. To do this, it is recommended to work out the spatula first on the walls, and then on the ceiling in some small room. Only when you have a perfectly smooth surface, you can proceed to repair in spacious rooms.
The video about the ceiling plaster below demonstrates the main points of operation:
Technology of work
Working with the ceiling is so difficult due to the fact that everyone has to do "upside down" in an uncomfortable posture, while the solution constantly strives to drop directly into the eyes. That is why the whole process should be divided into several stages and clearly follow the instructions outlined below.

Marking and primer ceiling
Any construction and repair work must begin with preparation and markup to clearly understand the sequence of their actions and represent the end result. Alignment of the ceiling is the same as the alignment of the walls, occurs through lighthouses - special labels denoting the level (horizontal or vertical) to remove the surface. In the case of ceilings, lighthouses are recommended to be exhibited by light. If you work in the corner room with two windows, exhibit beacons along. So you will have more likelihood to avoid drops, which often happens when there are 3 rows of lighthouses, and the average is obtained below. And to expose lighthouses across and does not make sense at all, since the result will grieve.

The number of the series of lighthouses depends on the width of the room - if it is less than 3 m, it is possible to quite easily by two rows, placing them in 60 cm from the walls. As a result, the distance between the beacons will be equal to 180 cm, which is quite enough to work with a long two-meter rule. At first, the plaster is applied to the middle row, and then remove the lateral ones. For wider premises, 3-5 m will need 3 lighthouses, and so on. We will consider an example of an alignment of the ceiling with a width of 3.5 m, so it took 3 lighthouses here: in the center of the ceiling and 20 cm from the walls. The length of the first row of each of the lighthouses should be slightly less than the length of the construction rule, that is, 2-2.5 m. The length of the second row can be done as it turns out.
How to prepare a ceiling to plaster:
- Make marking with a simple pencil at points where the self-tapping screws will be located. It is better to immediately write on the ceiling the dimensions of the lighthouses so as not to measure them every time. Make a perforator hole on the markup and drive the dowel there.
- Self-tapping screws do not twist - first you need to apply primer. Since the surface of the draft ceiling concrete and smooth, the primer is needed so that it can be able to hold high quality and tightly. One of the optimal options for such cases is Betokontakt. Apply a mixture generously into several layers, giving drying the previous layer.
- After complete drying of the primer, determine the lowest point of the ceiling surface. For this purpose, it is more convenient to use the laser level and a carbon (tape measure). Hang the level on the wall as possible, let the beam and see what mark it will be highlighted on the square or roulette.
- If you have no laser level, you can take the usual bubble. For this level, it is necessary to glue to the long rule of scotch. Start the measurement from any angle, from time to time making a litter near the holes under the self-tapping screw. The work will take quite a lot of time and will require patience, but without it you will not be able to get a smooth surface. Your task is to find a point where the layer of plaster will be minimal, and if there is a little mistake, it will be spent either too much a mixture, or that even worse, during the work you are drunk in the draft ceiling, and all work will go to the pump. As you understand, to cope with such a task, you need to be able to handle measuring instruments.
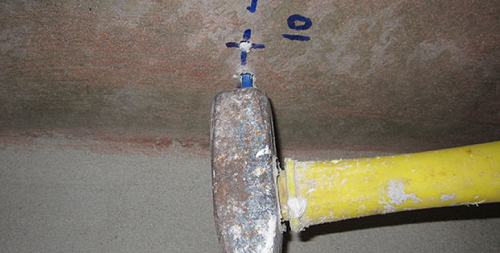
- So, when you were able to calculate, the lowest ceiling segment began to begin with, screw it up so that it is not twisted to the surface by 6-7 mm. This distance will be the standard coating lighthouse thick. The rest of the self-tapping screws, respectively, should be underacted even more, that is, to act more over the surface of the ceiling.
- The second self-tapping screw is "on the eye", after which you attach the rule between it and the first self-tapping screw. Check the horizontal of the construction level and adjust (screw or unscrew the second screws) so as to exit the smooth horizontal plane.

- The same procedure is done with the second and third self-tapping screw, and so on. Periodically check the levels between different pairs of self-tapping screws, and not only between neighboring - so you will be sure that they did not allow the minimum deviation, which in the end can grow into a large difference in height. If you are working as a bubble level, the process of installing the Mayakov will take about 2 hours or longer. An experienced master will spend 1-1.5 hours for it. But with a laser level, it will go much faster, so if it is possible to borrow it or rent it - do it.


Stuccoing on the ceiling
Before proceeding with step-by-step instructions, I would like to draw your attention to one important point. All are heard about the high quality of German building mixtures, especially Rotband plaster. However, not even to all experts know that the maximum allowable thickness of the layer of such plaster can be only 1.5 cm, while the second layer should not be put in any case, otherwise everything can fall off. Thus, if the high-alone surface drop is more than 9 mm, it is impossible to plaster with rotband. The fact is that domestic and European construction norms are very different, and we are good if you get to meet 3 cm plaster.

In general, in the very process of applying plaster there is nothing complicated - smeared on the surface, extended the rule and removed everything too much. But in the case of the ceiling there are its subtleties. So, it is better for him to do a more thick solution, otherwise it will be on you and on the floor. But it is impossible to do too cool the mixture because it simply cannot stick to the ceiling. Since in this case, the strength of gravity works against you, the technology of applying plaster is best to choose depending on the required layer thickness. Steel ironing is convenient to work, if you need to apply a thin layer to 15 mm - impose a mixture with a slide and transfer it to the ceiling by moving forward and up. If the layer is needed, use a simple spatula.

Important moment: the thickness of the layer of plaster, the greater the likelihood of the formation of air bubbles. In these places, the solution does not fit with the ceiling and saves, thereby reducing the strength and durability of the entire coating. The most frequent risk zones are in the corners between the wall and the ceiling. In order to prevent any problems, some professionals use construction trick - at first the thin layer of the solution is applied, they are waiting for its drying, and already then put the main thickness. The first thin layer provides a high-quality clutch of plaster with a draft ceiling. The interval between the application of the first and second layer should be not more than 30 minutes. - The first layer should only snack slightly. Otherwise, the consistency of the layers will be too dissimilar, and the bulk may fall off.

In the photo above, it is demonstrated just such a situation - the first thin layer is perfectly preserved and is well kept on the ceiling, while the thicker mass fell off. If after completing the work and drying the plaster you still detected bubbles or cracks, it can be fixed. We will have to scrape the spatula of the plaster to the very base, after which it is replaced by a solution to this place.
Specific points of ceiling plaster:
- Start work is best with your back to the window, moving towards it. So the light will not make his eyes, but you will see everything with full-fledged natural lighting.
- Remove the surplus of the solution, moving the smooth or rule on yourself, and the last (finish) movement of the rule is always in the opposite direction from the window. So you can consider the work defects and immediately fix them.
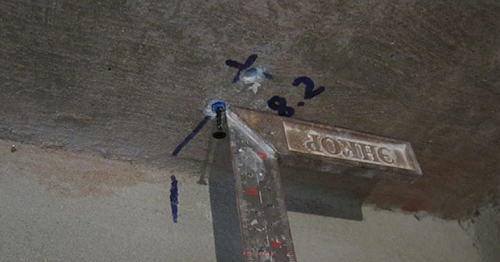
- Constantly check the plane along the lighthouses after each mixing the solution to eliminate situations when the layer enters the layer. Fix then it will not be easy. Also, after each portion of the Zaminate solution, the edges are shown in the image below.

- The remaining inadequate stripes along the walls and along the axes of central screws should be closed after grapping the main plane. Before proceeding with this, unscrew all the screws so that the rule is not clinging for them and they were not visible after the grout.
- After alignment, do not forget to remove all lighthouses. It will only be left to close and align the grooves from them, and you can move to the final stage - grout.


Grouting ceiling
If you coped with the ceiling leveling, the grout will seem like a trifle case. To do this, divert the plastering and apply it with a thin layer on the area of \u200b\u200babout 1 m². You should not immediately smooth it with pressure, otherwise you will have a bugish ugly coating. Just wait a couple of minutes so that the moisture from the solution slightly absorbed into the frozen plaster, and then accumulate. You can experiment with fresh and "double-minute" plaster to see how much the result is.
When the solution collapses, finally "Polish" it to get a perfectly smooth surface. After the grout, the high-quality plastered ceiling looks like this:

As you can see, the ceiling plaster is a pretty specific undertaking. The idea of \u200b\u200bmaking the opportunity to make cheap and high-quality repairs, but at the same time scares the complexity and the need to possess special skills. Therefore, before you decide on an independent plaster, soberly appreciate your capabilities.
Laying the above material Useful video about the ceiling plaster with your own hands:


