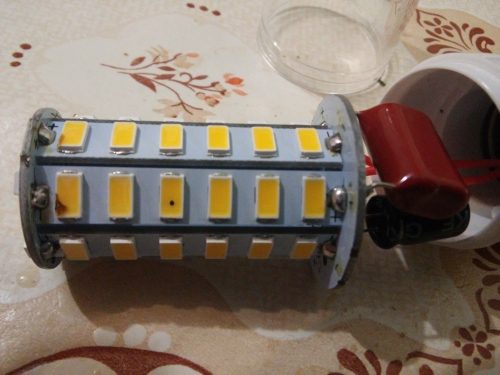
LED lamps several years ago deservedly gained popularity around the world. Their strengths in comparison with incandescent lamps or gas discharge are obvious. Firstly, their service life is several times higher than the last two. If the incandescent lamp lasts about one year, and mercury is about four, then the production of the LED lamp can reach more than 10 years. Secondly, the LED lamp significantly saves electricity. With the same flow of light energy, it consumes 8 times less electricity than incandescent lamp, and 2.5 times less than a gas discharge lamp. In addition, mercury vapors or other harmful substances are not used to work with the LED lamp, so their disposal does not require special equipment.
Content
The only drawback of LED lamps is their price. Despite its constant reduction, they are still inaccessible to the majority of the population of the planet. Like most electronic items, LED lamps sometimes break. The cause of breakdowns may be a poor -quality assembly, problems in the power supply, etc. Based on the cost of the lamp, in some cases it is cheaper to fix them yourself than to buy a new one, especially when it comes to a product with a capacity of 20 watts and above.
About how to make repair of a LED desk lamp with your own hands - further in the article.
The device of the LED lamp
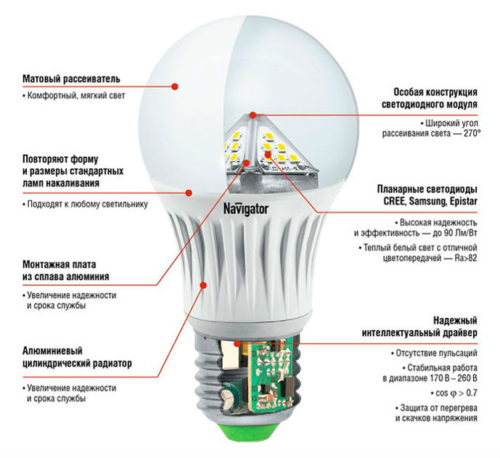
The scheme of the LED lamp is quite simple and the breakdown in it rarely happens. In order to understand the reasons for the breakdown, it is necessary to understand the principle of operation of this lamp. The usual Ilyich light bulb works from alternating current with a voltage of 220 V. It uses a glow of a tungsten spiral in a vacuum flask. Accordingly, no additional devices are required. In the LED lamp, the opposite is true. The LED, which is a direct light source, works from direct current with low voltage (approximately 1B). Accordingly, the lamp should have a device that converts alternating current into a constant one and reduces the voltage.
The ice lamp itself, the repair of which has to be made, consists of several parts:
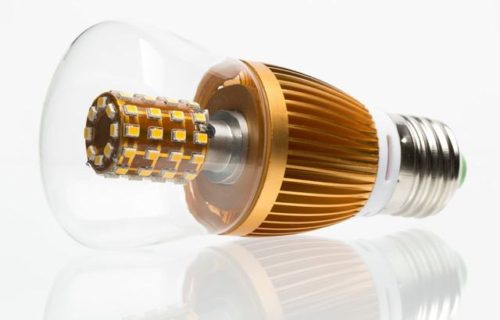
- Base. The base of the LED lamps are no different from halogen or incandescent lamps. For a standard cartridge, the E27 base is used.
- Light dispersion. A plastic matte flask, unlike incandescent lamps, is not soldered to the basement, which makes it collapsible.
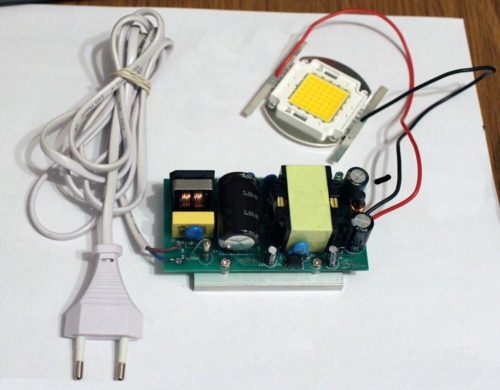
- Printing fee with LEDs. Under the flask there is a printed circuit board, on which several LEDs are located. The brightness of the glow of the lamp depends on how much of them and what power they are.
- Frame. The lamp housing can be made of plastic or ceramics.
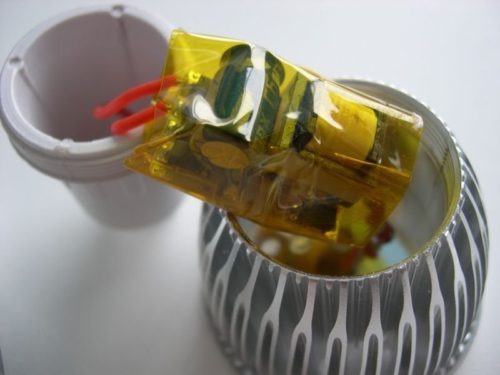
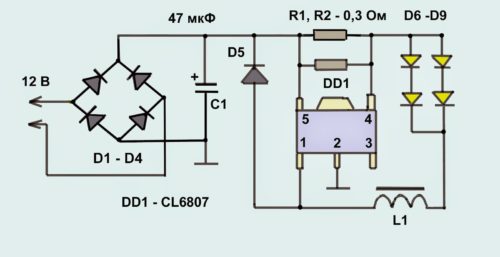
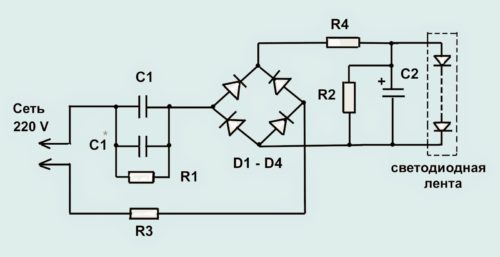
- Power supply. Expensive lamps are made using transformers to reduce voltage, cheap - non -transformer, which negatively affects their reliability. There are also 4 diodes on the board (the so -called diode bridge, which is a rectifier) \u200b\u200band a microcontroller in the form of a microcircuit.
Do -it -yourself LED tools for repairing LED lamps
In order to restore the LED light bulb with your own hands, you must have a minimum set of tools:
- Multimeter. This device will help to check the voltage in the circuit, the presence of cliffs, the work of the main details of the circuit.
- Soldering iron (with rosin and solder). It will be necessary to replace damaged parts or restore the cliffs of the chain.
- Small screwdriver. This tool is necessary to disconnect the board from the lamp housing.
- Subtle clerical knife. It is needed for a neat disconnection of the details from the printed circuit board.
Repair of the LED lamp with your own hands on 220V
There are only two reasons why the lamp may not burn:
- The wiring malfunction (cliff of contact wire, switch malfunction, non -contact in the cartridge).
- The malfunction of the lamp itself.
Before starting disassembling the lamp itself, it is necessary to exclude the first reason.
The procedure is as follows:
- So, when the switch is turned on, the lamp did not light up. A simple way to check the lamp: screw any other into the cartridge, regardless of the type.
- If the control is caught fire, the case is in the lamp, if not, you need to look for the problem in the wiring. For this, a simple tester is used, which shows the presence of voltage in the circuit. Leaning it against the cartridge with the switch on, it should show the presence of 220 V on the cartridge.
- If there is a voltage, but the light is still not burning, you need to check if there is a contact between it and the antennae of the cartridge.
- With poor contact between these details, an arc occurs, which is the cause of the formation of a carbon on antennae. It needs to be cleaned (naturally, before turning off the voltage), and bend the antennae. After that, check again with a control lamp.
- If there are no voltages on the contacts of the cartridge, it is removed and the presence of the phase on the wiring is checked when the switch is turned on. If it is present on the wiring, then the cartridge is changed, otherwise the switch is checked.
When the control is glow, the problems in contacts and wiring can be discarded and directly engaged in the LED lamp itself.
The procedure in this case is as follows:
- Before starting the repair, the lamp must be carefully disassembled. When carrying out work, it is necessary to remember the sequence of disassembly and the location of the fasteners. For convenience, you can remove the disassembly process on the phone.
- The process of disassembling the LED lamp is quite simple, however, due to a large number of small details, it requires accuracy.
- The first step is to remove the diffuser. The plastic flask is attached to the case of the lamp "in the groove", and to remove it, it is enough to lift a thin screwdriver or knife.
- The next step removes the board with LEDs fixed on it. It is screwed to the case with small screws. For complete dismantling, the plate must also be carefully placed with a screwdriver.
- Next, the base is separated from the lamp case. It is squeezed around the case and holds on small zabins. To separate it, it is necessary to unclench the zabins (it is important to do this evenly throughout the entire circumference of the base). The removal of the basement itself does not require any effort.
- Then the wiring is separated, which connects the board with the LEDs and the power supply.
- The last step is the power supply itself.
- Now the lamp is disassembled and you can proceed with a visual inspection. First of all, it is necessary to inspect the scheme for melted or burnt details. It is they in most cases that are the cause of the lamp breakdown. If there is one, it must be gently dropped out and replaced with a new one.
- If visually the cause of the breakdown could not be found, then a multimeter will come to the rescue of the T8 LED lamp LED lamp. This device is “nicknamed” every detail of the board, after which you can accurately determine the failed.
When the cause of the breakdown is determined, you can proceed to its resolution:
- One of the reasons for the absence of a lamp glow may be a breakdown of one of the LEDs. They also need to be "calling" the device. But there is a way and easier. You just need to solder two wires to the usual finger battery, and alternately lean them against each of the LEDs. A faulty detail will not give a glow. It just needs to be dropped and replaced. If it is difficult to find a similar LED, you can simply turn it off the power chain. In the vast majority of lamps, they are connected sequentially. In this case, you can simply close the chain with some kind of conductor. To do this, a small piece of wire is soldered to the place of the burnt LED. Buying LED is not a problem now. They are sold on special tapes, from which it can be dropped and installed on the workplace at any time.
- The blinking of the LED lamp is a clear sign of the capacitor malfunction. Therefore, if such symptoms appear, it must be immediately replaced. However, there are often cases when the LED lamp flashes if it is included in the network through a circuit breaker with a built -in LED. They are often used to make it easier to find a switch in the dark. In this case, it should be replaced with a regular model.
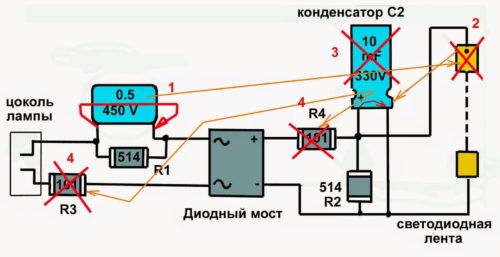
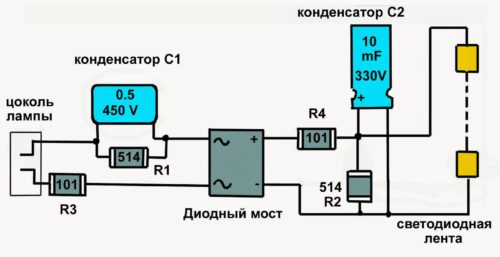
- The most common cause of the failure of the LED lamp is to dry and shake one of the capacitors. There are two of them in the lamp: the first one by 450 V, the second - by 100 V. When the first of them is shackled, the voltage in the circuit is critically increasing, which causes burning out of one of the LEDs. The lamp due to high voltage begins to burn brighter, but not for long. Usually, after the “departure” of one of the LEDs, the voltage on the second capacitor reaches 300-330 V, which is why it fails. After this happened, two resistors fail from high voltage, completely tearing the circuit. Having called each of the elements, you can find a malfunction and replace.
- Chinese manufacturers are especially “sinful” by low -quality capacitors. The voltage on the first condenser so that the lamp works for a long and high quality should be at least 240 V, because the voltage on LEDs is usually up to 180 V. In this case, it is better to put a capacitor of a larger capacity, or to connect another one in parallel, thereby achieving a similar result .
- Less commonly, the driver (microcircuit) of the LED lamp is out of order. Do not repair the driver of the LED lamp with your own hands, it changes to a similar one. The driver of the driver depending on the lamp parameter can be found in special tables of their manufacturers.
- If there are problems with soldering parts (lack of experience or materials), you can buy a finished light bulb. Its replacement will be much cheaper than buying a new lamp.

