By the location and specifics of the installation of lamps, the ceilings made of drywall are taken to divide on the design with the open backlight and with hidden illumination. In ceilings, which belong to the first type, the lighting is suspended or embedded using specially prepared holes. It is worth saying that the frame and the ceiling cover, made of drywall, has a low bearing capacity. Therefore, if this module is used, then the selected hanging lamps should not weigh more than ten kilograms.
Content
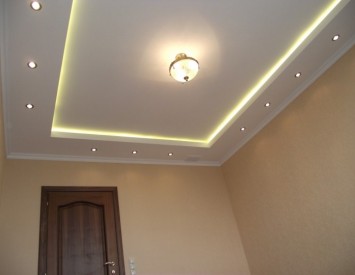
As for the second type of ceilings, in this case the lighting is located in the niches specifically made for this, which are between the two levels of plasterboard sheets. In this case, the light into the room will fall by reflection from the surface. Using the hidden illumination of the ceiling from drywall, with the correct approach you can create a unique cozy atmosphere. On the installation of such designs and let's talk in this article.

Select backlight
If you wish to build a ceiling of plasterboard with backlight, then, first of all, it is worth thinking about choosing the most suitable lamps for use as a backlight. In most cases, the choice falls on luminescent and LED lamps. Here we will talk about LED lamps.
Lights with such lamps have a number of explicit advantages:
- First of all, it is their energy efficiency, which is almost one and a half times higher than in other lighting options.
- The diode backlight of the plasterboard ceiling, made of LED lamps - economical and very practical option for any home. In this case, such lamps allow for a sufficient level of room lighting.
- Such lamps are usually installed using self-adhesive tape. Therefore, the simplicity of installation is also their undoubted plus.
Today there are control units that allow you to control the backlit of the ceiling of the plasterboard. The photo below it clearly shows.

To date, there are several different variants of LED lamps. Each of them is characterized by a set of parameters:
- One of these characteristics is the view of the LED. To illuminate the room, such models are most often used as SMD-3528 and SMD-5050. The latter is more powerful.
- A rather important parameter for the design of the room is the color of the LED lamp on the ribbon. Most often use monochrome tapes, but there are also RGB ribbons that can change colors. If you want to install such structures for lighting, you need to buy special controllers that provide sufficient giltness brightness.
- Another weighty characteristic of LEDs is the density of diodes. Under this it is customary to understand the number of light elements located on one meter of the tape. For lighting, tapes with different density are used, for example, designs with density, 30, 60 and 120 are actively used. And if the first two are suitable for contour backlight, the third is not used for this.
- An equally important parameter of any LED lamp is their protection against moisture. It is provided with a special silicone insulation.

Stages of installation of plasterboard ceiling mounting
- Start installing a backlit ceiling is needed from its markup.
- Next, you need to collect the framework. For the frame, the same metal-friendly is most often used, which is used for any suspended ceiling of plasterboard. To make the frame you need to perform the following steps:
- at first, it is necessary to make an indent of about 100 millimeters from the ceiling overlap and at this distance on the beds of the room axial line. This line will pass throughout the perimeter and will determine the level of the future ceiling. To check the line we use the construction level;
- then, on the line, the starting profile should be consolidated;
- now you need to fix the suspensions, and it is necessary to attach a frame from the main profile;
- the framework is securely breed using conventional self-tapping and special crab connectors;
- encourage plasterboard sheets.
How to install box frame with niche for backlight

Plasterboard can not be considered a solid material. Therefore, if you do not use other structural elements, it will not be able to withstand the severity of the second tier. It is usually the mounting of the backlight.
For this reason, the frame of the second ceiling tier is usually attached through drywall to the top-level guide. To achieve this, such fasteners need to be located in the same place where the guide will pass in the future, which forms a backlit box. Two guides going across the longitudinal profiles of the main ceiling, usually easily attached at a distance of 400 millimeters from each other. In a different way, the case is with the process of fastening other two guides, especially if there is no longitudinal profile above them. Such designs are very unstable. Therefore, this profile has to lay specifically when the main framework is set. Sometimes it should be designed a second level based on the existing design.
Not a problem if the mortgage is forgotten. After all, longitudinal profiles are usually located pretty close to each other, and this makes it possible to choose any of them to use it as a base.

The installation process consists of the following steps:
- Make from the main ceiling an indent to the height of the box, which will be laid later. And at this distance, place the labels.
- After that, connect these tags by horizontal line.
- Next, around the perimeter must be marked, while retreating from the walls of the room at the desired distance. As a result, the lines connected together must make a figure in the form of a regular rectangle. If you know that the walls in your room are perfectly even, and the corners are only straight (strictly 90 degrees), you can do not equal to the distance from the walls around the entire perimeter. Otherwise, the markup should be carried out with the help of the square.
- Go to the process of mounting a suspended design with backlit. It is best to start with the fastening of the guide profile on the earlier markup. The profiles recorded on the ceiling should be located the shelves down, and the designs on the walls are directed towards parallel (opposite) wall. Guides on the ceiling must be screwed into the profile of the main framework.
- Then you should create the structures of the stands of the ceiling profile. For this purpose, cut the material into small parts. In height, they must be equal to the size of the box. On the one hand, it is necessary to make small cuts on bends, and then beaten inside the rear wall. To calculate the amount of material, be sure to consider the fact that the suspensions will need to be attached approximately with a step of 500-600 millimeters.
- Then insert the previously prepared suspension racks in the guide profile, which were previously prepared. After that, screw them with self-strains for metal.
Next you need to make blanks from the profile. For this, it is cut into parts equal to the length of the bottom of the box design. - It is important that their size differ from the distance between the wall and installed on the ceiling by the guide profile. The fact is that on the bottom plane of the box for fastening the LED backlighting of the ceiling of plasterboard, a shelf is required. Thus, the profile length should be more than the specified distance at least 50 millimeters. This should be enough to accommodate small lamps or LED tapes.
- Then the obtained billets are placed in one end in the guide profile located on the wall. Then secure it with self-draws.
- The second end of the workpiece should be made at an angle of 90 degrees with a suspension resistant.
As a result, some framework with protruding profiles will be obtained. Now the protruding part of the material must be drowning. To do this, cut the segment of the desired length from the ceiling profile and then insert them inside. These segments will play the role of the base for fastening the plasterboard strips forming a shelf intended for the installation of ceiling lighting. - Next, the protruding ends of the frame must be closed. To do this, lock the guide profile on the perimeter to these ends, and then screw it with conventional screws. Frame preparation is completed.

How to perform a frame facing
- Facing the box work is not difficult. The most important thing here is smoothly cut down drywall and in order to carry out the necessary work. Material should be cut using hacksaw. Thanks to this, the ceilings from the backlit plaster will look more neat.
- After that, it is necessary to handle the edges of the plane and cut off the excess paper from them.
- Before starting work on facing, be sure to stretch all the wiring to highlight the wiring.
- First you need to fasten the strip to the shelf of the niche. If it happened that between the first level and it is too small, then screwing the screws can be performed using an angular bits.
- After that, it is necessary to carry out the vertical part of the box. For this purpose, plasterboard should be attached to the suspension stands, and then to the ceiling guide. It is important that the joints of the attached bands occurred on the racks.
- Next, proceed to the facing of the horizontal part of the box.
Then screw the side to the end protruding part of the structure. Due to this, the side will not be visible to the backlight, which in the future will be located on the shelf of the niche. It is important that between the upper edge of this side and the main ceiling, the distance was at least 50 millimeters. To strengthen the upper edge, before the start of the work, you should put on it with a P-shaped profile. - Setting the backlight is almost completed. It remains to build lighting elements. This will require a LED tape. Today they are offered different power. More tapes can be monophonic or change colors. Also required 12 volts power supply. When the LED Tape View is selected, it is necessary to calculate the power required for it. To this end, measure the perimeter of the niche, which was prepared for the installation of the future illumination. Then calculate the product of this value and the power of one ribbon ribbon.
Important nuances:
- LED tapes can not be connected to the power supply sequentially. Otherwise, each subsequent tape will shine not as bright as the previous one.
- In addition, you need to know that the higher the power of the power supply power, the more in its dimensions. This must be taken into account in the manufacture of the fifth required to hide the backlight. As an alternative option, you can purchase your separate power supply for each tape.
Installation and subsequent connection of LED tape

- Such ribbons are usually offered in building stores in the form of five-meter bobbins. On the reverse side of each of them, the adhesive basis is applied, which allows it to be installed on the surface of any orientation - both horizontal and vertical. Therefore, when working on plasterboard structures, in order to attach a diode backlight, you can use a shelf in a niche or an inner-side-side wall.
- When connecting the ribbon directly to the power unit, it is important to use the right scheme.
- For the second tape, the wires must be put in the niche parallel to the ribbon, which was laid first.
- The power supply should be installed in the plasterboard niche in the place where the wires were previously displayed. Next, it can be connected to the network. This will be the last stage of the construction of the ceiling with illumination.


