Most apartments built in the "Khrushchev" times are not particularly highlighted by their spaciousness. However, during the construction of such premises, individuals were always envisaged and, as a rule, small rooms are storage rooms. In the storeroom premises, it was customary to store all sorts of necessary and unnecessary things, clothing and preservation. This tradition has been preserved to our times, today people have a wristworker and even workshops if the size of the room allows. Compact shelves in the storage room allow you to distribute many different things on a relatively small area.
Content
Calculation of space
It is possible to use the storage room to be used rationally by placing the shelves and racks in it. The process of manufacturing the shelves does not take a long time and will not require additional knowledge, the main thing is a competently organized layer layout in the storage room.
You can fill the storage room with different furniture and accessories. When arranging this room, shelves, various bedside tables, dressers, mirrors, suspended shelves are often used.
Having arranged a small chungy in her apartment, it is worth deciding on how to properly put the shelves in the storage room and thereby save space. Breaking the walls and expand the room of the already small apartment, it is better to make the shelves with your own hands.
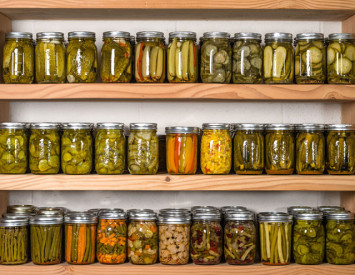
If your storage room performs the function of storing conservation and all sorts of jars - then try to make the maximum amount of wide and stable shelves made of high-quality wood with a metal fortification, which would stand the load.
For books and other things you can make hinged shelves and shelves with glazing.
So that the wooden material does not rotate and not destroyed under the influence of time, in the manufacture of it, it is necessary to cover it with a verse, varnish or paint.
What the standard wooden shelves look like in the storage room, you can see in the photo below.


Load on the shelves
Before making the shelves in the storage room, you need to decide on the intended load on them. For storage cans with preservation, durable and stable shelves are suitable. But, in general, the load depends on such parameters as:
- thickness boards. The more weight loaded on the shelf of things, the thicker should be the board. The optimal thickness is 3 cm;
- fastening. Wooden shelves can be attached to the walls, both with metal devices and wooden bars. The highest quality is the mounting on metal brackets. Plastic in this case will not fit;
- the number of fixtures. The longer the shelf, the greater the fasteners should be.
Advantages of shelves in storeroom
It is possible to release its storage room from excessive races by cabinets and racks by placing the shelves in it, since the advantages of these compact structures are obvious:
- saving space of storage room;
- spacious shelves allow you to hide from the field of view all unnecessary things;
- shelves in the storage room are a refusal of excessive bulky furniture;
- the rational use of each meter in your apartment.
Tips for making shelves
In order to make a pantry shelf correctly to serve it for a long time, take advantage of several important advice:
- Decide with the appointment of the future shelf. If you plan to store large boxes, bags and banks in the storage room, then you will have to make shelves with spacious and deep.
- To protect racks from destruction, the tree must be prepared with varnish or verse.
- If your storage room is long and narrow, then the most correct solution will place the shelves in the form of the letter "P" on the three walls.
- For the manufacture of shelves it is better to use a natural tree, and for partitions it can be limited to plywood sheets.
Installation of shelves in storage room
Free square meters of your apartment can be rationally used to create a separate room. For registration of the pantry do not need to invent solid and bulky cabinets or racks, it is enough to arrange compact and spacious shelves in it.
If you agree with this solution, then break the wall preparation. To begin with, check the walls on the presence of roughness. If there are irregularities, then shuffle the walls. Paint the surface is better in bright colors. Since the storage room itself is a premises without windows, then bright walls will be cleaned excess darkness.
To mount the shelves you will need:
- wooden boards;
- drill or perforator;
- screws;
- brackets;
- building level;
- pencil;
- screwdriver.
When the walls in the storage room are prepared for work, to begin with a pencil and level make marking. It should be determined in advance how the shelves will be located, their distance and dimensions. The width of the shelves should allow large items on them, banks and at the same time that the shelves do not cover the passage into the room. Dimensions are selected individually, depending on the parameters of the pantry.
Proceedings:
- Screw to the wall brackets. Metal brackets are stronger, since plastic may not withstand large loads. Specify the correctness of the details by level.
- Pre-cut boards suitable for the size of your storage room, skill with sandpaper or grinding with a grinding nozzle.
- Finished shelves treat the verse and varnish.
- When the boards are completely dried, place them on the brackets and screw the screws. As a reference point, the approximate distance between the shelves should be 0.5 m, and the optimal depth of the shelves is 30 cm.
- When the shelves are fixed on the brackets, we can assume that everything is ready. Such comfortable and durable shelves in the storage room are very simple, you do not need a large number of materials and special skills.

Shelves in stroke board storage
Before you start manufacturing shelves, stock up the necessary tools and special metal fasteners. for perforating drill it should be selected for wood or concrete, and the thickness of planed boards for shelves should be equal to 20 cm.
To work, you will need:
- lobzik electric;
- punch;
- plane;
- screwdriver;
- knife;
- roulette;
- pencil;
- screws;
- pVA glue;
- sandpaper.
The length of the boards for shelves chosen exclusively on an individual basis, depending on your storage size. Besides planed boards you will also need long sticks of wood (4,5h4,5 cm), plywood (8 mm). Treat stained wood and then cover with varnish.
Manufacturing technology:
- Before you start, make a better future drawing shelves. On this sketch on the walls on either side, configure accommodation shelves.
- By the walls of self-tapping screw the pieces of wood that will be subsequently bonded to each other shelves. Thus, you should have a frame made of bars.
- It was convenient to stack shelves, attach the cross between the longitudinal bars. Distance and height between them define themselves.
- Further, from planed wood fret saw out shelves that fit the dimensions of your frame, and place them on the cross-bars. Overlay should be, as they say, "in a paw" or each other. Secure them with white glue and screws.
- The first and fourth shelves make solid, and the middle two - split between a veneer. Thus, the sections are obtained.
- Number of shelves can not be limited on both sides. Spending a minimum of free time, you design the most common, but very sturdy shelf in the closet to store all sorts of items.

Shelf for storage of wood
To make a shelf in the closet with your own hands, you will need boards 25-30 mm thick bars section 20x30 mm. If the width of the storage permits, useful metal bracket or tube section.
To work, you will need:
- tree (pine) or finished boards;
- screws;
- jigsaw;
- sandpaper;
- level;
- pencil;
- metal tube;
- flanges.
Before starting work, make marks on the closet wall. The most acceptable option shelves installation - a step of 30 cm in this case on the shelf can accommodate cans, a volume of 3 liters and shoe boxes..
Manufacturing technology:
- With the help of a spirit level and pencil to mark horizontal lines, like on the side walls of closets, and on the back.
- Pre-cut on the desired size wooden bars attach to the walls. On side sides - 30 cm long bars (this value is the depth of the shelf). Bold each bar on 2 durable chambers under the hexagon. Long horizontal bars fasten three screws.
- Shelves are made from the board, which you need to predeter.
- Surved in the size of the skill boards sandpaper or with a grinder with a special nozzle.
- Wooden shelves finished and treated with veils are laid on bars and screw themselves with self-draws. To do this, you will need self-tapping screws on a 35-40 mm long.
- When the shelves are in place, it is necessary to strengthen the design so that the shelves do not begged and do not break under the weight of the cargo. In advance, purchase a pipe for furniture and 2 flanges for each shelf.
- Cut the first piece of the pipe. Its size is height from the floor to the first shelf. Insert the pipe between the shelf and the floor and attach the flanges.
- Try to make the vertical tube between the shelves on one vertical line. In this case, you can achieve maximum stability.

Pantry shelf
This is not a difficult example, how to make a mounted shelf, will help you independently decide on the set of necessary tools and technology of manufacturing shelves in the storage room.
To work, you will need:
- wooden board with a thickness of 1.5x2 cm, width - 20 cm;
- self-tapping screws or furniture config terms;
- jigsaw;
- drill;
- screwdriver;
- bulgarian;
- pencil;
- ruler.
First prepare a tree to work. Board cut the jigsaw in length. You will need two boards of 80 cm and two - 25cm. When the boards are cut, stick them from all sides with the help of a grinder with a special nozzle. Align the wooden surface until it becomes perfectly smooth.
Manufacturing technology:
- When the boards are prepared, proceed to their assembly. To do this, all 4 boards are connected to each other in such a way that the box came out. Make holes and screw the configurations.
- When the box is collected, on the back side screws screw metal hooks for furniture.
- Tree cover the verse and then you can paint it into any color or varnish.
- When the coating dry, the finished mounted shelf can be attached to the wall.

See the process of making a wooden shelf you can on video.


