The cellar in the country area is the most necessary object, because raising a decent harvest of vegetables and fruits, we can reduce all the results of our works if they do not provide their proper storage. How to build your own hands this important building is told in this article.
Content
Varieties of cellars
There are 3 main types of cellars:
- fully opened in the ground;
- hooded half;
- ground.
Where to locate the cellar
Building a cellar at the cottage starting from choosing a place. It follows from the following considerations:
- If you need to save space, place it at home or under one of the economic buildings. Of course, first the roam of the cellar, and then we will be erected. Such a cellar is most convenient to operate.
- When the size of the site allows you to build a detached cellar, then besides its direct destination, it will also become an interesting element of landscape design. It should not be forgotten that when choosing a place, the decisive factor is hydrogeological conditions - ground water level, first of all. The best place is an elevation.
How to make a cellar in the country
To understand how to make a cellar in the country, first consider the easiest option. Such a primitive non-capital cellar Sadniki is sometimes made to use them for storing products brought with themselves and some small part of the crop. The process of its structure from several stages:
We make a sketch where we indicate the dimensions of the cellar, the necessary materials and the approximate cost.
- We proceed to the cup of the pit. Optimal depth in your height.
- We arrange the bottom of the cellar, i.e. I smell a layer of rubble - approximately centimeters 15, sand - centimeters 5, trambam and pour a concrete solution. This element performs two functions - foundation and gender.
- In the corners of the pit, even before the fill of the concrete mixture, set the racks from the corner. After the concrete floor is freezing, we are tightened by metal crossing frames.
- In order to prevent soil sprinkling, we get a challenge grid for the frame with a shallow cell.
- We set the lid, well insulated so as not to pass the air from the outside.
- We arrange primitive ventilation in the form of a pipe. The simplest cellar is ready.

Capital cellar at the cottage with their own hands

Having decided to build a capital cellar in the country with their own hands, such to serve for a single generation, approach weighted to each step. Now consider the cellar version that is completely underground. The main thing: start the construction when plus temperature on the street.
We select material
We treat our financial opportunities with soberly, and then decide what to choose for the construction of your food safe:
- brick;
- concrete plates;
- wood;
- metal.
Select dimensions
Experts consider the following parameters optimal:
- Volume in final form - 2x3x2 m, length, width and height, respectively. These sizes vary depending on the specific conditions and needs, but in any case, the length and width of the pit is added 0.5-0.6 m.
- Floor - 0.5-0.6 m above the line of groundwater running.
- The ceiling overlap is 0.2-0.3 m lowered lower than the depth of the soil.
- Wall thickness - 0.25 m.
Concreting base and walls
Choosing a suitable dimensions and squeezing, proceed to the fill of the bottom of the pit concrete:
- Level the bottom of the pit, strictly controlling the horizontal level.
- I fall asleep gravel, then moistened sand. Diligent trambam.
- We drag the sand-gravel pillow in rubberoid - horizontal waterproofing.
- Fill the base with concrete solution.
- We set the steel rods around the perimeter in 100 cm increments and wait until the base is free.
- To vertical rods weld or tie the wire horizontal reinforcement, observing the interval of about 300 mm.
- We arrange a solid formwork. Check vertical.
- Fill the concrete of the wall of the cellar immediately evenly throughout the perimeter, otherwise the mounting seams will appear, which will weaken the design.
- We apply a bitumen mastic or glue the runneroid - vertical waterproofing.
For your information: Sometimes the polymer film for waterproofing is placed in the formwork, and then poured the walls.
Important:to ensure a sufficient density of concrete, and in the walls of the cellar did not form air sinks, constantly stirrely mix the concrete mix during the fill.
There are other options for the walls of the walls in the cellar:
- Stay out of red bricks, stone or concrete blocks.
- Lower the logs or wooden bar. In this case, the tree is treated with special means to prevent its rotting.
- Encourage asbetic sheets on a wooden crate.
Sometimes there are walls of metal, but then do not avoid problems with the temperature.
Ceiling for cellar
For overlapping cellars, different materials are used:
- reinforced concrete plates;
- durable wooden bars or logs;
- metal profile, etc.
The walls for overlapping are the walls of the cellar, so its dimensions must exceed the square of the room under it. This important stage of construction is performed in the following sequence:
- We place the channels with focus on the walls with a greater length of 0.5 m from each other.
- We weld first perpendicularly, and then parallel to the metal profile fittings so that the squares are with a side of 250 mm.
- We arrange a wooden formwork.
- We introduce 2 asbestos pipes for supply and exhaust ventilation and the electrical engineering box with a wire laid in it.
- We mount rigid backups, the purpose of which is to fulfill the deflection of the overlap when pouring a solution having a lot of weight. The backups set with such a calculation so that there are an area of \u200b\u200babout one and a half square. m.
- Sealing the formwork, preventing the solution of solution when pouring.
- Fill the concrete, filling the entire space in the gap of the sewller-reinforcement grille. Watch that no empty corner remains. In the finished view, the overlap is a plate, the maximum height of which is 0.3 m. Through such a stove for about a month.
- We warm the overlap of rubberoid or other thermal insulation material.
- We fall asleep ready overlap of the earth, forming a holmik or make a roof. Since the overlap we had very strong, it can serve as a foundation for the construction of a small structure of a small structure - the burial, made in the form of a house, gazebos or to make an entrance in a different way.
The sequence of manufacturing concrete overlap is set out in this video:
The above describes the process of independent device of reinforced concrete blocking of the cellar, but if there is the possibility of using construction equipment, ready-made concrete slabs are bought. There is one inconvenience in this option - the gabarities of the cellar will have to be limited to the sizes of the plates.


To divert the cellar in the country in the way the way it is possible only when the groundwater is low, and if their level is high, this option, of course, is not suitable. For sites where water is close to the surface, a good solution is to build a bulk cellar.
How to build a bulk cellar with their own hands
This type of cellar is performed in 2 versions: labaz vegetable, it is also called terrestrial and semi-breeded.
The choice of one of the options depends on the level of groundwater. In this case, one interesting people's method is used:
- Buryat Shurf at least 1.5 m depth. It makes sense to do it in the spring when there is enough water in the ground.
- Checking a day, there is water in it. If the water appeared - you can build a cellar only on the surface, otherwise - you can also lay down and a semi-breed cellar.
Construction of land cellar

If it turned out that the humidity level is too high, then there is no other way out, how to build an overhead cellar, the desired microclimate is supported in it at the expense of the layer of the Earth, which the basement was collapsed. Schematically, the construction process looks like this:
- Choose a place on the hill.
- We make markup and remove the soil layer around the perimeter to a depth of no more than 40 cm.
- Delighted, increase the perimeter by 30 cm on each side.
- We fall asleep to the pit drainage, i.e. Bitted brick, crushed stone, sand and just building trash, tamper.
- We arrange a brick floor.
- We perform walls. How the material for them is suitable logs of small diameter, boards, porch. Naturally, the tree is processed to protect against rotting and pests.
- Close up the gaps.
- From the outer side we cover the wall with bitumen mastic and glue the runneroid.
- We mount the wooden overlap and coat it with a mixture of clay with straw.
- Fract the mastic glosol and cover the rubberoid.
- I fall asleep the layer of land, which we sow the lawn grass.
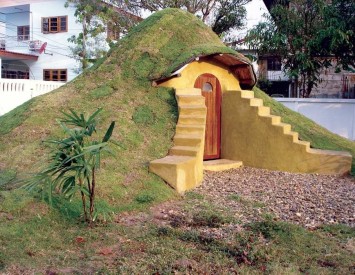
We build a half-breed cellar
Most often, semi-breastned cellars are built on dachas, photos taken at different sections, show how this version of the repository can be originated, turning it into one of the elements, harmoniously fit into the design and decorating the plot.


The feasibility of the semi-breeding cellar device is justified by the high level of groundwater location on the site, when lower than 1 m is impossible in any way. The algorithm is:
- We are preparing to be a depth of 0.7 m.
- We arrange a brick or concrete base.
- We build a wall at a height of 0.22 m, not forgetting at the same time to leave in one of them the opening for the front door.
- Isolating the bottom and walls.
- Construct the overlap that is easiest to make 5 cm thick with a thickness, then:
- i smell the clay layer;
- we hide the two layers of rubberoid;
- we fall asleep with a soil on a thickness of 0.7 m;
- observe the design of the turf.
6. Insert the door, build a canopy over it, make steps.
Below is a sketch of an overhead cellar:

Here:
- 1 - cushion from rubble, broken brick or sand;
- 3 - soil;
- 4 - a mixture of clay and straw;
- 5 - a waterproofing;
- 6 - fatty clay, playing the role of the castle;
- 7 - a floor made of bricks set on edge.
This cellar is possible to attach to the house or garage, then build only have 3 walls.

Construction of all these cellars requires considerable physical effort and the availability of free time, but there is still one option that allows you to significantly speed up the process. We are talking about the cellar of plastic. We consider in detail the advantages and disadvantages.
Plastic garden cellar

Plastic cellars are the chambers with a thickness of the walls a maximum of 1.6 cm. The form meets different. There are structures with rigid ribs or without. Components of individual products are different: they can have a cover, shelves, a staircase, a ready-made ventilation system. Popular sizes - 150x150x150 and 200x200x200 cm.

Benefits of construction
The advantages of such a design are expressed as follows:
- The placement location is selected, where it is convenient to the owner, and not depending on the finding of groundwater.
- Installation technology is very simple compared to the traditional cellar device, because There is a need for the fulfillment of many works.
- There are no temperature and humidity drops on the caisson.
- It will not settle microorganisms and pests.
Cons Kesson
Before making a decision on the acquisition of a plastic cellar, think about whether you are arranged by its minuses:
- the cost of considerable, will cost interest on 25 more expensive made by their own hands;
- standard dimensions;
- if it is incorrect, high soil waters can oust it from the pit.
Tips experienced
In order not to regret the acquisition made, listen to the advice of people who already have such happiness as a plastic cellar for giving:
- pay attention to the quality of the material, check certificates, GOST and other documentation;
- for installation, invite specialists;
- to observe the quality of work, it is good to have a familiar professional in the extreme case a person in no way associated with a working brigade;
- to protect yourself from problems, conclude a contract with installers and pay attention to the warranties they provide.
Burner manufacturers
Plastic cellar can be bought or order. For example, the company Russian Aqua Hold releases the cellar in 3 performances:
Cellar Bars
- Rectangular plastic with a thickness of 10 mm.

2. The cellar in the second execution of the cylindrical shape made from the pipe polyethylene, spiral with a minimum of 2.5 cm, height at the request of the client.
3. The third cellar is rectangular, cast, manufactured using a rotoforming machine. He has stiffeners and protruding bottom, which reliably protects the caisson from the float.
Cellar Tinger.
Good cellar from plastic produces a Tingard polymer product plant. The main advantage of the Tinger cellar is that it does not have seams, which means that it does not face the penetration of groundwater through a poor-quality connection.

It is impossible to build a cellar in the country, not knowing the basic principles, its arrangement. Useful knowledge about this is divided by the author of this video:


