If you have a summer cottage, and you also like to create beautiful things with your own hands, then you just need to try to make crafts from plywood. They will not only become an adornment of the court, but also bring the warmth and sincerity.
Plywood options
Many builders do not even know that from such simple material as plywood you can make interesting crafts. What is plywood? In fact, this is nothing more than thin sheets of wood, glued together in a special way, one sheet is glued to another along the fibers, the following to the previous against the fibers. And so several layers, from two to ten. The sheets glued in this way give the faner a special strength. This material is quite malleable, they cut out crafts from plywood with a jigsaw, earlier even at labor lessons in schools, they did this. These crafts are held well and long, and the material is not expensive. So the matter remains small: to figure out that you can create from it. To do this, you can see crafts from plywood in the photo or spy on neighboring dachas. Or maybe even come up with it yourself.
From plywood you can make a lot of interesting things for a summer residence. It can be:
- Bird feeders.
- Vases.
- Interesting figures.
- Fences.
- Postal boxes.
- Racks for hangers.
- Window sills.
- Houses and much more.
Figure from plywood
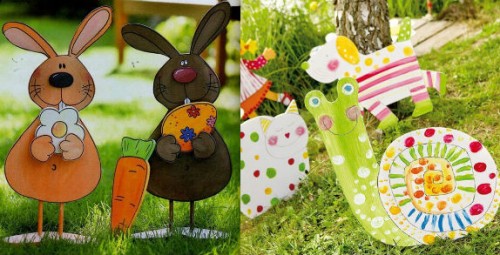
Most often, the cottage is decorated with flat plywood figures, it can be animals, birds, vegetables or some fabulous characters. They are especially relevant in the country where young children rest.
In order to create a craft for a garden from plywood you will need:
- plywood sheet is moisture -resistant, 2 cm thick;
- pencil;
- acrylic paints;
- paint brushes;
- electrician;
- drill;
- self -tapping screws;
- coating varnish;
- fighting paper;
- pegs.
According to this method, you can make any flat figure for a summer residence.
- Take a sheet of plywood and draw us a pencil figure. If you can’t do it yourself, then you can use tracing paper to the plywood already a ready -made drawing.
- Gently cut the figure in drawn lines with an electrician.
- Walk around the edges of the figure with sandpaper to polish it.
- In the workpiece, drill holes where the pegs will be attached. The holes are made in two rows, below, where the limbs are located in the figures.
- Screw the pegs to the limbs of the figure. The size of the pegs proceeds from the height of the figure itself, the larger its size, the longer the stakes. Keep in mind that they should enter the ground at least half a meter, otherwise a strong wind can demolish the figure.
- Power the figure. Make her face, figure, clothes. First with a simple pencil, and then paints. When the paint dries, paint the ends of the figure also. When the figure dries from all sides, it needs to be opened with varnish.
- Determine the place where the figure will stand and dig the stakes into the ground.
So you can make several figures on one topic. It can be a plot from a fairy tale, fruits or vegetables.
Bird feeder
To make a bird feeder for a garden with your own hands, you will need the following materials:
- plywood sheet is moisture -resistant;
- fighting paper;
- hacksaw;
- acrylic paints;
- brushes;
- water -resistant glue;
- screwdriver and screws;
- varnish for the surface.
How to make a feeder for a summer residence:
- Like any crafts of plywood, the feeder also needs to start to do with drawings. Mark the product plan on the plywood sheet. There should be drawn a pallet, a roof, side sides and supports.
- Using a hacksaw, carefully cut all the details. And their edges are sure to polish with sandpaper.
- All details are attached to each other with glue, and only side supports are connected using screws.
- To make the feeder look bright and aesthetically pleasing, decorate it with paints, and when it dries, then cover on top with a layer of varnish.
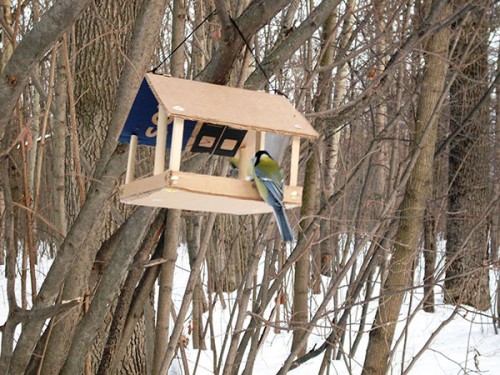
- When the feeder is completely ready, attach the rope to it on top and hang on a tree. After a few days, birds will recognize the road to her and will visit her every time you put a delicious treat. This craft will be doubly useful in a summer cottage due to the fact that birds will destroy pests from the crop.
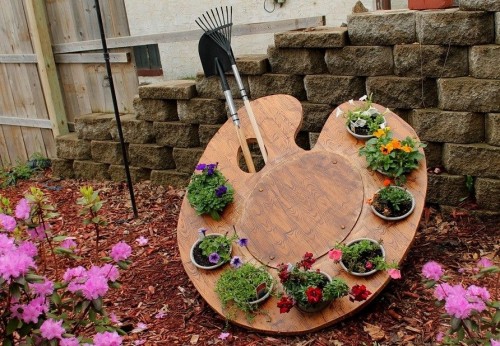
A flower bed of plywood
Such an original flower garden will become a decoration of any cottage. To create it, you will need the following materials:
- pots with flowers;
- shovel, rake;
- plywood;
- bars;
- clamps for fasteners;
- stain and varnish;
- pipe scraps.
To create it, you need to do the following work:
- Decide right away. What flowers you have to decorate this flowerbed. Transplant them in pots so that they bloom all summer with you. Petunia is good for this role.
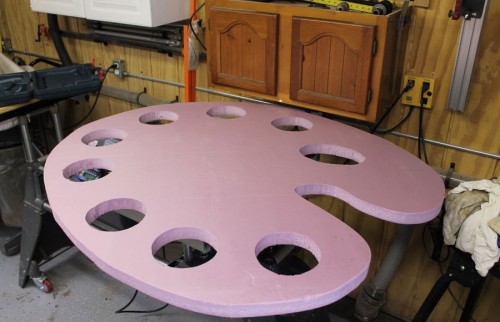
- Now take a sheet of plywood and draw on it the artist’s palette template, given that the paint places will become holes for pots with flowers.
- Gently cut the shape with an electric jigsaw.
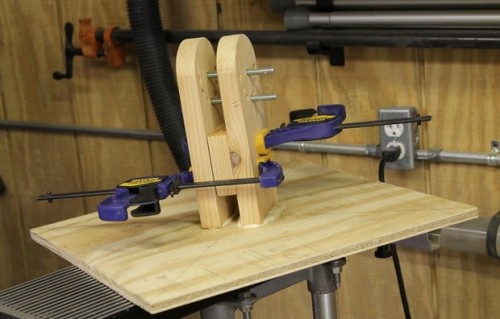
- To fasten the palette, take the bars and connect them with the base of the flowerbed using a clamp.
- As a result, you should get a mount for crafts from plywood, as in the photo.
- From the parts of the pipe, you need to make a stands for the inventory.
- Inventory is decorated with bright paint.
- First, treat the plywood with a stain, and then varnish.
- Insert flowers into the holes of the palette and install the flower bed in place in the garden.
Craft "Blacksmiths"
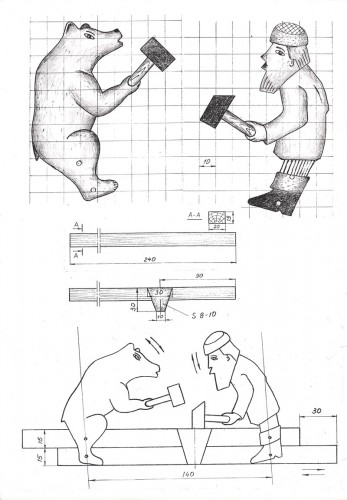
You can make crafts from plywood and for children. The child will be glad of such a famous toy as "blacksmiths." Its meaning lies in the fact that by shifting, the bar in different directions pull the figures of the blacksmith and the bear. And it turns out that they knock with hammers on the anvil. There are a lot of variations of this toy, each author brings something his own to it. Ideally, this toy is made of wood, but then its creation becomes possible only to an experienced master. For those who are not very familiar with carving skill, there is a simpler option and it is made from a plywood sheet, while the principle of operation of the crafts is preserved.
You will need to make such a craft for plywood:
- plywood sheet three -layer;
- two rectangular wood triggers;
- nails;
- pVA glue;
- electric jigsaw;
- hammer;
- awl;
- electric burner;
- sandpaper;
- pencil;
- tracing paper.
To make “blacksmiths”, you need to do the following work:
- Draw a drawing of figures of a man and a bear, or print a ready -made on a printer.
- Pour the front side of the plywood sheet with sandpaper. It is important to do this only along the fibers.
- Copy a drawing on a plywood sheet with a pencil.
- Wrap the figures with an electric jigsaw. Make sure that the jigs of the jigsaw passes along the outside of the marking line.
- Pull out the sides of the workpiece with sandpaper.
- Using an electric burner, apply a drawing.
- Apply a pattern of an anvil on the plywood and cut it. Then polish and you can not burn.
- Fix the anvil in place with cloves, strips and PVA glue.
- Based on the drawing, place the strips, shift them by 3 cm.
- Make holes for nails so that there is a small gap, cloves should easily enter.
- Making sure that the hammer touches the anvil, install the figure of the peasant. No need to completely clog nails, because when setting up, probably you will need to interrupt them a little further.
- Fix the figure of the bear with a hammer raised above the anvil. It is necessary to make sure that the centers of the hats of the nails are on the same line.
- Try whether the toy works correctly. Whether a bear and a peasant hit the anvil alternately. If everything is fine, then it remains only to fix all the nails thoroughly.
- Put the toy in the gazebo in the country to delight your guests with a craft made from plywood with your own hands.

