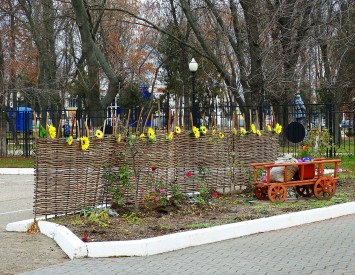
Wing is a pretty colorful fence created in ethnic style. Previously, the woven or, as it was also called, "Tyn" was a mandatory attribute of each countryside. Over time, people refused to have such fences, because more modern materials appeared: metal, brick, cement. Circumstances have become more serious, and fences are stronger. But today, such a decorative design element is increasingly, as a woven can be seen on only in a rural outback, but also on modern household plots, and even in the center of the metropolis. Wovers can be made in the country with their own hands, and it is not necessary to impose security functions on it - with the help of such a fence, you can freeze the flower bed, a flower garden, a garden, a seating area, a gazebo, etc. This building will fit very beautifully in any interior, especially if you want to add ethnic style notes.
Content
Wing: Advantages and Disadvantages
The woven fence will give an inquidate area not only a rural look, but also a special sense. Especially the woven looks great if you add ethnic design solutions around it - it will give a special flavor to your home.
Woven: Advantages:
- Made of ecological material.
- It is inexpensive.
- Easy to manufacture.
- You can disassemble and collect several times.
- Original solution.
- Excellent decor element.
- For construction, any material can be used: not only branches that remained after the rejuvenation of shrubs and trees, but also thin PVC pipes.
Woven: Disadvantages:
- Short-lived.
- It is used only as a scenery, since it does not carry full-fledged fence functions.
- Quickly breaks, even if you make a small physical effort.
Today, the woven can be seen in ethno cafe and restaurants, in kindergartens and in playgrounds. This fence is beautiful and often use as decorations of recreation places. A very original wint looks in a major city surrounded by all the benefits of civilization. But at his site, the woven can freeze flowerbed, lawn, gazebo, brazier, the main thing is to choose the right accessories and design.

Woven with your own hands: Tips for beginners
In order for your improvised braided fence to be fame, and served as long as possible, remember these simple tips:
- The durability of the Plentress depends on the speed with which the branches rot, so that the fence serves faith and the truth as long as possible, it is necessary to help him in this - to protect against rotting. The cheapest antiseptic is automotive oil - they need to handle the surface of the branches. The substantial minus of this means: the branches will acquire a dark color, and to touch the fence will be contraindicated - the oil does not absorb and does not dry, which means that the woven will leave the fat traces on any subject, which will affect it.
- Another way to prolong the life of the Plentress - the drain layer, which will prevent the contact of the branches from the ground. As a drainage, you can use crushed stone or sand, and you can also use the other. First you need to pull out a trench - a depth of 50 cm, then fall asleep drainage layers and install vertical pegs.
- In order to protect the supporting pegs, the part that will be underground should be charging. You can also lubricate this bitumen.
- To facilitate the installation of the pegs, you can pre-drive into the ground scrap - due to this a peculiar hole is formed. Now in these holes you can quickly install pegs.
- Weave woven tonging branches between stakes. So that the lower and the upper branches do not slip from the pegs, it is necessary to tie the first and last twig to the middle branches.
- It is not necessary to use the dry branches for the creation of Plena, which have been lying for a long time, because they do not have elasticity. As soon as you try a little to bend such a material, the branch immediately crashes. That is why the diluted branches are needed - they softened, after which it will be more interesting with them.
- To create a beautiful gathering, choose the same branches - both in thickness, and in length.
- Choosing a branch for pegs, remember that 50 cm will be hidden under the ground, which means that the length should be the corresponding height of the fence.
- If you do not supplement the top 10 cm, you can use the pegs with decor elements.
- Think up the elements of the decor - the woven looks much richer if you decorate it with traditional rural decorations.
- The woven can be screwed to the grid Rabita or a metal fence - so you will not only decorate the home, but also hide the yard from prying eyes.

How to make a woven: preparatory stage
Woven: How to Prepare Material
You firmly decided to build a woven with your own hands? Then you need to know the secrets of the material harvesting.
- The raw material for the manufacture of the Plentaries is harvested in January - at this time you definitely do not harm the trees.
- Go to the forest or in any other place where trees grow and where you can unhindered to cut the desired number of branches.
- The branches must be flexible and have a length of at least 50 cm, and the diameter is at least 1-2 cm.
- Experiment: pick up the branches of different colors and shades.
- Before starting to weave the fence, the branches must be soaked at least one day in water - in any container so that the liquid covers the raw material completely.

What branches are suitable for the manufacture of plentine
For some reason, there is a stereotype, according to which the branches of such trees are ideal for the construction of a Plentry: Iva, Birch, Apple Tree, Dogwood, Walnut, Pine. In fact, this is not quite true, because your wint can be made from any tree of wood.
Of course, the most successful choice is the long and flexible branches of trees and shrubs: willow and nuts. But if it is a little to dream, then you can weigh a great fence from another raw material, for example, gathering Rogoz (reed), beams of straw, birch, derm or even amur grapes. Suitable for the manufacture of Sunday Annual Saving Saving.
Prefer the straight and flexible branches of trees and shrubs that grow near the reservoirs. It is believed that these branches are more likely by moisture, they will have a small core and a very smooth surface.
If you turned your gaze onto the straw, then take rye: it is more durable and has long interstices. If it is good to wet, then such straw retains flexibility well, becomes elastic and suitable for weaving. In addition, this straw has a very beautiful color, although, in the case of which the woven from this material is easily painted with aniline paints - in any favorable color for you.
But to make a woven from the root (rogo), raw materials should be collected from August and ending in October.

How to make a woven: work process
First of all, it is necessary to decide on the material from which you will weave the fence. Then - with the place to install it and decorate.
The woven consists of support (base) and "body" of fence (bars).
Wing: Cooking the basis
- As the basis of the Plentress, you can use a wide variety of branches - pegs that are driven into the ground on the same distance from each other.
- The pegs must be lost in the ground at least 20 cm, but in order for the design even the strong wind and the landscape of the Earth, it is necessary to deepen the branches by 50 cm.
- The diameter of the pegs for the base should be at least 5 cm.
- The most reliable stakes are obtained from larch.
- Wooden pegs can be replaced with metal or plastic. For these purposes, you can use both fittings and PVC pipes. They can be painted in a convenient color for you, and put the plugs in hollow pipes. Due to this, the design will be able to simultane very long.
- If you use wooden stakes, treat them with an antiseptic, varnish, impregnating Pinotex, paints - it is to prevent the rotation process and improve the strength of the base. Slices are best charring or processed by an antiseptic.
- Do not forget to make drainage for the base - from sand and crushed stone.
- The pegs should stand at a distance of no more than 50 cm, but it is better to put them more often - about 30-40 cm from each other.
- The height of the Plentore is selected individually.

Woven: Cooking Rod
- The most important requirement for rods is flexibility.
- If you do not have fresh cut rods, you need to soak in the day that have been cut for a long time. But if the rods will be in the water too long, they can refund.
- You can soften the rod to the ferry - arrange a steam bath and they will become more flexible. You can also put under the wet burlap.
- Ponds can be painted in any color - paints or vegetable dyes. For example, the yellow fence will be due to the onion husk and birch leaves, and brown - due to the brave of branches and black alder. You can use manganese, sampling, etc.
- Before you start painting, you need to remove tannins - they are contained in the crust in many plants. In order to do this, you need to put a branch in a soap solution for a couple of hours.
- If you are not going to paint the branches, then you should not clean them from the bark - so the woven will look very natural.

Weave horizontal woven
- Take straight and thick bars (fittings, pipe, etc.) and build the basis of the future fence.
- If the twigs are thin, post them closer to each other.
- Take the branch and thread in turn between all vertical bars.
- Do not forget that the branch must fall on the rods in turn: the slam, then the right side, and so on, until the end of the fence (fence section).
- Weaving begins with a thick end of the branch!
- Alternate weaving - the branches must take turns to swell pegs, both to the right on the left and left to right.
- The next branch should not repeat the path of the previous one: if you started to fly the first peg on the right, the next branch should be tired on the left, then the next branch will deteriorate it on the right, etc.
- Thick and thin ends of branches should be distributed evenly.
- The thickness of the shoulder should be the same.
- After you have achieved the desired height of the fence, it is necessary to fill the length of the branches - this can be done using a secaterator or a garden knife.
- Do not forget about the castles - these are the ends of the rods, which are attached with the help of wire to spicks and other branches.


Weave vertical woven
- Kens are driven as described above.
- Horizontally a few branches are tied up to the spicks - these are the planks to which the remaining branches will be attached.
- The branches are installed vertically - they will determine the horizontal planks.
- The thick end of the branch must rest in the ground.
- From above, the rods are associated: you can make it with a wire or rope, but you can need a few branches horizontally.

PVC Pipe Woven
If you have not prepared twigs for the construction of plentine, you can build it from thin PVC pipes. The specificity of the work is exactly the same as with natural raw materials.
- Cut the pipe on the tube required length. Vertical pegs should be authentic.
- Drink pegs to the ground.
- Wear pegs, starting from below: first to the left, then on the right, etc. until the material is over or until you reach the desired length.
- Cut on the sides of the pipe.

How to decorate your woven
- It is believed that Sunflowers and Nyurists have definitely disembed near the whites - this is a classic scenery for a given fence. Sunflower may well be artificial: plastic, from polymer clay, from fabric, etc.
- Late chrysanthemum, chamomile, gladiolus, asters, dolphinium, nasturtiums look at the week.
- The woven can be a good support for curly plants.
- Near the pastry, you can put a colorful bench - rugged from the stump and the board.
- From above on pegs, you can hang clay pots, children's boots, etc.

Wing: Best Works. Photo


