The kitchen is one of the most important premises in an apartment or house. Because of its direct appointment - cooking, this room is exposed to various harmful factors such as temperature drops, steam, fat, high humidity, smoke, etc. All of them badly affect the interior. To level it a detrimental effect, it is necessary to choose correctly than to separate the walls in the kitchen.
Content
Requirements for materials for decoration walls of the kitchen

The most important requirement for finishing materials, which will be lined with your kitchen is practical. The surface of kitchen walls should easily wash without losing its appearance. As a rule, work in the kitchen is associated with the constant risk of pollution of the walls. Splashes of various liquids (juices, coffee and tea, soups and fat broths) can over time to turn the finish into a not quite pleasant picture. Therefore, the surface of the walls in the kitchen should easily clean.
The second requirement is resistance to moisture and temperature drops. Especially this property is manifested in winter when, when cooking a large number of dishes, the room temperature rises, and then sharply decreases, and a large amount of steam is released. Unpredictable materials, such as paper wallpapers, can lose their properties.
Another of the most important requirements - fire safety. Cooking in the kitchen in most cases is associated with the use of open fire. Therefore, to separate its walls with combustible materials, such as plastic, is not recommended.
The most popular materials for kitchen walls

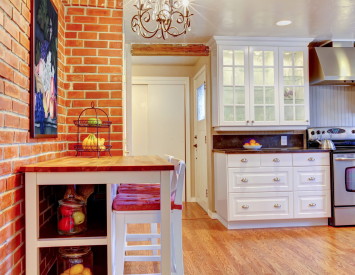
Registration of walls in the kitchen with ceramic tiles. Ceramic tile. This is a classic in the kitchen finish. It is successfully used throughout a fairly long period, and the popularity of such a finish is only grows. Tile can only be uploading a apron - a small area of \u200b\u200bthe wall above the working surface, and possibly the entire perimeter of the walls. The beauty of various drawings, different sizes, the possibility of combining - make this material one of the leaders in the kitchen finish rating.
Advantages:
- easy to wash
- no moisture is afraid
- resistance to temperature drops,
- large service life.
Disadvantages:
- high price,
- mounting complexity
- the need for careful surface preparation.

Wallpaper wall decoration. They are considered the easiest option for finishing kitchen walls. Naturally, we are talking about phlizelin or vinyl wallpaper. They have a special microscopic coating that allows them to wash with a damp cloth using non-abrasive detergents.
Advantages:
- low cost of materials
- easy installation (they can be punished with their own hands in a few hours).
Disadvantages: Wallpapers are traditionally afraid of direct sunlight, they simply burn out on them, as well as high humidity and temperature drops that can cause peeling them from the surface.

Wall decoration in the kitchen plaster. The plaster as a decoration of the kitchen appeared relatively recently, if, of course, it is not considered that its similarity, which was created by the Soviet "Mount-Builders" with paint and bliss. Today, plaster, created on the basis of synthetic or mineral materials, can noticeably revive the kitchen interior, making it more elegant. Mineral includes mixtures based on plaster, lime or cement. Synthetic are based on polymers, such as styrene or acrylic. The color of the walls in the kitchen due to painting by plaster can have a wide range.
Advantages:
- easy painted,
- not too high the price of materials,
- simplicity of application.
Flaw: The need to cover the plaster with special compositions to counter moisture.

Stone kitchen wall decoration. This material is an excellent alternative to ceramic tiles. Artificial stone can create an excellent atmosphere of a medieval castle in the kitchen. If it is for it to choose the right light, the result will be very good. This material gained popularity as an addition to the modern interiors, it perfectly harmonizes with furniture of any color and design solutions.
Advantages:
- easy to wash
- simple in laying,
- it has relatively low weight,
- pretty beautiful material.
Flaw: high price.

Decorative wall decoration in the kitchen MDF panels. This material is quite rarely used for cladding walls of kitchen premises. Usually furniture is made from MDF, but recently a large number of designers began to use it as a finish. The main advantage of this material is that it is possible to create an excellent design of walls in the kitchen due to the combination of panels with different colors.
Advantages: Beautiful appearance.
Disadvantages: Pretty high cost of repair, fear of excess moisture, and, especially, steam.
Simple decoration of kitchen walls with your own hands
For our kitchen, we chose a fairly simple finish option. The working zone will be finished with several rows of ceramic tiles, and the rest of the vinyl wallpaper.
After all the wiring is installed, we begin the preparation of the wall to the starting putty. First of all, we need to press all the wires in the grooves. It is necessary to make it necessary so that with the putty they do not drank outwards, which can damage the layer. To do this, we breed a thick solution of the starting putty and with a spatula we appline it on wired grooves in increments of 0.3 m. We do it carefully. If there is a need, before the putty is grabbing, it is easy to hold the wire with a spatula to not damage it.

When the putty dry, check the walls in front of the primer. Easily catching up with their rubber hammer or just a fist. If there are places behind the lag of the old plaster from the wall, it must be knocked down.
Next you need to clean the wall from the remains of old wallpaper. To do this, moisten their water and, when they are enough to scatter, carefully remove the spatula. The next step is proceded to the primer. For this operation, we use an acrylic mixture of deep penetration. We apply it with a thick painting brush. You should not regret the primer. After drying the walls, we apply another layer.
After the walls are dried, we begin to put off. The first layer is distributed to the starting mixture. It is characterized by a larger grain size, which is very good for alignment of the walls. To apply starting putty, we need the following materials:
- Set of spatulas.
- Mixer and drill.
- Rule.
- Level.
- Strip mesh.
- Perforated corner.

Further work order:
- To begin with, install a perforated corner on the outer and internal corners of the room. We put a putty at an angle and gently glue the corner on it.
- Let the putty dry dry a little. Then begin to apply the second layer. Do it neatly, smooth layers, from time to time checking the rule or level of no irregularities. If the walls are too curves, be prepared that you will have to apply several layers.
- After applying the same layer, we take a major cloud mesh and cleaned irregularities and roughness. Then the wall is straightened again, and, if necessary, shit again. Ideally, after starting putty, a smooth surface should turn out.
- Then we apply a layer of finishing putty. When diluted, its consistency must remind a thick sour cream. It is applied by a thin layer. After drying, they wipe in fine mesh, and ground.
- The next step will be the pasting apron of ceramic tiles. Tile we have a standard size of 20 cm x 30 cm. Between two rows of material, we will put a row of decorative edge.
- The size of the apron should be such that it is 2-3 cm below the kitchen table, and on top - by the hinged box. To do this, knowing the height of the Tumb Kitchen headset, diameters using the level of the horizontal line - the boundary of the first row. Then, on this line, we establish a support for the first row. It can join a metal profile or a wooden plank. Break it on a fast mounting dowel.
- Before laying the tile, the surface can be projected. For this operation we buy special glue. We dreamed it to the consistency of melted plasticine. To apply glue to the surface of the wall and tiles, use a serrated spatula.
- There are several crossbars between the tiles - they are needed to excerct the same distance between them. After installing the second tile, check its position using a level. It should be in the level from the first.
- Tile lay on the ranks from the bottom up. If you do it for the first time, do not bred a lot of glue. While you will align the tile, it can just dry. When the glue will die, put the edging, and then the second row, etc.
- After laying the tiles, we drag the seams. To do this, we use grout for seams. They are different colors, so you can pick up a tile under the tint.
- The last barcode is sticking wallpaper. This is perhaps the easiest stage of the decoration walls of the kitchen. For him we will need: wallpaper glue, painting brush, woeful rubber roller. We divorce the glue by the proportion specified by the manufacturer for a specific type of wallpaper. In order to avoid the formation of lumps, thoroughly outweigh the solution as the mixture is added. Do it better than a mixer.
- Then take the level and blackout the vertical direct. On it we stick the first lane of wallpaper. Glue material gradually from top to bottom, smoothing the roller. The next lane is sticking online.
- If your ceiling is smooth, then when you form a joint of Wallpaper, the end of the band exactly coincides with its level. If not, it is possible to google. In this case, do not glue the end of the wallpaper. When the glue will dry, carefully cut the nipside with the help of a knife and, missing the adhesive composition, stick. That's all, the decoration of walls in the kitchen with their own hands is ready.
Walls in the kitchen: photo


