Plinth is needed for decorative trim and protection. In addition, the cable is often paved inside it so that the wiring is not visible. It can be made from both natural and synthetic materials. We will talk about the features of the use and installation of wooden plinth.
Content
Plinth varieties

Distinguish the following types of products:
- Plastic.
- Wooden.
- Metal.
- Polyethylene.
- From laminate.
- From MDF.
Specifications:
- The type of plinth used is selected depending on the material used for surface flooring. For example, for carpet, ceramic tiles, laminate, or linoleum is recommended to use a plastic plinth. It is suitable for rooms with high humidity, office premises and offices. There are many color options and shades of this building material. Each of them is distinguished by moisture resistance, aesthetics, resistance to household chemicals. In addition, they are durable and durable. Only you should not apply them with wooden floors. Of the disadvantages, you can note the fact that they have an unreliable mount, which is why they have to fix them additionally. For plastic plinths, buy plugs and the necessary connecting elements. The price of products is relatively low.
- Several more expensive wooden plastic plinths. They are most suitable for dry premises. It is best to install them for wooden floors and parquet. They are environmentally friendly, reliable, durable, wear-resistant and durable.
- Metal plinths are made, as a rule, stainless steel, aluminum and non-ferrous metals. They are most suitable for the kitchen, hallways and bathrooms. These materials are distinguished by durability and moisture resistance. Only prices for them are quite high.
- Also on sale there are polyurethane plinths, which are distinguished by flexibility, resistant to mechanical damage, temperature and humidity drops. In addition, they are easily clean. Thanks to all these properties, such materials are very suitable for bathrooms.
- Plinths from laminate do not need additional fittings. They are most suitable for laminate floors.
- The appearance and properties with products from laminate similar plinths from MDF. For their manufacture, MDF panels are used. They are considered more durable than wooden.
To make it easier to choose a plinth, it is recommended to follow some rules:
- It should be combined with walls, floors and doors.
- The product should be approached by the type of floor covering and match the characteristics of the room.
- It is necessary to take into account the stock of the length of the product under trimming.
- In some cases, the completed view of the room can be given due to the plinth, which is slightly different in color from the floor covering.
Read more about Wooden Plinths

The tree used by man as a building material since ancient times. It has earned a reputation for such properties as durability, strength, and environmental friendliness. In addition, this material is easy to process, which allows us to give it the desired shape.
The only thing any wood does not tolerate exposure to moisture. Therefore, it is not necessary to lay wooden flooring and skirting boards in rooms with high humidity. Especially easily deformed under the influence of unfavorable conditions of soft wood (cherry, lime, walnut). Hardwoods are more resistant to such indicators, but they are much easier to crack when dry.
Skirting is best to buy from the same material as the floor covering. If possible, should be ordered strips of wood from the same manufacturer that made the floorboards. So the more the likelihood that the product will be of the same color to the flooring.
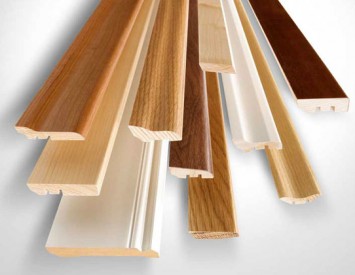
Plinth floor can vary in pattern and color. Most often, these boards are made in the shape of a triangle or so-called "evroplintusa". Last characterized by a small area of \u200b\u200bthe sole in the form of strips. It is convenient because it allows you to move up the furniture almost flush against the wall. On request, you can make any design skirting boards, for example, with a small notch, which effectively "hide" it leads.

There are two types of products: from veneer and solid.
Products made of veneer is cheaper than from a file. Often, as the basis for their manufacture are used pine or spruce. Wood veneers superimposed over the base. Its appearance is as good as products from the array.
Skirting the array are usually made of valuable wood or softwood. These products are resistant to mechanical abrasion and durability. In this case, it is difficult to establish. The price of this plinth is determined, above all, the cost of wood species, which is used as a basis. In addition, the price affects the build quality. The cheapest wooden skirting board is the material of pine, and the most expensive - of oak.
Today, at a special technology produced plinths oak, maple and ash, which have increased flexibility and elasticity. Such products should be stored in sealed containers because they are outdoors harden.
Plinth you can buy today at any hardware store.
Requirements for the plinth
Wooden plinth: photo


When buying any finishing and building materials, you must be guided by certain quality parameters. So, there is a standard for the plinth - this is GOST 8242-88. It indicates which requirements are presented to the product. Plinth Wooden wide must also answer this GOST.
So, according to this standard, the product should:
- Have a smooth and smooth surface without signs of rot and defects.
- Be environmentally friendly.
- Well dried.
- Durable.
- Have a humidity indicator not more than 16%.
Plinth Wooden high is processed on milling machines, with which the product takes the right form. It can be covered with tinting and protective varnish or have a natural natural color.
In addition to Russian quality parameters, there is Eurostright for this lumber. So, according to him, there should be grooves made specifically for the cable laying on the back side. They comply with the requirements of the German Standardization Institute or DIN. It is these norms today are used throughout Europe.
Installation of wooden plinth

Instruments
The following tools will be needed for work:
- Hacksaw in the tree.
- Construction corner.
- Stuslo.
- Roulette.
- Screwdriver.
- Selfless.
- Pencil.
- Countersink.
- Electric drill.
- Dowel or butterflies.
- Long nail.
- Wooden plinths.
Stages of mounting
For independent installation of wooden plinth, at least the basic skills of working with wood as a building material are needed. It is also important to adhere to the installation instructions.
The order of installation of wooden plinths is as follows:
- Measure the walls. Clear and prepare all the corners of the room.
- Drill hole holes. Between them should be about 80-120 centimeters.
- Screw the screw and drown his hat. The distance from the floor covering at 15-20 millimeters should be observed.
- All joints and locations of the product installation lubricate with a special wood putty.
- If you need to, paint and cover the product with varnish.
- The plinth from the veneer can be fixed on clips or glued. When using the first method, it is necessary that the walls are absolutely smooth.
Now we will tell about the installation stages in more detail.
How to install a wooden plinth on a brick wall

To begin with, you should remember one important rule - do not mount the plinth on the day of purchase. The material must be given time to adapt to the room where it will be installed. Therefore, it is better to put it at least from the beginning of the second day after the purchase.
Procedure for work:
- Starting the installation is best with the indoor corner of the room. For this you need to know its size. They are performed using a roulette.
- The resulting measurement result is shifted schematically on the plinth. After that, a piece of the desired length is cut from the material with the help of a hacksaw or circular saw.
- It is very important to properly dock plinths with each other. For this, first of all, their ends should be circumcised exactly at an angle of 45 degrees. But sometimes there is a gap due to the presence of an uneven and poor-quality corner indoors. Violation of the geometry of the angle is observed quite often. The appearance of the gap in this case is not a reason to throw out a sliced \u200b\u200bpiece of the plinth, because the slot can be covered. With large sizes of the gaps, it is recommended to fit the joints of the material with the help of a grinder.
- If it is known in advance that the room has uneven angles, then the markup should be done a little different. It is necessary between the wall and the floor to the corner to put a stick of the plinth, after which closer to the place of docking on the floor is drawn the markup line. It must be done on both sides for each angle. After that, you should unlit a piece of needed length and draw the markup at the end of the rail.
- As an upper point, you can use the top angle of the stick, rushing into the opposite wall. The bottom point will be the line that was made when markup. These two marks need to be connected to the line and trim the bar at right angles to the floor. If you do a neat cut, then the slots should not be. Plinths are docked each other if in relation to the length of the wall, the length of the cropped plinth will be maximum.
- In some cases, the entire length of the room requires two pilot strips. To the joint in the middle notice, they should also be connected at an angle of 45 degrees. If one plinth was enough on the wall, then it connects to another only in the corner of the room.
- Sometimes even more than two segments per wall may need. In this case, in this case, it turned out beautiful and strong docking, you need to crop plinths at an angle of 45 degrees. Such a joint, processed by additional sandpaper, will not be noticeable. If you cut at right angles, then the joints will be visible.
Important! It is worth saying that the docking quality depends not only how the plinth is cut, and from the quality of the product itself. Therefore, it is worth thoroughly inspect the material before buying in the store. So, along the entire length, he must have the same thickness. In addition, the product should not be jar and bitch.
How to attach a wooden plinth to a concrete wall

- First you need to place a place drill where mounting dowels will be placed. This is done quite simple. If the wall is smooth, it is enough to make markers every 50 centimeters. If there are defects on the surface, fasteners and, accordingly, the holes will be needed for them.
- Holes drilled on the markup. If the wall is brick, then plastic dowels will be placed in the connectors. When attaching a plinth to the wall, self-tapping screws or "butterflies" are used.
- Fix the wooden plinths to the wall simply. You only need to take into account some important moments. Thus, the bar is allowed only after the joints are carefully adjusted. In addition, it is important that the holes under the dowel have the right depth - it should not exceed the length of the dowel more than one centimeter.
- To comply with the specified depth, you can do as follows. Measure the desired length on the drill and mark this distance using the wrapped isol. Next, on the plinth, it should be deepened to the heads of the screws and dowel screws so that then they are not noticeable. The diameter of the drill must be slightly larger than the attachment hat. The hole under the Hat can also be done with the help of a zenkovka.
- When the plinth will be well fitted, it remains to consolidate. After that, you need to proceed to the exterior. For this, the surface of the plank is first cleaned by contaminants, and then swelling, is covered with varnish or painted. Varnish (paint) can get on the wallpaper or floor. In order to prevent this, surfaces should be covered with something.
Installation of wooden plinth on the wall of plasterboard

The sequence of installation in this case is as follows:
- With the help of a pencil, mark on the wall of the place where the self-tapping screws will be screwed.
- The same markup needs to be made on a wooden plank.
- Drill in the bar at the places of the opening, the diameter of which is equal to the thickness of the nails used. Accordingly, choose the appropriate diameter of the drill. In order not to spoil the floor when drilling, under the bar need to put a wooden board.
- Take the Zenkovka and in the holes to make small recesses. It is necessary so that the hat of the screws or nails plunge into the plinth.
- Finally, fasten the plinth in its place.
Wooden Plinth Care Rules

- It is impossible to moisturize the plinth too much.
- When washing, the remedy should be applied to the sponge, and not on the product.
- To remove dust, it is best to use a dry or slightly wet cloth.
- As a care agent, a cleaning spray can be used and a degreasing soap for dishes.
- If the floor is processed by potent cleaning agents, immediately after that it is necessary to wipe all the sublifting.
- You can try to remove the stain with an abrasive powder, but it should be extremely accurate.


