Metal tile is the most sought-after roofing material among all the analogues that the construction market offers. The popularity of this coverage is explained by the fact that it has a number of positive performance. These include relatively low cost, strength and ease of installation. The material for the manufacture of such a floor is galvanized steel with a polymer double-sided coating. In this article, we will look at the main points regarding the laying of waterproofing under metal tile.
Content
Features of the construction
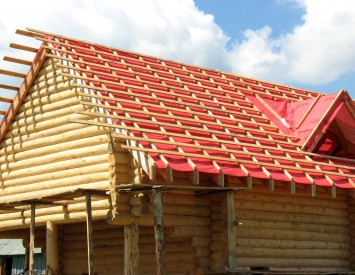
The base for covering the roof of metal tile is a doom. This design is intended to evenly distribute the weight of the roofing coating on the rafted system and carrier walls. The presence of the crate ensures the functionality of the roof, protecting the walls of the house from destruction.
The lattice under metal tile can be made of such materials:
- plywood flooring;
- oSB plates;
- wood boards.
Depending on the periodicity of installation details, the design of the crate is divided into such types:
- dried type;
- solid view.
One-piece design will help prevent roof deformation under the influence of loads. Therefore, the frame stacked by a solid method is used for a soft roof. The variant of the rarefied cage is more suitable for metal tile. The profiled steel from which the coating is made, has a high strength in order to withstand all possible loads during operation and not subject to deformation.
Solving, whether waterproofing is needed under metal tile, it is also worth considering the fact that the room under the roof will be heated or not. If it is supposed to heat this space, in addition to waterproofing, you need to build a counterclaim. This design will help ventilating and removing steam from the structure of the insulation. If it is not planned to dampens the room under the roof, it will be enough to put the waterproofing film on the raftered.

Criteria for selecting material
When choosing raw materials for frame structures, some characteristic features of materials should be taken into account:
- Boards for design should be thick from 25 mm to 32 mm.
- When choosing materials, it is necessary to navigate the distance of the rafter step. For example, if the space between the rafters is 0.9 cm, then the thickness of the boards should be more than 32 mm. At a shorter distance, respectively, choose and smaller the thickness of the boards.
- In order for waterproofing under metal tile for a long time, the difference in the thickness between the boards should be taken into account. The indicator should not exceed a 2-3 mm mark. If this value is larger, there is a possibility that the rafted boards will not be allowed to be allowed during the styling process. This in turn will entail the irregularities of the coating. Therefore, it is better to refrain from the purchase of material with a deviation from the above indicator.
- The width of the boards should be 10-15 cm. It is desirable that the length has the size of a multiple step of the rafted, but this is not a prerequisite. Boards may have a different length, but in this case, after cutting there will be less waste.
- Remember that it is not necessary to acquire a planed board. The cost of such a material is quite high. It is quite suitable for standard material that has minimal differences in thickness indicators. Before proceeding with the installation process, the crate must be impregnated with antiseptic composition to protect the design from rotting and ignition.

Installation of the cerebral construction
A layer of waterproofing is stacked under metal tile, which is attached to the rafyles through a construction stapler. The task of this layer is to protect the design from the negative impact of moisture due to the formation of condensation. It is assembled on the inner surface of the roof as a result of temperature differences. Under the influence of moisture, the insulation wounds, which leads to a decrease in its thermal insulation qualities. In addition, due to moisture ingress, the crates are rotting, the roof freezing and the appearance of mold. To protect the design from destructive phenomena, such actions should be made:
- Starting from the bottom section of the roof, it is necessary to the anti-condensate film. The width of the layer should be about 10 cm.
- Then you need to put in the raftered the counterbircuit. To do this, you can use the boards 30x100 mm or a cross section of 30x55 mm. The bar or board should not be brought to the sink, leaving the distance of 15-20 cm.
- It is necessary to avoid the appearance of a protruding fragment at the edge of the sink. For this, the thickness of the first board should be greater than a similar indicator of the subsequent element by 10-15 mm. The declared step of the crate under metal tile will allow the design to firmly consolidate on the basis.
- The first timber should be fixed to the ends of the rafter along the entire length of the sink. In this case, it is necessary to trace the mount to be made in a straight line and did not go beyond the border.
- Next to the priority board it is necessary to screw the metal bar for the eaves and the vertical board. This should be done with screws. Step size between the 1st and 2nd boards should be 5 cm less than the indentation between the elements that will be laid later. At the same time, the space of the causing between the following fragments should coincide with the length of the profile of the wall-mounted tile. This is how to install all the design boards.
Important! To make sure how correctly the step is selected, located between the cornice board and the subsequent fragment, you must perform such actions:
- put two boards that must be placed in parallel with respect to each other;
- on top of the tiles sheet;
- the location of the boards should be equal to the tile fastening section. At the same time, the resulting improvised cornice should contribute to the necessary flow of water;
- if the burline size is greater than it is required, the flow of water will turn through the chute. Otherwise, water will come on the wall between the front board and the chute.
- At the end of the installation of the crate, the next step will be the installation of end slats and skate boards. For strength, such a plank should additionally nail the board with a cross section of 25x100 mm. Mount them are needed in the place of fastening the skate.
- To lay the first sheet of the tiles in such a way that its edge is 30-40 mm played behind the cornice bar. Due to this, water from snow and rain will immediately fall into the drainage chute, not penetrating under the coating.
- In places of pipe adjoint, the windows of the attic or a skate, the crate must be laid with a solid flooring. In the area of \u200b\u200bthe skate, the width of the board can be made more, since here, in addition to the edge of the professional sheet, it is necessary to fix a metal profile.

Rules for calculating steps
There is a recommended size of the shade of the crate, which is 350 mm. Such a distance allows you to mount the sheets of coating at the bottom of the wave. However, this indicator is not universal. The following rules will help determine the correct Dina step:
- The space between the boards depends on the type of roof. This value is determined by the distance from the lower part of the first board to the top section of the following.
- In addition to the type of roof, during the calculations, other points that determine the shared step should be taken into account: the magnitude of the eaves, the rod of the roof, the parameters of the drainage gutter.
- If the drainage is provided, it is necessary to add at least 3 cm to the performance. For example, if the diameter of the chute is 9 cm, it is necessary to make a protrusion of a similar size. And with a diameter of 12 cm - a little more.
- The magnitude of the protrusion is calculated from the front board. In the absence of such an element, the calculation must be made from the sling cut. For the necessary water removal, the protrusion indicator should be determined depending on the skate angle. The smaller this angle, the greater the magnitude should have a protrusion. Based on these indicators, the calculation of the step is determined.
- We make calculation using a level up to 1.5 m. It follows the space between the top of the first wave and the lower roof trim. Then on the rafters put the label by level. This indicator will be equal to the level of attachment of the board.
- The first board should be somewhat thicker than others to withstand the weight of the roofing material. The remaining fragments should be triggered in accordance with the marks that need to be applied through two rafters, given the magnitude of the roofing profile.

Installation of drainage pipe
Turning to the next stage of work, it is necessary to do such manipulations:
- To the vertical board is a fastener of a chute for wastewater.
- Brackets for chute mounting should be installed before laying metal tiles. They are recommended to mount the width of the tile waves, observing the distance of 50-60 cm. Fastening takes place on the bottom of the crate.
- The installation process should be started with the fixation of two extreme brackets. As a result, 5 mm on each meter of length should be obtained.
- Next, between these two fasteners, a rope should be pulled out, which will carry out an auxiliary function when installing the remaining brackets.
- Then the chute is installed, and after the burdock of the cornice.

Conclusion
The reliability and strength of the roof depends on the base. To ensure the quality of the coating, evenly distribute its weight and prevent the destruction of the house, before installing the roofing material it is necessary to install the crate and waterproofing. The installation process of this design does not represent complexity and does not require qualified training. After reading the rules of the workflow, you can mount the crate, without resorting to the services of specialists.
On the video device you will see what a doom goes under metal tile and how to fix it correctly:


