The dining table in the house is not just the subject of the interior, but more. This is a symbol of home coat, a place where the whole family is going on weekends and holidays. He is not only eating - they communicate here, it combines and brings closer.
Content
On sale a large selection of tables, but made by your own hands, according to an individual project, has a completely different energy. After all, if you also love guests to take, then the sizes of your dining table should be big. Let's go through all the stages of its manufacture, consider all the technology to the smallest nuances.
Types and design of dining tables
Compound
The design of the table includes:
- countertop (cover);
- podstole, part of which is a CARGA belt;
- devices for transformation - elements running;
- perhaps boxes.
Dining table requirements
Dining tables must respond to the following requests:
- be durable, and it depends on the design of the table;
- hard. This indicator depends on whether the feet of the tables with the kings are so correct;
- have a large overturn resistance, i.e. Resistant. This parameter is determined by multiplying the vertical tipping force on the sweep length of the cover in mm. If the result is less than or equal to half the width of the podstole multiplied by the weight of the table, the table is stable.
Distinguish dining tables:
- transformable;
- not transformable.
Table top
For making countertops use:
- natural wood;
- wood chipboard.
Countertops are in their design:
- sliding, with this if in the table is provided not sliding underground, then after certain manipulations, at the table can accommodate 2 people more. If the design provides a sliding countertop and sliding underground, then there are necessarily inserts. In the presence of 3 such elements, the dimensions of the dining table increase by 6;
- retractable. The design of the retractable cover is not a sliding podstole, it provides an increase in seats by 2 or 4;
- transformable, i.e. Attached. When attached hinged covers, you can put 4 or 8 people at the table.
Finishing for table covers:
As a facing use:
- paper-layered plastics decorative;
- veneer, imitating natural wood;
- various films whose basis is polyvinyl chloride. The drawing of the film can recreate the structure of natural wood, marble, natural stone.
Depending on how many guests need to be placed, the size of the countertops for dining tables is determined. At the same time, they are focused on how much space is 1 person, and it is from 50 to 60 cm.
Dining table with your own hands
Look in the special literature or on the Internet the drawings of dining tables and choose suitable for yourself. If you are a novice in a joinery, then it is better to start with a simple. We choose a table with a tabletop made of natural wood with a size of 100x60 cm.
Tool
If you have already had to do carpentry work, then surely your arsenal already includes:
- circulating saw;
- skeleton saw;
- the workbench is a joiner - a very simple, including the cover, an expanded, tray, a clamp of the front, clamp of the rear, nest, comb;

- screwdriver, and maybe there is a drill, then it will replace it;
- pneumatic novelty pistol;
- electrofuganes;
- sewn or curly screwdriver;
- lobzik;
- hand mill.
Not unnecessary and all sorts of other devices and tools in the form:
- stop for planing -1;
- brazing board -2;
- stusla - pos. 3;
- wooden clamps - 4;
- metal clamps - 5.

Materials
It will be necessary: \u200b\u200bboards pine edged 4 pcs, thickness 50, 150 width and 1000 mm long.
Manufacture
Let's start with the countertops:
- customize boards in length, strictly withstanding angle of 90 degrees;
- we take electrofugum and process boards on the ends to perfectly dock them with each other. To do this, try to work with the same clamping force;
- to create a solid canvas from the boards, perform the seasons. At the same time, their diameter should not exceed half the thickness of the board, and on their ends, they make chamders, then they easier to enter the holes;

- on the sides of the boards we carry out a central line;
- location with a length of 100 to 150 mm;
- places where the holes will be under the wings are planning a seboard or screwdriver;
- drill holes on the sides of each board using 8 mm drill;
- slots smear glue and clog into the holes;
- we apply glue on the boards and connect them tightly;
- clamp in a clamp until complete drying;
- we take place on the surface of emery paper to remove the glue;
- if irregularities are observed at the joints, then we remove them with a ruble;
- edges with sandpaper sandpaper;
- if I do not like the rectangular shape, then round the corners.
Important: so that in the process of operating the table, the gaps did not arise, while docking the boards, lay them in such a way that the fibers are mounted mirror. Consider - on one board, the ring expand in one direction, to the other in the opposite. It means to a blackboard with rings expanding to the bottom, apply the other on which the rings expand to top. 
Legs for table
- draw the floor shape younger;
- we drink one leg from the board with a labzik, which will become a sample for the rest;
- we put the sample on the board, supply the contour and make another 3 legs;
- if you want, it is possible to perform patterns with a manual milling;
- spit items;
- cut the connecting jumpers. Corners, they make them oblique and carefully grind.
Remember: Millinger - tool is not safe, so take care of your hands. Use the clamp by applying a drawing.
You will understand how it is done, viewing a small video:
Assembly
The legs should be diagonally. The assembly process is simple:
- lubricate the connection location;
- insert the legs;
- rectangle, which turned out, fix in clamp before drying, and this is approximately a day;

- after complete drying of the supporting part of the table, we apply it to the lid and supply, both internal and external circuits;
- we make the mark in places where the legs should be attached to the tabletop;
- drill holes;
- we score the seats;
- apply glue to the connection site;
- we combine legs and countertop.
Dining table for dining room is almost ready. It remains to give him an aesthetic appearance.
Finish
For decoration it will be necessary:
- morid;
- varnish colorless.
Having everything you need, start:
- we apply a layer of the veil and wait until dried up;
- very neatly pass on the surface of shallow emery paper to shoot down, raised by painting a vintage veil;
- varnish and let dry;
- if irregularities appeared, they grind again emery paper;
- once again, quench the surface.
It can be said that the process of making dining tables, the truth is still the simplest, you have already mastered. Now consider how the transformers are manufactured.
Tablebook
A small cabinet of the wall can remain unnoticed at the entrance to the dining room, but if you decompose it, the whole family will fit, and also guests. This table consists of:
- basics;
- rigid rigidity;
- table tops of 3 parts;
- legs.
All this can be made of:
- lDSP sheets 1.6 cm thick with sizes 350x175 cm;
- 12 loops-butterflies 4.5 cm;
- 4-corners for compounding countertops and bases;
- 2-corners-stops for legs;
- 45-screw screeds (confirmates) 7.5x0.45 cm;
- 45 plugs;
- decorated paper tape (melamine edge);
- 100 pieces. Self-timers.
be careful: First buy evronts, and then plugs to them, since some plugs are needed to a cross confirmation, and to hexagon - others.
To cut the chipboard is independently very difficult, so better ask you to cut the slab immediately when you buy it, and for this you already have a sketch with all sizes. Need to cut:
- 2 large tabletops with dimensions of 86x69 cm;
- 1 small table top with a length of 86 and 32 cm width;
- 2 racks that are height equal to the height of the table for a minus sheet thickness, i.e. 72.4 x 25 cm;
- 2 ribnes ribs for retractable legs 48.5 x 18 cm;
- 3 ribs of stiffness for the base with sizes of 70.8 x 11 cm;
- 4 felling legs 70.2 x 6 cm;
- 4 overhead strips 60 x 6 cm.

Collect a book book
- We accumulate all edges with a decorative ribbon, overlapping it on the edge and stroking the hot iron.
- Putting the basis, make fitting legs, outlining where the loops will be attached.
- We collect legs using confirm and attaching loops.
- Evrovinty closing plugs.
- Now podstole or skeleton. Back down from the bottom of the side walls 7 cm and 10 cm from the floor anchoring rib horizontal.
- Krepim is another edge of stiffness after horizontal.
- In the middle of the countertop, on the previous edge fasten the upper riffness edge.
- A smaller cover is screwed, now we put on it the basis.
- On the right and to the left of the foundation are stacked by large countertops and secure them with the help of butterflies loops.
- Hour legs to the base.
- Table transformer ready. We put it on the legs.
As a result, a table was obtained, which in folded form has a width of 19.5 cm, a height of 74.2 cm, and if they decompose it, then the tabletop will have dimensions of 78.7 x 142.0 cm.
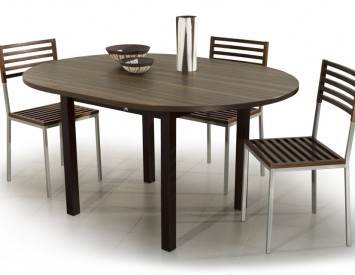
Dining table sliding
There are many varieties of sliding tables, but the most popular dining tables:
- round;
- oval;
- rectangular.
We will have a wooden table top, so:
- planing wooden plate;
- cut out the required form;
- table top mode on 3 parts;
- we make legs from 4 bars of 7.5 x 7.5 cm, the height is 770 mm, process them on the machine;
- we manufacture the sideline and facial tsarps, process from the mill;
- we attach the legs to the sidel's tsargam;
- we establish guides along the long sides of the Tsarga;
- in order for the countertop to move in the grooves, we set it from the offline of the crawl and secure them with the help of self-sufficiency;
- we make the waders for fixing the parts of the table top;
- we establish the wrenches, pre-groaping them with glue.

If you already feel that they became without a small real driver, then to finally condemn themselves, you can try to perform the product much more difficult.
Sophisticated transformer dining table with his own hands

Let's see how to make a dining table transformable, which occupy little place and performs two functions: when you sit down, then this is a big table, and the rest of the time it is transformed into the coffee table. The most difficult thing in it is a mechanism, with which it undergoes changes.
Collect the transformation mechanism
The mechanism that transforms our table will consist of 2-parts:
- housing;
- working parts.
Needed the following material:
- 0.3 m square. Chipboard;
- 4 pose m pipe profile 2x2 cm;
- 1.2 Pog. M profile pipe 5х2,5 cm; 1 m. 2x0.4 cm strips;
- m8 bolts 12, 5 and 6 cm - 6, 2 and 2 pcs. respectively;
- 26 nuts M8; 24 washers 30x8;
- you will need 12 pieces of intersection screeds; 0.06 pog. m of a non-uniform corner with shelves 4,5х2,5 cm;
- 8 bolts M4 2 cm long;
- the mechanism will not work without gas shock absorbers, so do not forget to buy 4 pcs. 120-140N. Look like a key mechanism of the table after the assembly will be like this:

We make table
For the manufacture of the dining table, you need to purchase with your own hands:
- 16 pcs. screeds of eccentric;
- 32 pcs. Eurobolts (confirmation);
- self-samples 32 pcs - 4x30 and 8 pcs. 4x16;
- 4 double corners of plastic;
- 12 pcs. threaded furniture funk d8 m6x13;
- bolts M6 3.0, 2.0 and 15 cm long, respectively 2, 8, 4 pcs.;
- 3 hinge loops;
- Chipboard furniture - 4.61 square meters. m.
Cut the chipboard and smoke the edges can not be done, but to contact the company with the appropriate specialization. All manipulations with the table, vividly shows the video:


