In the field of modern design art there are many possibilities and options for the transformation of any scale and different layouts. One of these options is the ceiling niche, with which even suspended curtains can be easily masked. If you are interested in such a popular decor element - we offer more details with the instructions for creating a niche in the ceiling.
Content
Making the ceiling niche
Making the ceiling in the living room - it is no less important process than the walls and the floor, because the ceiling can sometimes be part of a general form of the room and its main focus.
Time does not stand still, refined and modern building technologies. Today, it is a forgotten past wallpapered ceiling. Whitewash and tiles over the head and has long lost its former popularity. In place of the old, new ideas come, come to life creative design ideas and options with which you can make a beautiful ceiling, plenty. The most common and durability are considered Tension and plasterboard ceiling on the right.
Flexible drywall can take absolutely any forms, while correctly selected backlight allows it to play with the light and convert the space. The volumetric ceilings with carved niches in the photo look quite original, moreover, drywall allows you to create different geometric shapes that do not boringly look even in one color scheme.


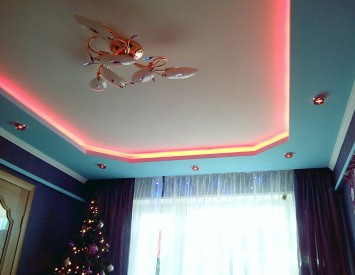
Stretch ceilings with built-in niche are complemented by lamps. This method is especially relevant in rooms with low ceilings: visually it makes the room above.
Often the ceiling niche looks like a false ceiling, which is at a certain distance from the overlap. Since the niche is mainly intended for the location of the cornice or the curtain suspension system in it, then it is equipped in front of the walls with the window opening. You can plan the design of various sizes: its width is designed depending on the size of the suspension under the niche. Thin string suspensions are successfully decorated with a shallow niche (3-4 cm), and massive fastening parts for the curtain require a niche width from 10 to 25 cm.
The original built-in backlight can radically transform the design of the room. When planning the lighting system, we need to consider a special shelf for the LED tape in the niche. Lighting the curtains should be equipped with a separate switch so that the room light can be controlled. By creating your original repair of the ceiling, it is necessary to think over everything to the smallest detail so as not to spoil the aesthetics and the appearance of the room. On the creation of a niche under the stretch ceiling, you need to take care in advance, because it is impossible to mount the canvas coating. Niche for curtains in the stretch ceiling is the most rational option that allows you to hide the cornice, give the curtains of lightness and weightlessness, and the premises of a beautiful view.
Niche in the ceiling perfectly fit into any interior: office, restaurant and accommodation. This simple designer decision will emphasize the feature of the style of the room, and in combination with highlighted, it will give the atmosphere of romance in the bedroom and will provide comfort in the living room. This design does not only look solid and dignity, but also allows the use of eaves with different ways of fastening. The trendy design experiment is suitable for people with a good taste that are not acceptable, as well as see beautiful in simple details.
Niche in the ceiling with his own hands
The false ceiling of plasterboard is the best design for the installation of the ceiling opening. And the most acceptable version of niches everything - is to create it in the process of securing the ceiling frame.
Manufacturing technology:
- Before you make a niche in the ceiling, you need to apply the layout. For this purpose, a ceiling parallel to the wall with a pencil, draw a line. The distance from the wall must be equal to the width of the mounting rails for curtains. Experts advise even at narrow hangers do niches width not less than 12 cm, due to the fact that the curtains should be placed in it freely. A narrow niche will create creases in the fabric.
- According to the available marking commence the installation guide profiles for the frame. The preferred recess at the edge to let a wide profile (10 cm). If not, then fix the ceiling starting profile, and to it from the rack Mount the main profile. Then they attach another start profile at the bottom of the ceiling plane.
- With screws connect all of drywall constructions.
- Plasterboard close the inner slope of the niche, and ends treat plane. The width of the strip of drywall should be equal to the depth of the niche.
- If you plan to make a niche for curtains with light, the LED transformer can be hidden in the ceiling directly. Tape from the lamps should be placed on the bottom shelf serving niche.
- Niche for curtains in the ceiling is ready, now we need it to putty and apply a coat of finishing. After drying proceed to install the cornice for curtains.

Niche in a tension ceiling with his hands
The Stretch ceilings do nizhu very difficult, but possible.
Manufacturing technology:
- With dowels with plastic or metal sleeves on the ceiling, attach the ceiling cornice. Do it better, before the suspended ceiling will be installed. The only way you can roughly determine the size of a future niche.
- Stepping from the eaves to 2 cm from the ceiling hook the timber of wood, which will be a support for the tensioning coating. Take care that the lower edge is flush with the surface.
- Clings to a tree along the entire wall, that it is positioned exactly. Then start to install the suspended ceiling.
- To the inner side situated towards the window bar, attach the metal profile and thread into it the web so that it is completely concealed timber.
- As a result, a niche under the cornice in the stretch ceiling should be. It is visible only near, and from afar it will seem that the curtains act straight from under the glossy cloth.

Niche in the ceiling of plasterboard with illumination
Almost everyone who is solved to work with plasterboard is wondering how to make a niche under the ceiling, additionally highlighted by LEDs.
This embodiment made of plasterboard sheets has several undeniable advantages:
- due to the fact that drywall in conjunction with a metal profile is resistant to heating, the drywall ceiling may not be limited to the number of lamps;
- since the skeleton structure itself is durable, then the lamps can be mounted directly to the profile;
- plasterboard ceiling hides not only wires and light bulbs, hoods, pipes, but also other minor disadvantages in the room.
Work technology:
At the initial stage of working with plasterboard for the ceiling on a sheet of paper, descend the locations of the backlight, current converters and a dispensing box. The eyeliner must be tightened to those places where transformers and lamps will be located only after you mock the frame from metal products. After that, you can proceed to the trimming of plasterboard sheets.
- Building level on the ceiling Make markup, according to which you attach a metal profile for the frame.
- Mounting the frame start with the ceiling guide profile. It must be screwed to the wall screws with a step of 30 cm.
- Next, according to the markup, the horizontal segments of profiles and rack are attached.
- After profiles are mounted, laid the wiring with a cross section of at least 1.5 square meters. All compounds should be carried out using a terminal block.
- When the wires are laid, you can begin to cover the frame of the frame of plasterboard, using a screwdriver and self-tapping screws.
- Upon completion of work, all seams are covered, previously saved by them with a paper tape or a reinforced mesh for the ceiling. Running irregularities is better than 2 times, and after the second layer is driving, skill with its sandpaper.
So, Niche is ready, it remains only to mount the backlight, which can be selected depending on the individual preferences:
- if you have made an open niche, you can use LED tape as lighting. It is necromotive, flexible and puffy, and therefore it easily takes the right shape;
- in construction stores today you can also acquire special RGV ribbons in different colors. Their main drawback is an overestimated price;
- for room with high humidity, you can purchase a hermetic LED ribbon. It is not afraid of wet cleaning and water entering;
- the luminescence intensity will help regulate dimmers that are classified by the number of LEDs on one meter of the tape.
Since the tapes with LEDs consume a voltage of 12 V, the usual 220-volt socket can melt wiring. Thus, it is better to share a pulse power supply.
If you have equipped in your apartment closed niche, then it is possible to hide the larger and more powerful lamps. They, of course, will also shine brighter.

Niche in the ceiling of expanded polystyrene
In order to construct such a niche, you should use the building with a knife, a gun with liquid nails, electric jigsaw, level and tape measure.
By making the proper layout on the ceiling, to be glued to ledge 10 cm from the ceiling, thereby concealing fine unevenness on its surface. Gluing lightweight frame can be as wallpaper, and on the blank wall after priming.
Ceiling niche of polystyrene weighs much less and is easier to be mounted than the gypsum frame. However, together with this such material has lower strength and heat resistance, therefore only suitable for use with LED adhesive tapes. The power supply should also not attach itself to the eaves, as due to heating it may melt polystyrene.
Installation of a light construction can fulfill yourself in just a couple of hours and you do not even need professional help, because everything is very simple.


