Full repairs in the apartment ends the replacement of the door that cannot be installed without platforms, where all the features of the installation are hidden. When replacing the door canvase, it is not necessary to change the entire door frame, but can not do without replacing old platforms to new ones. They must correspond to a new style door, color and texture. The aesthetic appearance of the door is guaranteed, the savings are tangible and install on their own, some trims on the door is a fairly simple task.
Content
Purpose of door cylinders
The doors are selected according to the overall interior stylist. They can be bought in the form of a doorway and supplement the corresponding platbands. Buying fully equipped doorframe cost much more. You can stop the choice on the classics and buy in a single style entrance and interior doors. The classic use various forms of casings.

The overall construction design door frame may include:
- cornice frame of the door leaf;
- vertical protrusions - pilasters imitating column;
- the capper, resembling a decorative shelf above the upper platband.
However, in most cases, limited to a simple door with platbands, giving preference to the door leaf from a natural array or an ecosphon. It successfully imitates a noble wood texture, and any shades are suitable for interior doors - from white oak to a wenge chocolate palette. The role of the decor performs inserts from glass or strict overhead elements. However, it is not necessary to do without platforms, under which the walls of the wall and the door box are hidden. The entrance door suggests a heavy and solid wooden canvas.
Tubes are decorative lining for the design of the window or door opening made from profiled slats. In the production of platbands, deciduous or coniferous rocks are used, as well as a spnowling with elite wood varieties. All these options are used not only for the manufacture of the door, but also for platbands for interior doors or entrance. Door platbands are the simplest way to mask the gap between the door frame and the wall of the doorway. The competent selection of profiled slats make not only in accordance with the texture and color, but also with the minimum and maximum width.
Modern door platbands are made from different material;
- imitating any eco-ship wood;
- natural array (wood);
- laminated plastic repeating wood texture;
- MDF coated with veneer.

Installation of platbands to the front door or interroom is performed at the final stage. It is also important to take into account that after these works it is difficult to make a neat painting of walls or pasting with wallpaper. Finishing work is performed before installing the door, as a last resort, you can also apply a greasy tape. But the fastening of the floor plinth is better done after making the platbands on the door.
Tip: Please note that the texture of the wood is not so important for the platbands, how much matching color. Often the interroom or entrance door is made of one material, and the platbands are few others. And if they are purchased separately, it is difficult to achieve complete similarity. Color is what they pay attention to first of all, and the shades of platbands and the door cannons should be as close as possible. But sometimes the design idea is such that the framing the door and the plinth should be one color. This technique is used when there is no possibility to achieve similarity, then the principle of contrast, which should organically fit into the concept of general design.
Varieties of mines
The platbands are made independently from a solid bar, and there are decorative blanks that are purchased in the finished form and cut the platband to the door in the size of the desired length on their door to the door.
Door platbands are several species, such as telescopic and simple overhead. Telescopic, as it were, envelp the protrusions from the plane of the platband, entering the grooves on the box - platbands on the door of the photo.

1. In the form of platbands produced in the main varieties:
- simple overhead, flat treated board, classic option for any stylistry;
- rounded on the frontal part, look a little unusual and elegant;
- figured chopped milling with grooves with grooves of different shapes, extraordinarily elegant and attractive.
2. The difference in the material from which door platbands makes:
- from different types of wood, most often - profiled mills, sometimes use even manual wood threads;
- laminated plastic platbands (PVC or polyurethane), resemble material for plastic windows;
- profiled or straight metal (steel, aluminum);
- composite materials made of several components (laminated plywood, MDF).
3. There are also varieties on the installation of platbands:
- the simplest overheads that are fixed on the door frame;
- telescopic, have a protrusion, the so-called spout or wing, allowing you to insert parts in the slot of the frame, they are used on some deviations of the door frame from the vertical of the walls, hiding all defects.
Tip: When the angle of sawing at the junction of the side and upper platband is intense, then in this place the gap will be inevitable. It should be neatly disguised with sealant or acrylic glue with the addition of a suitable pigment. If the gap is between the wall and the platband, you can fill out the emptiness of the plaster using the mounting tape so as not to stain the surface.

Materials and fixtures for fastening
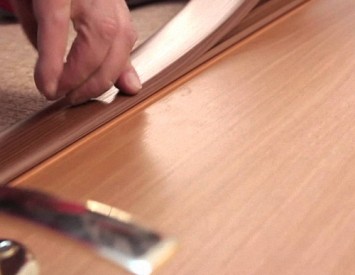
The function of the platbands on the door is to hide or disguise all the defects of the doorway and the forming slots between the door frame and the opening in the wall. Carefully attached platbands on interior or entrance doors give them a finished look. It is very important to maximize all the joints on the corners so that the slots are not formed with obvious traces of the joinery glue. Attach the platband's planks in different ways:
1. Finished wood platbands are the easiest way to install on glue, for example, liquid nails or other suitable views. This method is used when the walls are perfectly smooth, and platbands with decorative chutes, and the use of nails is undesirable. Also, extremely solid materials are easier to glue than to nail.
2. Mounting foam is extremely rare, as it cuts from inside wood and plastic. However, for the installation of a metal profile, its use is possible, but in minimal quantities, taking into account all the precautions of working with this building material.
3. When it is not realistic, then nails are used. It is quite effective - securing platform planks with special thin nails, preferably without hats. The tops of long nails can also be cut and independently. If nails are used with small hats, their tops are slightly interfered. For maximum effect, they are masked by a corrective pencil based on wax or acrylic sealant, exactly coinciding on the shade of wood or other material.

4. Effectively fastening the platbands and shooting with studs with a construction pistol, but it is necessary to have a skill to get the most accurately. This is appropriate where it is impossible to use the adhesive composition and other ways, for example, if it is a temporary fastening, and the Internet cable will be laid under platbands.
5. If the platbands are made of their non-standard dense materials, metal or MDF, then possible fastening by special methods. For example, it is sometimes necessary to drill holes under the nails or self-tapping screws in advance to be used to facilitate installation.
6. There is another backup option when the platbands are installed on special attachments, "beaks" - they are sold in specialized stores with an instructions attached to them.

Tip: Cashbar from MDF and plastic can be simply glued. Plastic platbands prefer glue. The flexibility of plastic gives an advantage - they are suitable for the wall with small defects and irregularities, for example, in the old seed house.
Features of the installation of telescopic platbands
In some cases, the doors are produced in the form of a finished box with a whole set for installation. Detailed instructions eliminates errors and shortcomings, it is important to only figure out the names - what is kind, a box and telescopic platband. This is a well-thought-out patented technology at which some special fasteners do not need.
Sometimes additional good are required, but this is if the width of the wall is more intended. In the rest, small deviations vertically and the size of the box itself, which does not coincide with the width of the doorway easy to perform when fitting the framing.

All features of the installation of the door frame with telescopic platbands are understandable from the manufacturer's instructions. Telescopic platbands on the door with their own hands install strictly according to the technological scheme. The characteristic feature of this design is the round form of the framing and a protrusion, which must be installed in the prepared groove. This mount can additionally be fixed using liquid nails.
Production of door trills independently
For work with wood, an appropriate tool is used:
- sawmills for cutting wood;
- woodworking machine for preparing billets;
- fugoval machine for processing the plane of the rifle board;
- pleismus for distinguishing billets of one size;
- manual power tools;
- grinding machine;
- bulgarian.
Immediately proceed to the manufacture of a platband using a tool available only in the presence of experience. Therefore, it makes no sense to talk about the features of work, we are talking about phased technology.
Tip: Choosing the optimal board is a responsible stage, because on the blanks for platbands you need a high-quality dry board, without bitch and defects. It is important to compare the directions of wood fibers on the lateral platbands, since the appearance after the simulatory, painting or opening the varnish will be different. The case of taste is to choose wood without pattern or textured.
Cutting blanks for platbands and processing is performed slightly larger size, for subsequent fit, so as not to measure. Make sure that the tool is well sharpened, and cut exactly from measured corners, otherwise the cut will be inaccurate, you will have to mask defects.

After pre-registration of platbands, high-quality grinding is needed, which is done in 2 stages:
- coarse processing of power tools;
- manual, using fine-grained skin, pouring the edges of fibers, circular scratches and small chips.
The cut at an angle of 45 ° is made after accurate measurements, immediately before installation, and not in the joinery workshop. Please note that you will need 2 pairs of blanks - on both sides of the door frame.
Preparation for the installation of lateral platbands
To install door platforms, you will need:
- lobzik or saw (small teeth);
- roulette, pencil and corner;
- plangies;
- furniture nails and hammer.
If the installation method is different, the additional tool is also taken into account.
The platbands are attached to the wall prepared after repair, after installing the door frame and before mounting the plinth.
Start processing from the other side where the door canvas should be opened - from there, where the door loops are located. Measures are made from the plank covering the box, from where the platband begins. The indent is being made in the same way according to the 3rd sides, taking into account the fit of the door. On the reverse side of the door it is not required.

Door platbands are important to secure well throughout the perimeter of the door box, but the installation starts from the sidewall where the loops are attached. The most precisely measure the length of the vertical billet, given the indent, adding to the length. From this point begins the line for dipping surplus at an angle of 45º. Note that the second platband is measured in the first, but on the wall, just applying and measuring for the greatest accuracy. The dimensions are often different, even if 1-3 mm, but this will affect the quality of the joint.
The processed slats with cut upper corners are intimidated by nails at the base, and the other about the meter. It is necessary that under unconished tops it was possible to put the upper segment of the workpiece for precise measurements. Under the upper corners is carefully laid a short platband and a point marks where to saw out exactly at an angle of 45º. Further, the workpiece is removed and cut down by the ending saw or another tool. It is important to observe the accuracy of the sawing and the exact angle, otherwise it will have to fill the gaps on the pitch.
Fastening the cylinders
1. After 2 long side and 1 short segment are ready, you can take a bit of sand and start fixing on the door frame.
2. In the canvas, measure the same distances under 5-6 nails, place small recesses under the nails. For the top plank, there are enough 2-3 nails, better only on the sides. After fixing the platbands on one side of the box you can go to the back side. For this, the second set of platbands should be prepared.
Tip: It is very convenient to mount on the self-tapping screw, but it will be necessary to prepare holes for installation. Self-stamp helper need to be dried for disguise.
3. On the other hand, the slot door box will fill with a small amount of mounting foam so that it does not cut wood. After hardening the foam, gently cut down the discovering fragments so that the surface under the platbands was smooth.
4. Measure and fix all components, similar to how they did on the first side of the door frame, but here the indents are not needed.
Tip: With a fraction of the door slam, the mounting step of the nails should be less, and if the door is attached with a decorative purpose, the optimal step is 40-50 cm. If the cap is provided, it is mounted after the completion of all stages of installation, after which they go to the fixing of the plinth.


