As you know, today, many owners want to make a truly cozy space from their bathroom. Fortunately, there is a simply enormous amount of building and finishing materials on sale, with which it is possible to transform even the most "gray" room.
Content
Most of all the attention of the hosts are given to the decoration of the walls, but much more important to concentrate on the ceiling. It is this component sometimes simply spoils the impression of the whole bathroom. It is worth noting immediately that on sale you can find a huge amount of materials to create a reliable and attractive externally ceiling.
In this material we will try to analyze the basic parts related to the choice of material for mounting the ceiling. Moreover, consider in detail the process of mounting the ceiling, as well as all the difficulties that you have to face.

Features of the selection of material for the ceiling in the bathroom
First of all, it should be noted that not in all bathrooms it is advisable to mount the ceiling. It happens that the space in this room is too modest, so it is better to leave everything as it is. If the room is actually large, here you can consider a wide variety of options.
For example, we can talk about stretch ceilings, which recently the hosts are assembled in almost any rooms.
Well, at the very beginning I would like to say that it is often the process of mounting the ceiling (regardless of which material is selected for this) quite complicated. Accordingly, if you do not want to experiment, it is better to entrust the work of professionals. Such a step is especially important if the ceiling material is expensive, and during repair work it can be seriously damaged.
In addition, if you plan to carry out the installation of the ceiling, it is necessary to pre-engrave everything else bathroom space. Accordingly, if the overall style of the room has already formed, you can start the installation of the ceiling.
The process of installing the ceiling may be significantly more difficult if the bathroom has a sufficiently unusual form. It may be, for example, a design created on the basis of plasterboard. If the room is the most ordinary "box", then the installation process must pass without unnecessary problems.
If you decide to install the ceiling in the bathroom with your own hands, and in this area you have very little experience, you should have a detailed instruction in the entire repair process, as you can allow a serious error at any time.
Preliminary events
Before starting the installation of the ceiling, it is necessary to carry out some preliminary actions.
First of all, we are talking about measuring. It is necessary to armared the most ordinary roulette and measure the ceiling area several times. This process may differ in some difficulties if the ceiling has an original form. At the same stage, it is necessary to roughly appreciate how much we need the ceiling material. It is possible if the material is inexpensive, it can be purchased with a margin. If it is, for example, a stretch ceiling, then every millimeter of the length of the canvas has a huge importance. Accordingly, it is impossible to make a mistake in such a situation.
After measurements it will not hurt to clean the surface of the ceiling. Quite often on the ceiling can be found and dirt and many dust. In some cases, this may be a threat to the installation of the ceiling. Align the ceiling, most often not required. The thing is that the ceiling that we are going to mock, and should hide all the shortcomings of the surface that the builders allowed, or the owners themselves during their stay.

Installation of the rush ceiling in the bathroom
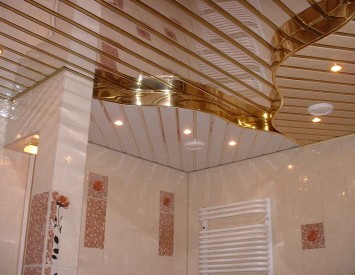
Rush ceilings in private homes, as well as apartments, are often used. In most cases, the owners make a choice in favor of aluminum rails that look great, and also have all those properties necessary for use in the bathroom.
The advantages and disadvantages of the cutting ceiling
To begin with, consider the advantages of such a ceiling:
- Modern style. Reiki, as you know, you can enter almost any housing interior. At the same time, it should be remembered that in front of large-scale repairs should carefully analyze all the details associated with the design, as even in the bathroom it is an important aspect. In addition, on the basis of the cutting ceiling, you can mount point lights. Accordingly, this is another moment that allows you to decorate the room.
- Stainless rails. As we said, the railings are often produced on the basis of aluminum. Accordingly, this material successfully confronts corrosion. This aspect is especially important if it comes to the bathroom, where the humidity is almost always increased. By the way, there are simply no worthy analogues.
- Easy cleaning. Many owners who have long established a rack ceiling, argue that it is very easy to wash. Accordingly, after a small cleaning, the surface of the material will sparkle, as well as on the day of purchase. However, it must be remembered that the aluminum material is easy to damage enough, so all manipulations should be carried out carefully.
- Dust-repellent coating. This feature to some extent concerns the last point, but separately I would like to note that the surface of the rush ceiling will have to be extremely rare.
If we talk about the disadvantages of the cutting ceiling, then they are quite subjective. First of all, it is worth understanding that due to the installation of the cutting ceiling slightly decreases the height of the room. This is especially bad if we have too limited space. Another disadvantage is related to the fact that when problems occurred, it will be necessary to dismantle the entire ceiling. In some cases, such works can take a long time.

Preliminary events
First of all, it is worth conducting room measurements. After that, of course, it is necessary to go to the construction store and thoroughly analyze the dimensions of the regions. This product does not have any standardized sizes, so often it is necessary to purchase all the necessary volume of the registers so that no problems have arisen. You should pay attention to the length, and on the width, and even the thickness of each rail.
You can find 3 types of rails: closed (analogue of wooden lining), open, with inserts. In the case of the bathroom, all 3 species can come up, but the last two are designed for high ceilings (about 5 m).
Also, when buying RECs, pay attention to the appearance of the material. First of all, it concerns the color of the rating products. Obviously, you can choose any option, but first of all you need to think that the future ceiling is combined with the whole room. Most often, the owners prefer neutral options.
In the installation process, we will need: tire (bar with special cloths), suspension (wire based on concrete ceiling), plinth (exclusively decorative component). Also, you may need point lamps. They need to take care in advance.
Installation process
- It all starts with attaching stringers. These are carrier profiles that are attached with the help of self-tapping and dowels. Special attention should be paid to this issue, since it is precisely on these profiles that serious loads will act.
- Face profiles need to be installed throughout the perimeter of the bathroom.
- After that, it begins directly hanging the ridges for stringers. Separately, I would like to say that it should be previously removed from the rail protect film. The installation process takes only a couple of tens of minutes. After that, the ceiling can be safely operated.
- If the installation of the lamps is planned, then the holes should be done in the rush material.
It is worth saying that the installation of plastic panels occurs almost the same as in the case of rush products.

Mounting tension ceiling in the bathroom
The hosts massively began to install stretch ceilings after the price of this product decreased significantly. Now almost anyone can afford to acquire a tensionable web that will not only decorate homemade space, but also make it more solid.
Positive and negative sides of stretch ceilings
To begin with, analyze the advantages of stretch ceilings in the bathroom:
- Moisture resistance. This is the point that is incredibly important in the bathroom. Accordingly, it is possible not to be afraid of water from entering, since the material for any scenaries will have approximately the same appearance. The moisture resistance of the material should be specified separately in consultants, as there are a wide variety of product variations.
- Durability. If the material does not damage, then it will be in one state for decades. Indeed, modern technologies demonstrate real wonders. Moreover, many stretch canvas manufacturers provide a warranty that often reaches 10 years.
- No need to care. Yes, indeed, it is not necessary to produce regular care for the stretch web, since this surface is completely not polluted. This is one of the main differences between the stretch ceiling from other materials.
- High temperatures are not a hindrance. As is known, some ceiling materials at too high temperatures can be deformed and come into disrepair. Fortunately, with a stretch ceiling, everything is completely the opposite. This material may even align a little if it is too hot in the room. Accordingly, it is possible to use tension material in the bathroom without any caution.
As for the weaknesses of the material, I would like to mention its low strength. Of course, it is very simple to damage the tensioning canvas. It is enough to throw some object into the ceiling. However, it is necessary to try here, since the material is elastic, and after some time it returns to the previous state. It is because of the fact that the stretch ceiling can be damaged, it is practically not installed in children's rooms.
Installation process
In this case, we need only a few fixtures and materials. Among them: a heat gun, a perforator, a dowel, a screwdriver, a hacksaw for metal, profiles, spatula.
- To begin with, we carry out the room measurements. Using the transporter you can find out the width and length of the corners. Also with the help of the level you need to mark the walls. It is necessary to make that the fastening of all the necessary elements was as smooth as possible. In addition, an indent must be made from the lower point of the ceiling - minimum 4 cm.
- Next, we take a profile and with the help of scissors for metal cut off the desired part. Profile ends need to trim at an angle so that they can be docked.
- Fastening profiles occurs based on dowels and self-tapping screws. You should apply the construction level so that each connection point is at the desired level.
- Now it's time to turn on the heat gun and heat the room up to 40 degrees Celsius. At the same time, you need to deploy a canvas and evenly warm it all over the entire length.
- We begin the fastening of the material from the base angle (marked on the canvas). The mount occurs with a spatula that material is refilled into the profile. After installing one corner - begin to produce similar manipulations with the opposite angle. Only after that, the installation of the center of the walls and around the perimeter begins.
- With the help of a thermal hair dryer, you need to smooth out all the folds that unequivocally appear in this process.
You need to take care of the holes for the lamps in advance if something like this is planned. To do this, you need to install special rings in advance, and then when the web is installed, make the necessary cutout.
Almost immediately after installation, you can use the room without any problems. As already mentioned, no temperature drops are not afraid of the tension ceiling.


