The suspension ceiling of plastic for the bathroom is the most optimal option when finishing this room. The speed of installation and the low cost of materials make it the most popular type of finish. In comparison with other PVC materials, the panels are not afraid of moisture impact, which is very important for the bathroom, they are easily clean and for a long time retain their original appearance. Currently, manufacturers of plastic panels offer products for every taste - from simple single-dimensional panels of the minimum width, up to wide with interesting pictures. Installation of the suspended ceiling will allow you to hide all communications that are indoors (wiring, air ducts from the exhaust or water supply pipe). Due to the fact that the plastic ceiling does not miss steam and moisture, you can not worry about the state of the primary overlap. From the variety of textures and drawings on plastic panels, you can choose what is suitable for the design of your bathroom.
Content
- Types of plastic profiles for mounting plastic ceiling in the bathroom
- Selection of materials
- Installation of plastic ceiling with your own hands. Preparation for mounting
- Installation of lathes of plastic ceiling in the bathroom
- Installation of plastic ceiling in the bathroom
- Plastic ceiling in the bathroom: video
Unlike the plasterboard or stretch ceiling, the plastic is very easily assembled and disassembled. The replacement of the entire ceiling coating can easily be made independently. How to make the installation of a plastic ceiling in the bathroom with your own hands - hereinafter.
Types of plastic profiles for mounting plastic ceiling in the bathroom

For the installation of plastic panels both on the ceiling and on the wall, the following types of profiles are used:
- Starting profile. It is designed to conceal the ends of the panels. It is attached around the perimeter of the room.
- F-profile. It is necessary for a smooth transition from the wall closing plastic, to the wall that does not close.
- N-profile. Designed to connect panels and to increase their length. It is used when the height or width of the room is too big to close one solid panel.
- Plastic corners. Used to close the ends of the panels in external and internal angles.
- Plastic ceiling plinth. It is used for the noble decoration of the plastic ceiling. In fact, it does not differ from the starting profile.
- Universal plastic corner. It passes on any angles, however, has a not quite beautiful appearance.
Selection of materials

For installation of plastic ceiling, the following materials will be needed:
- Plastic panels. When choosing, you need to pay close attention to their quality. They should be smooth, monophonic. Cheap plastic has one not quite a pleasant property - it is shifted from the light of point lamps, spoiling the whole picture of the repair. Therefore, it is better not to be made and buy quality material than "enjoy" in vain spent time.
- Profile Metal Guide (UD). The amount of this material depends on the size of the bathroom. It will be installed around the perimeter of the room. Accordingly, its amount will be equal to the sum of the lengths of all the walls of the bathroom.
- Metal ceiling profile (CD). It is intended for mounting the ceiling cable. This profile is mounted perpendicularly. To reliably fix the plastic to the ceiling and prevent its deflection, this step when installing the profile should not be greater than 0.5 m. Depending on this parameter, you can calculate the required amount of material.
- Be careful when choosing profiles. It is necessary to buy only high-quality galvanized so that they are not covered with rust from high humidity indoors.
- Brackets for mounting the ceiling profile to the main overlap. They are installed in increasing no more than 0.7 m. Otherwise, under the weight of the entire design, the profile can be fed. They are attached to the ceiling by dowels of quick installation.
- Self-tapping screws (the so-called "seed").
- Self-tapping screws for fastening plastic panels to profiles.
- Start plastic panel or ceiling plinth.
- Fast mounting dowels.
- Plastic panels.
From the instrument will definitely need:
- Perforator or shock drill.
- Screwdriver.
- Electrolovka.
- Level, roulette, pencil, knife.
Installation of plastic ceiling with your own hands. Preparation for mounting

Before installing, it is necessary to make a mounting scheme. It will help correctly calculate the amount of materials and determine the sequence of work. Usually, the installation of the ceiling starts with lined walls, that is, after the tile will be laid on the walls of the bathroom.
For fixing the guide profile, you can use two ways: mounting on the wall or fastening on the tile. The second method is most preferable because there is no risk to damage the tile when driving holes. It must be remembered that if the pated tile falls, then when the hole is drilled, it can burst. When using the first method, it is necessary to remember that when mounting on the wall over a number of tiles, the width of the guide profile is reduced, which will make it impossible to fix the starting ceiling baseline. From this situation there is a simple way out: "Instruct" the wall above the top nearby tile with plaster. The process is not too complicated. To do this, there will be plaster, a plastic spatula (metal is not desirable to use so as not to spoil the surface of the tile), greasy tape. They are stuck the upper part of the tile so as not to be stained by plaster intercutric seams.
The first thing is covered with tile tile, then neatly plaster is leveled with a wall under the level of tile. Installation of the guide profile can be started after the plaster is completely dry. As a rule, this is the next day. The profile is attached using a fast mounting dowel. If the tile is fixed correctly, it can serve as a level for installing the profile. It is fastened all over the perimeter, fixing each other in the corners.
Installation of lathes of plastic ceiling in the bathroom

Procedure for work:
- After completing the installation of the waterproof profile, you can start the installation of the crate. To do this, use wide CD profiles. They are growing in the rope profile, are set perpendicular to the direction of plastic panels. The transverse profiles are attached to the bypass with the help of small tapes (seeds). They are better not to save and install 2 pcs. One connection. When installing transverse profiles, designate the place of attachment of future lamps on the ceiling so that the profile becomes at the required distance.
- After the cuttack is collected, transverse profiles with suspension must be attached to the main ceiling overlap. If the ceiling is lowered for a small height, then standard brackets should be enough. Otherwise, you need to use special suspensions.
- Such brackets to the ceiling are attached using fast installation dowels, and to profiles are all the same seed. When attaching transverse profiles, their position must be monitored using a level.
On this, the installation of the frame is complete, you can start installing a plastic ceiling in the bathroom.
Installation of plastic ceiling in the bathroom

Procedure for work:
- The first step in the work of work will be the installation of a plastic starting plinth. It is attached to the bypass profile with the help of metal screws with a press washer. In the corners of the room you can cut off the plinth under 45 ° with the help of a stub, however, it will be much more reliable to insert them into each other, cut through the diagonal and secure the self-tapping screw.
- Before starting the installation of plastic ceilings in the bathroom, be sure to connect (but do not connect the lighting wiring, install the terminals at the ends of the wires. Secure the wiring to profiles or suspensions using plastic clamps.
- Now you can pout panels. Before starting work, it is necessary to remove the polyethylene film from the panels. This is a very common mistake, especially among those who do this for the first time.
- Cut the panel is a bit shorter than the width of the room, about 4-5 mm. The panel must be cutting either a jigsaw with a small tile, or with a metal hacksaw, with the mandatory processing of the place of the cut of the shallow skin.
- When the panel is ready, the installation begin. The first to the profile starts a narrow end. Then the panel bend a little bends and starts wide.
- To push a profile a bit for the panel plant, you can use a spatula, just to do it carefully, so as not to spoil plastic.
- After the panel is inserted into the profile front and from the sides, its rear is screwed by self-drawing to transverse profiles. Now the role of the start page to which the subsequent panel will be inserted, will play the previous one.
- Next, we move according to the specified scheme. In the place where the installation of lamps is planned, it is necessary to make slots in the panel. They are made with a special crown or a simple knife. More convenient to make this work before installing the panel than to do it "at the place."
- The greatest difficulty when installing a plastic ceiling represents the installation of the last panel. Naturally, if the premises length is not multiple panel size, it will need to trim along. You can do this with a knife. The width of the last panel should be slightly smaller than the distance from the penultimate until the ceiling starting plinth stops.
- First, we turn the last panel into the plinth, and then with the help of an ordinary tape, glued onto its surface, we feed it towards the penultimate and snatch the lock.
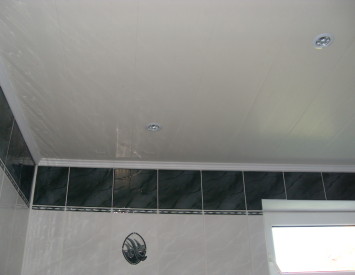
- That's all, now it remains to install lamps and plastic cutting ceiling for the bathroom ready.


