Stainless steel chimneys are best suited for installation with their own hands. Even a person ignorant in the stove will cope with this work, since everything that is required of him is to combine the finished components of the design by the type of designer. Of course, there are some nuances in this matter, on which the efficiency and durability of pipes depend. From this article you will learn everything about how to properly assemble stainless steel chimneys with your own hands.
Content
Design features
Stainless steel chimneys have the second shorter name-“Sandwich Dymage”. As in the case of sandwich panels, such a name is explained by the features of the design of the pipes-they are created from several layers. The inner layer is made of stainless steel so that the condensate that occurs during the operation of the stove or boiler does not destroy the pipe ahead of time. Behind it is a heater that does not allow smoke to cool too quickly (if hot smoke is sharply encountered with cold street air, condensation will occur). As a thermal insulation, as a rule, non -combustible basalt materials (mineral wool) are used. The outer layer is made of stainless or galvanized steel (budget option), which gives the strength of the structure.

Such a device makes it possible to remove furnace gases and soot as successfully as possible, because the inner layer of stainless steel steadily tolerates extreme temperature changes, and its smooth surface does not delay the particles of soot. The latter will be very pleased with those who decided to replace the brick chimney steel - it will have to clean it much less often.
The advantages of stainless steel chimneys:
- The possibility of installation at any time of the year.
- Elementary maintenance and care - since the internal circuit does not contribute to the accumulation of soot, it is enough to clean the chimney once a year.
- In the case of a breakdown of any segment, there is no need to dismantle the entire structure-you can disconnect and replace the faulty area.
- Due to the small weight of the chimney, the construction of an additional foundation under the stove is not required, as in the case of brick products.
- There are options for chimney pipes for all types of fuel: coal, firewood, gas, butter. By installing this or that type, you should know that it will most effectively remove smoke only in the case of a furnace furnace with a suitable raw material.
- For the manufacture of contours to a metal alloy, titanium is often added to give strength. On sale there are heat -resistant pipes with wall thickness up to 1 mm, capable of withstanding heating up to 600C.
- The durability of the structure is determined by its quality. Good stainless steel pipes will last 20-30 years for the chimney.
Of course, there are not enough pipes for installation - a lot of fittings and fasteners (brackets, revision, adapters, tees, knees, clamps, rosette, etc.) will be required. More details about the structure of stainless steel chimneys and installation are described in the video below:
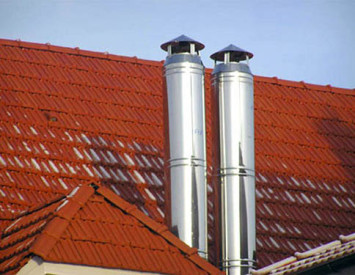
The upper part of the chimney must be cone -shaped, as well as have a sparking, a voppler or at least a thermogribok to protect the roof from the fire, and so that precipitation does not get inside. Thermal insulation of the sandwich dizmens allows them to be removed along the outer wall of the building, but if possible, it is better to skip it inside the house in order to reduce heat loss.
Types of metal chimneys
Entering a construction store, you will see several varieties of chimney. They differ not only in value, but also by structure and purpose. The above products have two walls, between which the insulation is placed. Such pipes are suitable for installation on fireplaces, boilers, gas devices and stoves.

There are also inexpensive single -walled pipes. There is no insulation in them, so there can be no talk of any insulating abilities. Such products are designed for the repair of any segment of a metal chimney, the creation of compounds in brick chimney and reinforcement of the structure.

There is a third look - the most expensive. Coaxial pipes appeared on the market relatively recently and immediately demonstrated their effectiveness. They have an unusual structure - a smaller pipe is placed in a pipe of a larger diameter. Through one, smoke comes out of the furnace, through the other fresh air penetrates inside and maintains intensive burning. Coaxial chimneys allow you to make heating devices more autonomous and are used in cases where a constant oxygen supply is required for fuel combustion.
Methods of connecting pipes
Standard details are used to connect sandwich dizzyes made of stainless steel, however, mounting methods may differ depending on the desired result.
There are two methods for joining the elements of a sandwich dummage:
- By smoke - this method guarantees the protection of the internal premises of the house from the penetration of carbon monoxide. It is often used in the installation of heating equipment inside a bath or residential building. It is very important to isolate all the seams qualitatively, otherwise the condensate will wet the insulation.
- According to condensate-this technique allows you to create conditions under which the condensate formed due to a sharp temperature drop was directed down the pipe down. With this method of assembly, the internal pipe of the upper segment is made to the lower bell of the lower, and as a result, the water flowing on top cannot harm the insulation. However, smoke can get into the house if there is at least one small gap.

In the first case, the chimney can suffer from condensate, in the second - there is a risk of poisoning with carbon monoxide, so what to choose? If you are building a chimney inside the house, it is better to give preference to the method “by smoke”, if in the utility room - “condensate”. However, in both cases, pay special attention to sealing all seams.
Installation of the chimney
The dimensions of the chimney made of stainless steel depend on the dimensions of the building and the required traction. The standard length of one segment can be 50 cm or 100 cm. Installation begins from below near the stove and gradually move higher, inserting one element into the other. However, many experts recommend acting exactly the opposite-to collect a chimney from above-down, starting from the roof. This will allow in case of breakdown not to disassemble the entire structure, but easily remove the faulty part and replace it with the new one.

On each segment there is one narrowed end - it should go to the wide end of the next part. All links should be mounted so that condensate accumulating on the walls can drain down and not linger in the seams.
Useful trick: in order to connect two pipes qualitatively, pull out the inner circuit of one of them by 15 cm, then insert into another pipe, and then fasten the external contours. Smoke each joint with sealant and strengthen the steel clamp. The sealant should be special - the usual will simply deal with the high temperature at the first firebox.
How to get a chimney outward
First of all, when withdrawing a chimney to the outer wall of the building, you should take care of its stability. Sharp gusts of wind, a strong hail or random blow can become a fatal trouble threatening to leave the house without heat. To prevent this from happening, the chimney must be firmly fixed. To do this, use various brackets with which they fix the chimney to the wall every 1.5-2 m.
If the design provides for the installation of a tee or driving, these parts should also be attached to the wall. They will hold the chimney strictly vertically, will not allow its collapse and remove part of the load from the docking elements. At the same time, a small distance should be maintained between the chimney and the wall - the indentation. In order to calculate the amount of the indentation, it is necessary to take into account the thickness of the wall of the heating equipment, the nature of the furnace (open/closed), the degree of combustibility of the finishing materials of the walls. Let us give an example: for example, the thickness of the wall of the furnace with a closed furnace is 65 mm, and it costs near the wall unprotected from fire. In this case, a safe distance will be at least 50 cm. If the furnace has thicker walls, say, 120 mm and stands near a brick non -marked wall, then the indentation can be reduced to 20 cm.

If you need to install a chimney inside the box or between two walls, two window openings with a size of 150 cm² should be made on the outer wall. One window should be located on the lower floor, the other is closer to the roof.
Passing the ceilings
If you lead a chimney inside the house, then sooner or later you will replace the floor between the floors. What to do in this case? In order to remove the pipe through the floors out, it is necessary to make a special box with a hole in the middle. In this box, insert a pipe with a diameter of a little more than the diameter of the chimney. The thickness of the box should exceed the thickness of the ceilings by 7 cm on each side.

The main purpose of such a box is the protection of the ceiling from ignition. In the process of operating the furnace, the chimney can repent up to 100C or more, which creates a fire hazardous situation, so it must be insulated. The box must be thoroughly fixed in the ceiling and tied with the pipe. The pipe inside should be whole (without joints, otherwise they will quickly disperse from temperature differences).
When you install the box in the floor, the pipe must be isolated qualitatively. To do this, it is better to use special mineral wool mats with a foil coating that reflects heat. Such mats are covered with refractory mastic and are not afraid of high temperatures. The hole in the roof also does not prevent you from holding such mats for reliability.
Drawing a chimney to the roof
So, the installation of a stainless steel chimney is already nearing completion, but a very crucial moment ahead is to bring the pipe to the roof. This can be done using a special link - roof cutting. The cutting should be selected in accordance with the angle of inclination of the slopes of the roof.

How is the chimney excretion:
- Using a marker, make markings on the inner surface of the roof. The diameter of the future hole should be slightly larger than the diameter of the chimney (only a few millimeters).
- Cut the through hole in the roof, alternately cutting out and removing each layer of the roof pie. You should not even try to cut everything in one fell swoop - the result will not please you.
- Place the steel pipe inside the hole to isolate the roofing layers.
- From the inside, attach a steel sheet with a hole for a chimney in the middle to the roof.
- Remove the pipe out and install the roof cutting on top.
- On top of the cutting, mount the required number of links.
- At the very end, attach an umbrella or sparking to protect the pipe from precipitation, and the roof from fire.

Important: where the pipe passes inside the roof pie, there should be no joints!
Useful tips
Stainless steel chimneys are a new generation product and successfully replace massive brick structures. And although their cost sometimes exceeds the price of the installation of even ceramic chimneys, the benefit becomes noticeable after a few months of operation. So, steel chimneys less likely need cleaning and break less, and if this happens, you can just buy a new segment and quickly replace it without dismantling the entire riser.

And for the use of the chimney to become even longer and more convenient, we have prepared several useful tips:
- When it is time to clean, start work on top, having previously made sure that the chimney would not be blocked (the bird could have been a nest in it, the leaves attacked, etc.).
- If the chimney clogged with something, do not try to pull out the blockage, but simply push it to the nearest revision. Examinations are special mounting elements that are installed in several places along the entire length of the chimney. They accumulate garbage falling from above. Before cleaning, all audits should be closed.
- To remove soot, purchase a special ruff, the diameter of which should be slightly larger than the diameter of the chimney. First, work with a ruff, and when the saza settles, clean the revision tanks.
- To clean the chimney as little as possible, try not to heat the stove with wood coniferous. It contains resins that settle on the walls inside the pipes and form difficult pollution. The same thing will turn out if you drown the stove with raw wood.
- It is not recommended to burn household garbage in the “home” stove - use the old metal barrel on the street for this.
- For prevention from time to time, throw a little aspen firewood into the oven - quickly burning out, they give a powerful high flame that burn the soot inside the chimney.
The installation of stainless steel chimneys is not so complicated if you choose the right pipes and know how to handle them. Use recommendations from this article and you will succeed!


