Interior arches are quite popular elements of the interior of modern housing. They give him an unusual and attractive appearance. Most often, such elements are used to design door openings. Arches are interior with their own hands - quite fulfilling the task. For this you need only a little diligence. Below we will look at several types of similar designs, their advantages. In addition, we will tell about the features of the installation of various arches.
Content
Types of interior arches

The arches differ in the form, which is selected depending on the structural features of the partition or the outlook itself. In addition, the form of arched arches depends on the preferences of the owner.
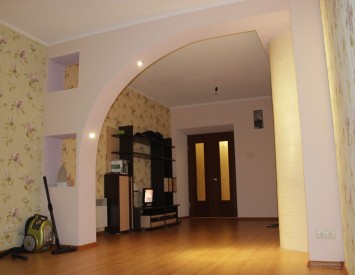
- The most popular today is the form of the arch, which is called "classic". In such designs, the arc is performed as a semicircle. This form is optimal for any interior that has not too wide opening.
- Another type of arch is "modern". It represents the form of a gentle arc. Such arches visually lengthen the interior opening and give the indoor decoration of the room more refined view.
- For wide openings, Romance is considered the best solution. The form of such an arc is a rectangle with the upper corners of the rounded form. Of the advantages of such a design, it should be noted that the roundings capture quite a bit of free space.
- "Trapeze". Such arch structures have a broken shape of the arch. They are able to highlight the design of the room. Such arched floors can be installed in the openings of almost any size.

The above species are not all existing today. For example, there are seven kits and structures with arc-ellipse. The configuration of arched openings depends on the size of the room and, of course, from the imagination of the owner.
Select the type of arch is preferably the only one that is most suitable for the design of the rest of the room. At the same time, it is necessarily taken into account how the form of the arch on which your choice fell will be combined with the style in which the finishing of the adjoining corridor is made. In addition, it is impossible not to take into account the height of the doorway. So, if its height is 2.1 m or less, the arched construction can occupy a lot of free space. In this case, it is recommended to refuse its installation. It will be enough to round the angles in the interior opening. The best arched structures look when the distance from the floor to the horizontal jumper of the opening is at least 2.7 m.
How to choose Material
For the construction of interior arches from a tree, such woods are used as pine, oak, beech and expensive red wood. Moreover, pine wood is usually used as the main material for such a design. The fact is that this breed has a core of a pinkish shade, which gradually becomes dark red. As for the benefits of pine, then among them can be noted elasticity, good density, plasticity and good resistance to rotting. Pine is considered one of the cheapest finishing materials.
In favor of beech or oak, it is usually made a choice if the apartment already has a similar interior decoration. These materials are rather durable, and at the same time they have a special texture and color. Red tree is considered the most expensive wood, but it looks very respectable.
Advantages of plasterboard arched openings

The plasterboard sheet is environmentally friendly, and at the same time relatively inexpensive material that is capable of keeping any form given to it. As for the interroom arches from drywall, they possess several significant advantages:
- First of all, it is an easy design, thanks to which it is rather durable and reliable.
- In addition, the dignity of the arc from drywall can be attributed to the relatively low cost of materials.
- In addition, they are easily mounted. Indeed, such arches can even make a person who is a little familiar with the construction work.
- When installing the design, it is not necessary to carry out large-scale dusty and noisy work.
Preparation for mounting

First of all, it is necessary to make measurements of the opening, where we assume to install the design. Width and height from the floor you need to know necessarily. The arches width should be the same as the distance between opposite sides of the opening. After measuring this parameter, the obtained value must be divided by half. The result of the division will be needed for the proper manufacture of smooth semicircle.
Before making the arch, decide on its form. During the preparatory work it is necessary to pay attention to the verticality of the wall. If it is not strictly vertical, then the arched construction will eventually look bad. In this case, the surface of the opening must be aligned. This is done with the help of putty works. In the manufacture of interior arches, it should be noted that the design will make the height of the opening less. As far as the general interior of the room is depends on the sight of the interroom. The photo below shows a few examples. If the height of the opening was initially less than 2 meters, then perhaps it is better to do the arch in such an opening at all. Instead, it is possible to make the framing of the opening with the help of decorative foamflast.
In addition to the above, it is necessary to prepare the opening itself for mounting the arch. In particular, it should be removed from the walls all that can interfere with the installation of the structure. It can be old wallpapers, panels or paint. Be sure to align and clean the wall. In some rooms, the form of a wooden arch does not coincide with the dimming dimensions. In this case, it will have to remake "under the arch", i.e. give it an oval shape. For this purpose, it is allowed to use stone, additional brick or construction of a rice carcart. It all depends on your preferences. The main thing that needs to be achieved is that the dimensions of the outlook obtained were the same as the parameters for which the interconnect arch is performed.
Materials for arch

In order to make a plasterboard arch, the following materials are needed:
- Guide and rack profile.
- Sheets of plasterboard.
- Two types of self-tapping screws (for fasteners of plasterboard and with press washer).
- Arched corner with necessary holes.
- Needle roller. Need for bending sheets of plasterboard.
- Latex putty.
If the main material of the wall is wood, then the installation of the profile is allowed to be made on the wood screw. If the wall is brick or made of plaster or concrete, then for fastening the profile frame, you will need a suitable size of a dowel with a screw.
How to make interroom arch

One of the most important and responsible operations is the manufacture of the facial part of the future arch. Here the main complexity is that it is necessary to make two parts that must be absolutely identical. This is equally relevant both for the arch from plywood and from drywall. Whatever material for the design is selected, the markup principle will be the same. Smooth semicircle can be made in two ways to be described below.
Method 1:
- For example, you can take a tight rope that should not be lengthened when tensioning and a simple pencil. The latter is tied to the rope. It turns out something like a primitive circulation. Next is the middle of the circle. The middle is located by the value that was obtained during the division of the width of the opening in half.
- For example, take the opening of 1 m wide. If it is divided into this value in half, we obtain that the arches radius will be 50 cm. The distance from the upper part of the opening to the upper point of the interior arch is about 10 cm. This value is added to the value of the arc radius. In our case, we get 60 cm. So much you need to measure the edge of the drywall sheet and spend the line. Next, the plasterboard must be cut so that its width is the same as the width of the doorway. In our case, it is 1 m.
- Now the middle is marked on the line. The result will be the point that we will take as a center for the inscription of the semicircle. Now you need to take a previously prepared pencil with a rope, measuring 50 cm on the rope (or another radius of the future arched design) and outline the semicircle. If everything was done correctly, then the result is a smooth semicircle.
- Then an ordinary stationery knife takes, with the help of which the semicircle is cut down by the markup. You can also cut off with an electrolybiz. The tool here does not play a big role. As a result, it turns out a 100x 60 cm rectangle with a semicircular neckline. Moreover, from the point of the semicircle, which is closest to the opposite side, will remain 10 cm to the edge.

Method 2:
- As for the second way, it is necessary to find something flexible for it. In this case, the device must be long enough. For example, you can take a PVC panel or a soft plinth. With this device, you can quickly draw the necessary semicircle for the arch on the drywall. But first you need to cut the workpiece, or rather a rectangle.
- For the opening of 1 M wide size of the arches of interroom will be the same as in the previous method, i.e. The length of the rectangle will be 100, and the width is 60 cm. After that, from each edge should be measured 50 cm and spend two lines. At the location of the lines you need to put a point.
- Now a pre-prepared auxiliary tool must be gently bend in the width of the opening in the form of an arc or a semicircle. In this case, the most convex part must coincide with the point that was marked on the rectangle. In addition, the edges of the flexible fixture must converge with the extreme labels of the rectangle.
- Next, the resulting arc is delineated so that it is noticeable on the surface, and cuts out. If the second way is used, then you will need an assistant. The fact is that one will not be easy to make the necessary markup rather accurate.
Plasterboard will have to bend on the shape of a frame. Therefore, to cover the lower part of the arch, it is desirable to use a building material specially intended for trimming the ceiling. It has a much smaller thickness than standard sheets of plasterboard. That is why it is better to be bent.
By the way, there are several ways to bend the plasterboard without destroying it. Consider some of them:
- If the depth of the opening is small and the arch allegedly will be no width of no more than 25 cm, then with one side of the bending band you need to do every 10 mm cuts. After that, the strip is neatly premounced on the cuts because of which it takes the shape of the arc. With the further installation of the plasterboard strip, you need to be the most careful. The fact is that the plaster is usually glued to one side of the cardboard. And it is precisely this part that should be the bottom of the arched construction. Cuts made at the same time will be on top.
- The sheet of drywall can be bent by piercing it with a special roller. To do this, the reservoir is first wetted with water, after which it is rolled through a roller with spikes. Then a punctured sheet of material bends according to the template. At the same time, punctures should remain from the bottom. After that, the design is left to dry. Usually it is enough to 12-14 hours. When drywall dries, it will be so tough as it was originally. But then we can assume that it is ready for installation.

As you can see, nothing is complicated. The most important thing is the accuracy, accuracy and adherence to the recommendations given.
Interior Arch Installation Technology
Before proceeding with the installation of intercommercial arched design, it is necessary to prepare the surface of the doorway. In particular, all noticeable irregularities on the wall are removed, which can interfere with the correct installation of the frame. After that, metal profiles are installed on the side of the opening sides. Arched construction must be in the same plane with its surrounding walls. To do this, the above profile must be placed slightly deep into the opening.
Next to the profile recorded in the opening, a previously curved profile is attached. After that, all the necessary details of the arch design are fixed on the self-sufficiency. In order for the profile to not joke from the pressure of the self-tapping screws, they need to screw them without excessive efforts to the screwdriver. If the profile is deformed, the whole design itself also loses the form.
Finish finish

After installing interior arches, it is necessary to finish. If the opening was made of drywall, then before mounting the design, it is advisable to carry out a facing (for example, caught with wallpaper). Arches from wood need to be covered with varnish and paint. This will protect the design from fading and aging, which will help increase its service life.
At the end of the work, it is necessary to check the arched construction for the presence of dents, elevation, chipping and irregularities. If so are discovered, they are desirable to eliminate them. This can be done with the help of finishing finish. If the arch is erected in an urban apartment or in a private house, you should know that wooden interior openings will always look better. After all, wood is environmentally friendly material. In addition, it is known as qualities as resistance to wear and durability. This makes it a very successful option for finishing the interior.
When the installation and decoration of the arch will be completed, it is desirable to make a framing from perforated corners. In addition, the locations of the joints and the seams will need to be sealed. The arch is then covered with starting putty. After drying the mixture, all the surfaces should be seal until they are perfectly smooth. Then you can already paint the arch or wake it up with wallpaper. The choice of finishing options depends only on personal preferences.
Interroom Arches: Video


