Recently, the installation of autonomous lamps in a summer or personal plot has become an excellent alternative to ordinary lighting devices that draw energy from common electrical networks. The main advantage of such devices is their independence and mobility. So, an autonomous lamp can be easily installed in the right place without shifting the cable and without installing new supports. Even when the light is turned off in the entire country village, they will be able to illuminate the site before the supply of electricity.
Content
- The principle of operation of an autonomous lamp
- The necessary materials for the lamp on solar panels with your own hands
- Assembly of the scheme of the LED autonomous lamp on sunny batteries
- Assembly of the lamp on sunny batteries with your own hands
- Operation of an autonomous lamp
- Do -it -yourself sun luminaires with your own hands: photo
- DIY lamp, master class: video
At relatively low prices for spare parts, as well as due to the emergence of low -power light sources, such as LEDs, home craftsmen had the opportunity to collect an autonomous lamp with their own hands without problems. Moreover, with minimal investments, you can make a reliable product, which will serve much longer than factory Chinese models. Repair of such sunlight on solar batteries can get out even more expensive than making a quality product in advance. About how to make a lamp with your own hands - further in the article.
The principle of operation of an autonomous lamp
Since the autonomous lamp is not connected to general electric networks, it should have another power source. In fact, it is no different from the usual pocket flashlight. However, in order not to constantly change batteries in it, such lamps are supplied with batteries. They are charged thanks to the work of solar elements in the daytime, and at night they give energy to LEDs. The latter, unlike incandescent lamps, have low energy consumption with a much brighter glow, which allows them to work for a long time on one charge of the battery.
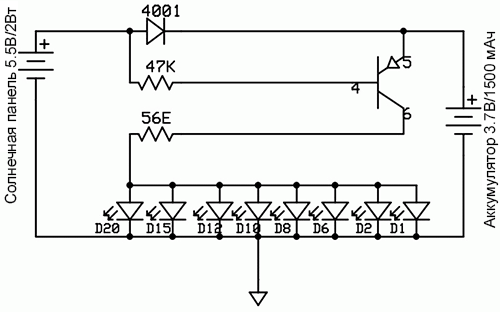
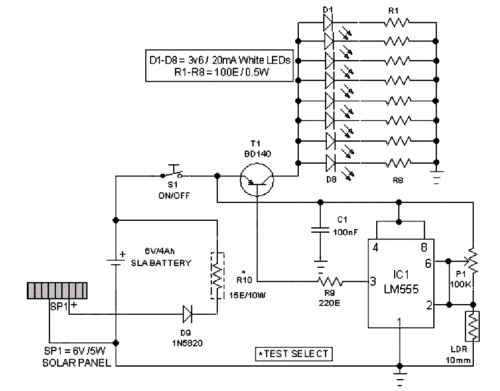
To automate the inclusion of a street lamp, photocells are used, which include it when lighting or special transistors decreases. The latter works as a key. When the voltage on the solar battery under the influence of sunlight increases, it starts the current to the battery. As soon as the voltage drops, which indicates a decrease in illumination, the transistor supplies the current from the battery to the LEDs. In this case, the solar battery paired with a transistor plays the role of a photocell.
The housings of such a lamp are usually made of steel or plastic. Since it will be constantly exposed to temperature changes, high humidity, its body should be sealed. Otherwise, the service life of the product will significantly decrease. The easiest way is to use for these purposes a metal box for food, which is tightly closed.
The necessary materials for the lamp on solar panels with your own hands
Almost everyone who at least once held a soldering iron and has elementary concepts about electrical circuits and their work will cope with this simple work. To collect a simple chain, it is not necessary to make a textolite fee and etch the paths on it. Everything is going simply, you can say "on the knees."
For the manufacture of one lamp you will need:
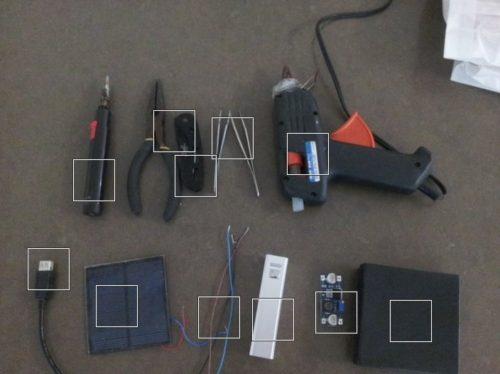
- Battery battery. The nickel-metallhydrid battery with a voltage of at least 3.6 V. You can buy it in any store is best suited. Find out quite easily, it looks like 3 finger batteries that are covered in a special film. Particular attention should be paid to the battery capacity. It depends on her how long the lamp can do without sunlight. The optimal container can be calculated as the amount of energy that the LEDs, multiplied by the number of hours of battery life with a margin of 30%consume.
- Solar elements. Recently, buying them is not difficult. If the voltage of the battery is 3.6 V, then the voltage of at least 5 V. is necessary for its charging, since the average panel that is currently sold produces approximately 0.4-0.6 V. Their power will need to be assembled in the battery, respectively, 10 pcs. In one. They are connected sequentially, in this case, the voltage of each panel will be folded. When buying individual photoelectric panels, it is necessary to give preference to those that have outputs. Otherwise, it is worth choosing sets that include conductors and a special flux in the form of a pencil. It is necessary for soldering contacts.
- One transistor 2N4403, rectifier diode 1N5391 or KD103A is also needed.
The resistance element (resistor) is included in the circuit. Its face value can simply be calculated using the formula:
R \u003d UX 100/NX0.02; Where:
- R is the resistance of the resistor;
- U - battery voltage;
- N is the number of LEDs;
That is, for three LEDs with a voltage of 1.2 V and a battery voltage of 3.6 in the optimal resistance of the resistor will be 6 kOhm.
Each of the LEDs is connected by a 33 Ohm resistance.
Assembly of the scheme of the LED autonomous lamp on sunny batteries
The work procedure at this stage is as follows:
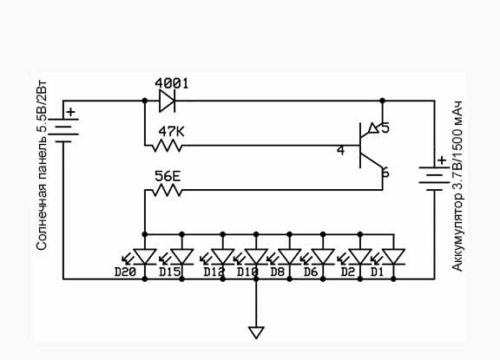
- Each of the LEDs has two legs - short (cathode) and long (anode). Short legs must be connected together, and then soldered, and to long - solder at one resistance of 33 Ohms.
- The free legs of the resistors must be assembled together and soldered, and a transistor collector is soldered to them. The resistor of 3.6 kOhm is soldered to its base, and the transistor's emitter is a diode cathode, which performs the rectifier function. A positive pole of batteries will be connected to it. The diode anode is connected to the resistance of the transistor base and the positive pole of the solar module. The negative pole of the solar battery is connected to the negative pole of the battery. The wire joins the Cathodes of the LEDs.
- It is necessary to provide sun modules with guides. As a rule, they go in sets with elements. If they are not, it is necessary to purchase a flat conductor and cut them into measured lengths. The length of the conductor should be 5-7 mm more than the width of the module.
- When soldering contacts, the most important thing is not to confuse the pole. Lesser contact of the solar panel is on its front side, and plus - on the back side. When assembling the battery, each subsequent element is soldered with opposite poles. In simple words: The minus of the previous panel is soldered to the plus of the subsequent.
- The contact of the solar module is a narrow strip of the conductor. In order to solder the conductor tape to it, you must first draw a flux (with a colorless marker that is included), apply a tape, and carefully draw on it a warm -up soldering iron.
- The tape already has a tin layer, so it is easily soldered to the surface of the module. When soldering, you must be very careful so as not to damage the modules. They are very fragile and are afraid of overheating.
- Thus, a battery of 10 modules is assembled together with a total voltage of 5 V. The layout of the modules depends on the size of the lamp. Typically, 10 elements are located in two rows of 5 elements.
Assembly of the lamp on sunny batteries with your own hands
After the electrical circuit of the autonomous lamp on solar panels is collected and checked, you can start assembling the design itself. The solar battery must be protected from precipitation. For this, the elements must be placed under the glass.
The work procedure at this stage is as follows:
- First of all, the solar battery for garden lamps with your own hands is laid on the glass installed on the frame. The glass frame is made of aluminum profile. The glass is attached to the frame using silicone sealant. In order for the solar panel to serve for a long time and is not afraid of hail and snow, it is better to use hot glass.
- After the frame with glass is ready, the solar battery is laid on it, the contacts are displayed and poured with epoxy resin. This seals the entire battery, reducing the effect of moisture on it. As an option, instead of epoxy resin, you can use a lamination film. It is covered with solar panels, and heated with an industrial hairdryer. It must be remembered that the heating temperature must be increased gradually so as not to spoil the film and contacts.
- Now the luminaire housing is made. To do this, you can take a sealed metal box. Holes are made in its lid to withdraw LEDs. Inside you can install a piece of foam. If the legs of the part when soldering the scheme were not bought, they can be inserted into the foam, thereby fixing them.
- After that, connect the bottom of the box and the solar battery case. The last step will be the closure of the flashlight case. Experts advise before this to dry the insides of the lantern with a hairdryer in order to evaporate moisture from it. So the flashlight will serve much longer.
Operation of an autonomous lamp
In order for the LED lamp with your own hands to work longer, it must be used correctly.
The following operating rules are available:
- In order for the batteries to be charged more efficiently during the day, they need to be oriented to the south side, at an angle of about 30 ° C to the horizon. In this case, the sun's rays will fall at the required angle and the efficiency of the battery will be high.
- It is better to install a lantern on a column 3 meters high so that the shadow from the trees does not interfere with the charge of the batteries. In winter, this lamp is not particularly effective and it is better not to use it. In conditions of low temperatures, the discharge of the battery occurs much faster, and the length of the daylight hours does not allow it to replenish her charge.
- In the winter, it is better to put such a lamp for storage, having previously discharged the battery. To do this, cover the solar battery with luminous matter, or put in a dark place. The transistor will automatically turn on the LEDs and discharge the battery.

