The internal filling of the bath is an important aspect when making a structure. Furniture will depend on the comfort of stay inside the steam, the creation of a special "bath" of the atmosphere, the ability to relax and fasten the flavors of fresh wood. Furnishing may include various objects, however bath shops – the main component, without which it is difficult to imagine a steam room. Make your own hands this product is not at all possible, you only need to stock materials and desire.
Content
Selection of material for shop
Among the main requirements that are presented to the raw materials of the bath bench can be allocated as follows:
- low thermal conductivity of a material that will provide the possibility of a comfortable seat or lying on the surface, without burning bare parts of the body;
- high density of wood, thanks to which the bench will not crack or split, delivering discomfort or leaving the heads on the skin;
- strength - this will allow the bath shop for a long time to serve in suitable condition, withstanding high temperatures and humidity inside the bath.

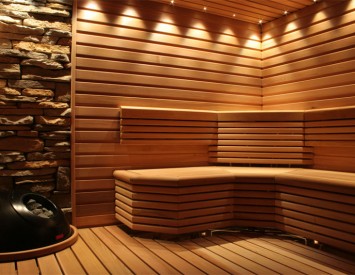
Making a shop for a bath in a photo , it can be noted that the best material for the product is deciduous trees:
- birch;
- linden;
- oak;
- ash;
- aspen;
- alder;
- maple.
In order for the steam room not only aesthetically looked, but also smelled well, you can build a bench from coniferous wood. For this suit:
- cedar;
- larch;
- pine.
Important! Pine shop is suitable for use only outside the steam room. Such a limitation is due to the fact that wood at temperature effects and high humidity highlights a sufficiently large amount of resin. And it will deliver only discomfort during operation.
The undisputed leader when choosing a material for a bench is Lipa. Wood such a breed has a pleasant light color, has high strength, it is easily processed and has a therapeutic effect on human health.
No less disseminated such material like aspen. However, its popularity was dictated to the cheap raw material, while many bath owners miss the moment that the main lack of aspen shops is the appearance of internal rot. As a result of such processes, the product quickly comes in disrepair. Therefore, in matters of quality, it is worth relying on a more expensive, but hardy material.

Variations of bathing beams
So the usual bath furniture actually has many options for design. Among the main types of product it is customary to distinguish:
- movable shops that serve to furnish the rest room;
- static benches used in the steam area.
Simple shopping Without a back often serves as a footrest. Such a miniature product for the bath is enough to make it yourself, but the stable leadership of the bench could not hold.
Mobile shops Popularity is somewhat inferior to more comfortable and practical products - bunk or stepped benches that significantly save place in the room and do not create obstacles under their feet.
Consider the main features of the products:
- Step benches are located one above one, while the top row with the shelves is slightly wider, because it will be possible to sit on it, but also to lie down.
- Bunk benches are used to furnish with small baths, and they will have to rise at them with the help of an additional gear staircase.
- For a very compact steam room, the optimal option will be the arrangement of the room of one bench in the form of a removable shelf.

Bannavka do it yourself
Having furniture in a bath made with your own hands with special diligence and accuracy - the dream of each owner. In order to make the most suitable product for its steam room, you need to stock up the required materials and tools.
Toolkit for the construction of a shop
To make a wooden bench for the bath you will need to prepare the following:
- screwdriver;
- electric jigsaw;
- manual milling mill with a full set of wood nozzles;
- electrolake;
- hammer;
- electrode and a set of drill to it;
- ribbon grinding;
- wood hacksaw;
- corolnic;
- chisels;
- roulette;
- clamps;
- building level;
- meter line.

Materials for work
After you got stuck with the necessary tools, the drawings of the baths for a bath , and also decided on the design it is necessary to prepare such materials:
- board for longitudinal crossbar 1460x120x30 mm - 6 pcs.;
- connecting Planks for Coast 1460x20x10 mm - 4 pcs.;
- board for future seating 1500x120x30 - 3 pcs.;
- connecting rails for seating 1500x20x10 mm - 2pcs;
- sidewalls 420x120x30 - 2 pcs.;
- connecting staps for sidewalls 420x20x10 - 2 pcs.;
- furniture sleeves 40x10 mm - 2 pcs.;
- plastic sanguisers for the sides - 8 pcs.;
- self-tapping screws Sideways 75x5 - 7 pcs;
- pVA glue for wood;
- self-tapping screws for fastening grooves 20x3 - 4 pcs.;
- semi-axis acrylic varnish;
- emery paper shallow and large grain.

Description of the construction of a bath shop
- To ensure the rigidity of a wooden shop for a bath, all products are tightened by side racks, fixing them until the stop of the longitudinal rail. At the same time it is necessary to use PVA glue for wood. Thus, the hard frame forms a longitudinal rail installed on the edge along with side racks. This will allow the sustainability of the entire design.
- The top board, which serves the seat, is attached to the frame of the glue. So that the shop is not damaged from moving on the floor, plastic spikes are attached to the lower ends of the side fragments.
- All bench elements are covered with moisture-resistant lacquer, which has an antiseptic effect. Thus, the surface of the design after processing acquires a semi-axle neat appearance, without damaging the texture of the tree itself.

Step-by-step manual guide
In the case when the construction of a bench's bench for a bath comes from finished furniture shields, the manufacturing process is simplified as much as possible and the processing of blanks occurs in accordance with the existing drawing. Otherwise, it is necessary to prepare the elements on their own. When cutting billets, it is worth considering purishness for finishing, which are 20-30 mm per side.
The manufacture of glued shields from the wood of the desired breed should be produced by rack of 20x10 mm in size, which is inserted into the longitudinal grooves between the boards. A similar bar can be made personally, however, it will require special equipment, such as a reysmaus. It can also be cut out of the plywood sheet, but it is much better to purchase a ready-made option, especially since its value is insignificant.

The process of building a bath shop consists of the following steps:
- On the smooth surface of the desktop, you must lay 2 boards in parallel with each other gaps. After that, they should be fixed by clamps. In the future, the upper surfaces of the wooden boards will be the base of the mill.
- Adjust the side focus with the base base so that it and the surface of the second treated board form a groove in 10 mm depth. If you intend to handle the cutter with a bearing, you will not need lateral stops.
- Thoroughly milling the hole in a few approaches.
- Do the same reception on the second board without changing the position of the cutter. At the same time notice: if the depth of the groove is less than the width of the bar, then it should be treated with additional passages.

- Repeat similar actions on other pairs of boards.
- Once all the grooves are prepared, test the shield. If the result is positive, then you can start gluing.
- Using a tassel, mark the holes, and then apply glue to the rack itself.
- Spread the rail on each board on the one hand, and only then pose the protruding edge into the adjacent board hole.
- After you glue the entire wooden shield, you can start it with it with wedges and clamps.
- So that the design is not bent, you need to put the bars, which on the sides need to be secured by self-drawing to the table. In this state, the product must be left until the moment of complete drying.
- All other fragments of benches should be made from prepared shields. To do this, apply markup in accordance with the prepared drawing.
- Then, by means of an electric batch, cut each contour of the details.
- Enter the rounding edges on both sides by the passage of radius cutter.
- Collect the components together by fixing them with self-draws.
Note!
- It is advisable to test the test assembly from the excessive excess material. Thus, you can see all the nuances that may occur when constructing a clean product.
- When applying glue, try to avoid premature content drying. The places where the excess fluid gathered, it is necessary to gently wipe dry matter to prevent adhesive spots on the outer surface of the bench.
Instructions for the manufacture of a bench for a bath is presented on a video clip:


